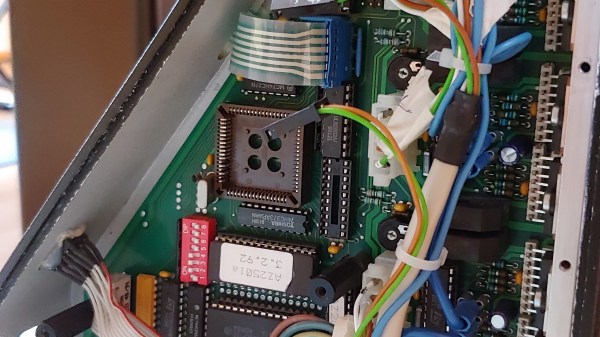
photo of the CNC controller, with the PLCC socket for the CPU, surrounded by driver ICs

Old CNC Brain Swapped With An Arduino

[Sebastian] and [Stefan Shütz] had a ISEL EP1090 CNC machine at home, sitting unused, and they decided to bring it to life. With pretty good mechanical specs, this CNC looked promising – alas, it was severely constrained by its controller. The built-in CPU’s software was severely outdated, had subpar algorithms for motor driving programmed in, and communication with the CNC was limited because the proprietary ISEL communications protocol that isn’t spoken by other devices.The two brothers removed the CPU from its PLCC socket, and went on to wiring a grbl-fueled Arduino into the controller box.

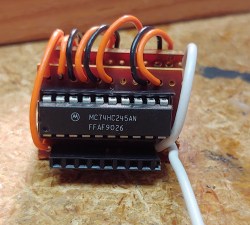
The interposer PCB, with an extra 74HC245 buffer on itThey reverse-engineered the motor driver connections – those go through a 74HC245 buffer between the original CPU and the drivers. Initially, they put an Arduino inside the control box of the CNC and it fit nicely, but it turned out the Arduino’s CPU would restart every time the spindle spun up – apparently, EMC would rear its head. So, they placed the Arduino out of the box, and used two CAT7 cables to wire up the motor and endstop signals to it.
For tapping into these signals, they took the 74HC245 out of its socket, and made an interposer from two small protoboards and some pin headers – letting them connect to the STEP and DIR lines without soldering wires into the original PCB. There’s extensive documentation, GRBL settings, and more pictures in their GitHub repo, too – in case you have a similar CNC and would like to learn about upgrading its controller board!

After this remake, the CNC starts up without hassles. Now, the brothers shall CNC on! Often, making an old CNC machine work is indeed that easy, and old controller retrofits have been a staple of ours. You can indeed use an Arduino, one of the various pre-made controller boards like Gerbil or TinyG, or even a Raspberry Pi – whatever helps you bridge the divide between you and a piece of desktop machinery you ought to start tinkering with.

Tiny Chain-Link Fence Made With Hand-Cranked Brilliance

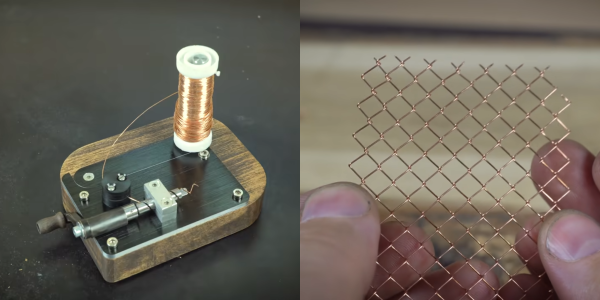
Chain link fences are woven with a mechanism that is almost hypnotic to watch, so [Levsha] decided to build his own tiny hand-crank tabletop version to make tiny copper wire fences.

Chain link consist of a series of wires bent and woven in a zigzag pattern. The zigzag bends are made by winding the wire around a rotating flat plate inside a stationary tube with a spiral slot in the side to keep the spacing of the bends consistent. [Levsha]’s version is roughly 1/10 scale of the real thing, and only does the bending and winding parts. Linking the bent wire together is up to the operator. All the components were machined on a lathe and CNC router, and beautifully finished and assembled on a wood base. The hardest part was the tube with the spiral slot, which took a few attempts to get right. [Levsha] initially tried to use steel wire, but it was too stiff and caused the winding mechanism to lock up. 0.4 mm copper wire turned out to be the best choice.

Although there is no practical use for this device that we can see, the craftsmanship is excellent, and it is one of those videos that reminds us how badly we want some machine tools.

Fine attention to detail is really what makes videos like this enjoyable to watch. Wee seen a few other such project, like a beautiful scratch-built lathe, or a pneumatic powered drone that can’t fly.

Continue reading “Tiny Chain-Link Fence Made With Hand-Cranked Brilliance”

Five-Axis Pumpkin Carving

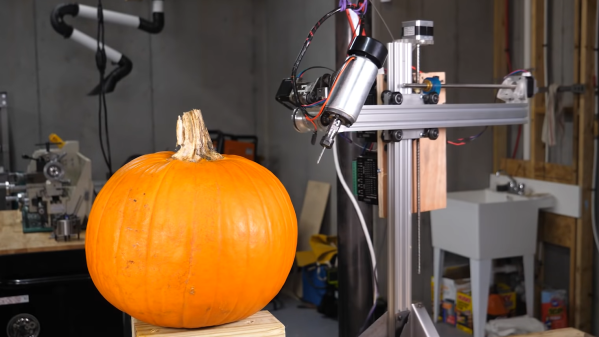
The day of carved pumpkins is near, and instead of doing manually like a mere mortal, [Shane] of [Stuff Made Here] built a five-axis CNC machine to take over carving duties. (Video, embedded below.)

[Shane] initially intended to modify his barber robot, but ended up with a complete redesign, reusing only the electronics and the large ring bearing in the base. The swiveling spindle is a rotating gantry with two sets of aluminum extrusions for vertical and horizontal motion. The gantry isn’t very rigid, but it’s good enough for pumpkin carving. Software is the most challenging part of the endeavor due to the complexity of five-axis motion and mapping 2D images onto a roughly spherical surface. Cartographers have dealt with this for a long time, so [Shane] turned to Mercator projection to solve the problem. We’re also relieved to hear that we aren’t the only ones who sometimes struggle with equation-heavy Wikipedia pages.

Since there are no perfectly spherical pumpkins, [Shane] wrote a script to probe the surface of the pumpkin with a microswitch before cutting, appropriately named “TSA.exe”. The machine is capable of carving both profiles and variable depth lithophanes, mostly of [Shane]’s long-suffering wife. She seriously deserves an award for holding onto her sense of humor.

With projects like explosive baseball bats and CNC basketball hoop, the [Stuff Made Here] YouTube Channel is worth keeping an eye on.

Bantam Tools PCB Mill Gets A Ferocious New Sequel

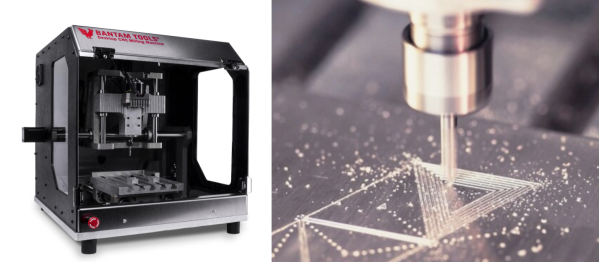
When the first Bantam Tools’ Milling Machine landed, it put PCB prototyping at the forefront with a smooth software and hardware pipeline for spinning out circuit boards in a manner of minutes. Now the folks at Bantam Tools are back, putting those insights into a new machine that makes cutting aluminum a first class feature. While machine details are still sparse from their announcement page, knowing that Bantam Tools has spent a few years turning classrooms of students into hardware prototypes reassures us that we’re in good hands. Now let’s spill some beans on this beast. Continue reading “Bantam Tools PCB Mill Gets A Ferocious New Sequel”

Yet Another DIY Handheld Pi Gaming Console

The Raspberry Pi is a great platform for running retro video games, and with the addition of some buttons, a TFT screen and some speakers it’s relatively inexpensive and easy to get a working console up and running. If you have access to even a cheap 3D printer, a good-looking DIY console is well within reach for not a lot of money. YouTube user [DIY Engineering] has a bunch of consumer-grade fabrication tools and has designed and built a high-end but still DIY RetroPi gaming console, the RKDR II.

Among the tools that [DIY Engineering] has are both a FDM and DLP 3D printer, a reflow oven, a couple of different CNC machines and a laser cutter. They are all consumer grade, but not necessarily cheap – especially combined! [DIY Engineering] uses Fusion3D to model the case, bezel and circuit board, the latter of which is a 4 layer board designed in Eagle and sent off to be fabbed. The buttons, D-pad, screen and battery are bought off the shelf, but everything else is DIY. Check out the video for the details – the tools used, and the design files, are linked in the information section under the video on YouTube.

Continue reading “Yet Another DIY Handheld Pi Gaming Console”

FR4 Machine Shield Is A CNC Milling Machine From FR4 PCB

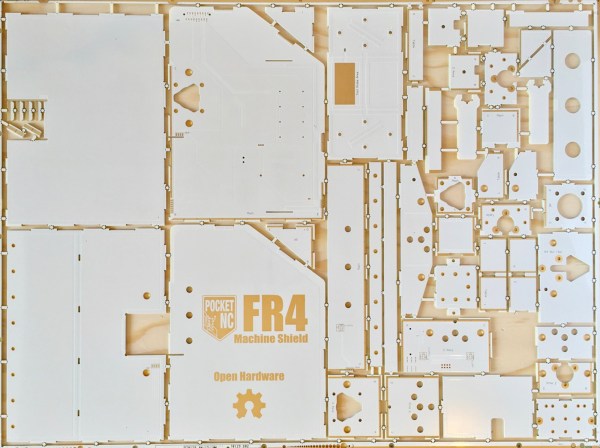
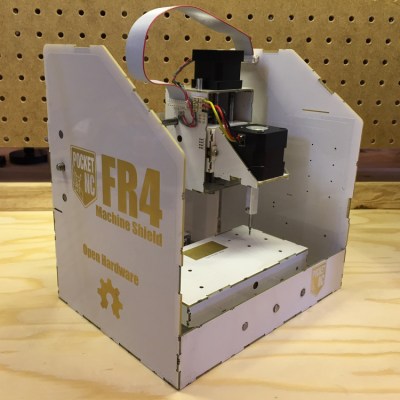
The people behind the PocketNC heard you like CNC PCB mills, so they milled you a PCB mill out of PCB. They announced their surprising new open source hardware product, a pocket sized 3-axis CNC machine entirely made out of FR4 PCB material, aptly named “FR4 Machine Shield”, at this year’s Bay Area Maker Faire.

UPDATE: The FR4 Machine Shield is now on Kickstarter

fr4_thumbWe know the concept from quadcopters, little robots, and generally things that are small enough to make use of their PCBs as a structural component. But an entire CNC machine, soldered together from a few dozen PCBs certainly takes it to the next level.

There is no doubt that 2mm thick fiber reinforced epoxy can be surprisingly rigid, although the Achilles heel of this method might be the solder joints. However, it looks like all load bearing, mechanical connections of the machine are supported by tightly interlocking “dovetail” finger-joints, which may help protecting all the solder connections from the strain hardening effects of continuous stress and spindle vibrations.

As you might expect, most of the wiring is embedded into the FR4 frame construction, and to squeeze the maximum value out of the PCB material, the motor driver boards interface via card edge connectors with the (currently Arduino based) controller board. In addition to the milling head, which features a brushless DC motor and a tool coupler, the team wants to develop heads for circuit printing, microscopy, pneumatic pick and place, hot air reflow, and 3D printing.

With all those cost-driven design choices, from the one-step manufacturing process of the frame and wiring to the dismissal of screws and nuts from the frame assembly, the “FR4 Machine Shield” could indeed become one of the cheapest CNC machine kits on the market. The team targets an introduction price of $400 during a Kickstarter campaign in June 2016. Can they deliver? [Gerrit] checked Pocket NC out at the Faire and ended up raving about how they run their business.

Enjoy their teaser video below!

Continue reading “FR4 Machine Shield Is A CNC Milling Machine From FR4 PCB”

3D Printing Pen And CNC Machine Yields Cheap 3D Printer

3D printers are ubiquitous now, but they’re still prohibitively expensive for some people. Some printers cost thousands, but even more inexpensive options aren’t exactly cheap. [Daniel] decided that this was unacceptable, and set out to make a basic 3D printer for under $100 by including only the bare essentials needed for creating anything out of melted plastic.

3D printers are essentially four parts: a bed, filament, and a hot end and extruder. In a previous project, [Daniel] used parts from old CD drives to create a three-axis CNC machine which he uses for the bed. To take care of the hot end and extruder, he is using a 3D printing pen which he mounts to the CNC machine and voila: a 3D printer!

It’s not quite as simple as just strapping a 3D printing pen to a CNC machine, though. The pen and the CNC machine have to communicate with each other so that the pen knows when to place filament and the CNC machine knows when to move. For that, [Daniel] went with a trusty Arduino in order to switch the pen on and off. Once it’s working, it’s time to start printing!

[Daniel] does note that this is a design that’s relatively limited in terms of print size and resolution, but for the price it can’t be beat. If you’re interested in getting started with 3D printing, a setup like this would be perfect. 3D pens are a pretty new idea too, and it’s interesting to see them used in different ways like this.