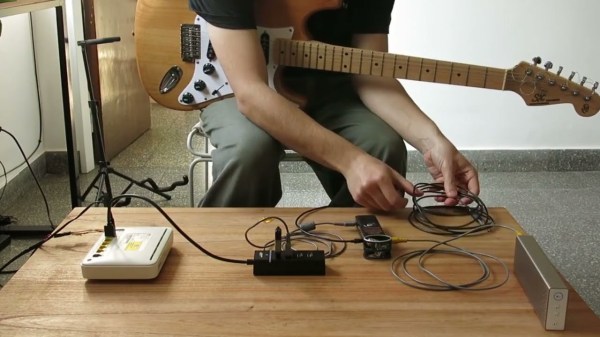
Arduino Drum Platform Is Fast

Drums are an exciting instrument to learn to play, but often prohibitive if there are housemates or close neighbors involved. For that problem there are still electronic drums which can be played much more quietly, but then the problem becomes one of price. To solve at least part of that one, [Jeremy] turned to using an Arduino to build a drum module on his own, but he still had to solve yet a third problem: how to make the Arduino fast enough for the drums to sound natural.

Playing music in real life requires precise timing, so the choice of C++ as a language poses some problems as it’s not typically as fast as lower-level languages. It is much easier to work with though, and [Jeremy] explains this in great detail over a series of blog posts detailing his drum kit’s design. Some of the solutions to the software timing are made up for with the hardware on the specific Arduino he chose to use, including an even system, a speedy EEPROM, hardware timers, and an ADC that can sample at 150k samples per second.

With that being said, the hardware isn’t the only thing standing out on this build. [Jeremy] has released the source code on his GitHub page for those curious about the build, and is planning on releasing several more blog posts about the drum kit build in the near future as well. This isn’t the only path to electronic drums, though, as we’ve seen with this build which converts an analog drumset into a digital one.

Continue reading “Arduino Drum Platform Is Fast”

MiniDisc Player Supports Full Data Transfer

Between the era of the CD and the eventual rise and domination of streaming music platforms, there was a limbo period of random MP3 players mixed in with the ubiquitous (and now officially discontinued) iPod. In certain areas, though, the digital music player of choice was the MiniDisc, a miniature re-writable CD player with some extra digital features. Among them was the ability to transfer music to the discs over USB, but they did not feature the ability to transfer the songs back to a computer. At least until now, thanks to this impressive hack from [asivery].

Although it sounds straightforward, this trick has a lot of moving parts that needed to come together just right. The MiniDisc player uses a proprietary encoding format called ATRAC, so a codec is needed for that. The MiniDisc player stores data from the disc in a 40-second buffer when playing, so the code reads the data directly from DRAM in 40-second chunks, moves the read head, repeats the process as needed, then stitches the 40-second parts back together. It can work on any Sony NetMD portable, if you are lucky enough to still have one around.

The project is a tremendous asset to the MiniDisc community, especially since the only way to recover data from a MiniDisc player prior to this was to use a specific version known as the RH-1. As [asivery] reports, used RH-1 players are going for incredibly high prices partially because of this feature. Since this new method demonstrates that it’s possible to do with other devices, perhaps its reign in the MiniDisc world will come to a close. For those still outside the loop on this esoteric piece of technology, take a look at this MiniDisc teardown.

Thanks to [Maarten] for the tip!

Dial Into The Internet Like It’s 1999

Restoring classic hardware of any sort is a great hobby to have, whether it’s restoring vintage cars, tools, or even antique Apple or Commodore computers. Understanding older equipment can help improve one’s understanding of the typically more complicated modern equivalents, plus it’s just plain fun to get something old up and running again. Certainly we see more retro computing restorations around here, but one thing that we don’t typically see much of is the networking equipment that would have gotten those older computers onto the early Internet. [Retrocet] has a strong interest in that area, and his latest dial-up server really makes us feel like we’re back in the 90s.

This home networking lab is built around a Cobalt Qube 2 that was restored after it was gifted to him as a wedding present. The Qube had a cutting edge 250 MHz 64-bit processor with up to 256 MB of RAM, and shipped with a customized Linux distribution as an operating system. The latest upgrade to this build sped up the modems to work at their full 56k rates which involved the addition of a DIVA T/A ISDN terminal and some additional hardware which ensures that incoming calls to the modems are digital. Keeping the connections digital instead of analog keeps the modems from lowering their speed to 33k to handle the conversions.

Until recently, [Retrocet] was running some of the software needed for this setup in a custom virtual machine, but thanks to the full restoration of the Qube and some tweaking of the Red Hat Linux install to improve the Point-to-Point Protocol capabilities of the older system, everything is now running on the antique hardware. If you are like [Retrocet] and have a bunch of this older hardware sitting around, there are still some ISPs available that can provide you with some service.

The Eerie Sounds Of Ioalieia: An ESP32/Valve/Analog Hybrid Circuit Sculpture

We’ve not had a circuit sculpture piece for a while, so here’s “ioalieia” a lovely hybrid digital-analog sound sculpture by [Eirik Brandal] to dig into.

Tidy straight lines. Nice job!

The host of the show is the ESP32 module, which generates audio frequency square waves, which are fed into a MCP4251 digital potentiometer. From there, it is fed into a AS3320 Voltage controlled filter (VCF), from Latvia-based ALFA (which is new to us, despite them being manufacturing electronics for sixty years!) This is an interesting device that has a four independently configurable filter elements with voltage controlled inputs for frequency control and resonance. The output from the VCF is then fed into a 6n2p (Soviet equivalent to the 12ax7) twin-triode vacuum tube, which is specifically aimed at audio applications.

The suitably distorted filtered square waves then pass into a Princeton Tech Corp PT2399 echo processor chip, which being digitally constructed, uses the expected ADC/RAM/DAC signal chain to implement an audio echo effect. As with the VCF, the echo depth can be modulated via the digipot, under the ESP32’s command. For a bit of added bling, the vacuum tube output feeds back into the ESP32, to be consumed by the internal ADC and turned into a light show via some PWM controlled LEDs. Lovely.

The final audio output from the echo chip is then fed into a speaker via a pair of LM380 amplifiers giving a power of about 5 W. It sounds pretty good if you ask us, and software configurable via Wi-Fi, giving this sculpture plenty of tweakabilty.

Of course circuit sculpture come in all shapes and sizes, and it wouldn’t do to not mention at least one sculpture clock project, and while we’re on it, here’s last year’s Remoticon circuit sculpture workshop.

Continue reading “The Eerie Sounds Of Ioalieia: An ESP32/Valve/Analog Hybrid Circuit Sculpture”

Smart Ruler Has Many Features

For those of us who remember old ball mice, they were a lot like modern optical mice except that they needed to be cleaned constantly. Having optical mice as a standard way of interacting with a computer is a major improvement over previous eras in computing. With extinction of the ball mouse, there are an uncountable number of cheap optical mice around now which are easy pickings for modern hacking, and this latest project from [Vipul] shows off some of the ways that optical mice can be repurposed by building a digital ruler.

The build seems straightforward on the surface. As the ruler is passed over a surface the device keeps track of exactly how far it has moved, making it an effective and very accurate ruler. To built it, the optical component of a mouse was scavenged and mated directly to a Raspberry Pi Zero W over USB. Originally he intended to use an ESP32 but could not get the USB interface to work. [Vipul] was then able to write some software which can read the information from the mouse’s PCB directly and translate it into human-readable form where it is displayed on a small screen. The entire device is housed in a custom 3D-printed enclosure to wrap everything up, but the build doesn’t stop there though. [Vipul] also leveraged the Bluetooth functionality of the Pi and wrote a smartphone app which can be used to control the ruler as well.

While the device does have some limitations in that it has to make contact with the object being measured across its entire length, there are some situations where we can imagine something like this being extremely useful especially when measuring things that aren’t a straight line. [Vipul] has also made all of the code for this project publicly available for those of us who might have other uses in mind for something like this. We’ve seen optical mice repurposed for all kinds of things in the past, too, including measuring travel distances in autonomous vehicles.

Continue reading “Smart Ruler Has Many Features”

The Tower, a discrete component circuit sculpture clock

A Breathtaking Circuit Sculpture Clock

The Tower, a discrete component circuit sculpture clockHere at Hackaday, we pride ourselves on bringing you the very freshest of hacks. But that doesn’t mean we catch all the good stuff the first time around, and occasionally we get a tip on an older project that really should have been covered the first time around. This remarkable circuit sculpture clock is a perfect example of one that almost got away.

[Gislain Benoit] creation is called “The Tower” for good reason: it’s built inside what amounts to a giant glass test tube. Inverted and adorned with MDF discs, the Pyrex tube stands 5 feet (1.5 meters) tall, and is absolutely stuffed with electronic goodness. There are more than 2,100 discrete components mounted inside on a helical framework of carefully bent wires, forming a vertical sculpture that displays the time on three separate pairs of seven-segment displays. All the diode-transitor logic circuits are built from discrete components; nary a chip was used, and to spice things up, [Gislain] used LEDs in place of regular diodes everywhere in the circuit. The result is a constant light show as the clock goes through its paces.

The whole thing looks amazing, and even the power supply at the base works in the overall presentation. The design is a bit of a departure from [Gislain]’s previous circuit sculpture clock, but it’s just as beautiful, and equally as mind-boggling in terms of construction difficulty.

Thanks to [Maarten] for the belated tip on this one.

A stepper-powered flip clock

Steppers And ESP32 Make This Retro-Modern Flip-Clock Tick

Before LEDs became cheap enough to be ubiquitous, flip-card displays were about the only way to get a digital clock. These entirely electromechanical devices had their own charm, and they have a certain retro cachet these days. Apart from yard sales and thrift stores, though, they’re a bit hard to source — unless you roll your own, of course.

Granted, [David Huang]’s ESP32-based flip clock is worlds apart from the flip cards of the “I Got You, Babe” era. Unfortunately, the video below is all we have to go on to get the story behind this clock, but it’s pretty self-explanatory. [David] started the build by making the flip cards themselves, a process that takes some topological tricks as well as a laser cutter. 3D-printed spools are loaded with the cards, which are then attached to frames that hold a stepper motor and a Hall-effect sensor. The ESP32 drives the steppers via L298N H-bridge drivers, but it’s hard to say if there’s an RTC chip or if the microcontroller is just getting time via an NTP server.

[David] might not be the only one trying to recapture that retro look, but we’ve got to hand it to him — it’s a great look, and it takes a clever maker to not only build a clock like this, but to make a video that explains it all so clearly without a single word of narration.

Continue reading “Steppers And ESP32 Make This Retro-Modern Flip-Clock Tick”