Spherical Quadruped Arduino Robot

[Greg06] started learning electronics the same way most of us did: buy a few kits, read a few tutorials, and try your hardest to put a few things together. Sound familiar? After a while, you noticed your skills started increasing, and your comfort level with different projects improved as well. Eventually, you try your hand at making your own custom projects and publishing your own tutorials.

Few are lucky to have a first-project as elaborate as [Greg06’s] quadruped robot. We don’t know about you, but for some of us, we were satisfied with blinking two LEDs instead of just one.

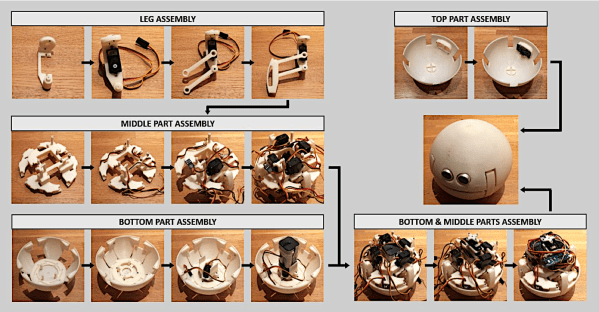
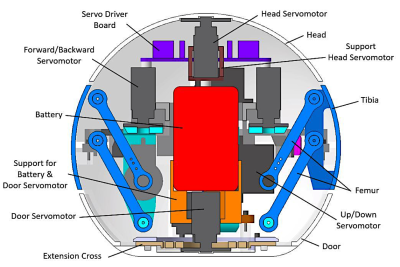
[Greg06’s] robot has a quadruped based, housed within a 3D printed spherical body. The legs are retractable and are actuated by tiny servo motors inside the body. [Greg06] even included an ultrasonic distance sensor for the obstacle avoidance mechanism. Honestly, if it weren’t for the ultrasonic distance sensor protruding from the spherical body, you might think that the entire robot was just a little Wiffle ball. This reminds us of another design we’ve seen before.

If that weren’t enough, the spherical head can rotate, widening the range of the ultrasonic distance sensor and obstacle avoidance mechanism. This is accomplished by attaching another servo motor to the head.

Pretty neat design if you ask us. Definitely one of the coolest quadrupeds we’ve seen.

Three-Dollar Router Rebooter Has One Job

Sometimes connectivity problems go away by power cycling a router. It’s a simple but inconvenient solution to a problem that shouldn’t exist, but that didn’t stop [Mike Diamond] from automating it for a few bucks in parts. The three-dollar router rebooter may be a simple device with only one job, but it’s well documented and worth a look.

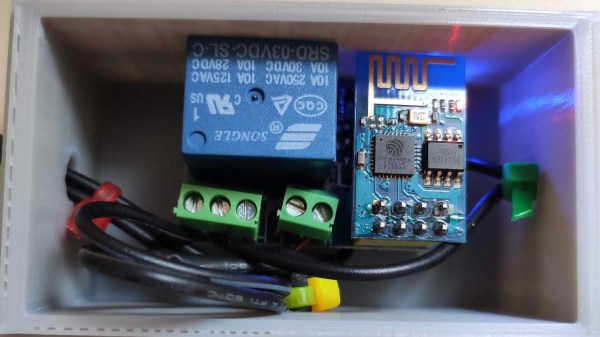
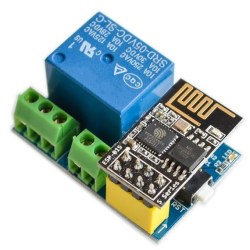
The device is an ESP8266 board configured to try to reach Google periodically via the local wireless network. If Google cannot be reached, the board assumes a reboot is needed and disconnects the 12 V power supply from the router by using a relay. Then, after a delay, power is re-connected and all of one’s problems are over until the next time it happens. [Mike] used a relay module that has built-in screw terminals and a socket for the ESP8266-01, so it looks like the whole device can be put together without soldering a thing.

While the code for making this happen may sound trivial, [Mike] nevertheless delves into documenting it. It makes a great example of how to implement a simple event-driven finite state machine in a way that’s clear and concise. By structuring the code so that there is a finite number of specific states the device can be in (router power on, router power off, and testing connection) and by defining exactly how and when the device switches between those states, operation and troubleshooting becomes a much more manageable job. Another great example is this IoT Garage Door Opener project. If you’re programming devices that interface to physical things, these techniques are definitely good practice.

Re-used Materials Make Tiny Offroad Track For Micro R/C

What does one do with tiny 1:35 scale remote controlled off-road vehicles? Build appropriately-tiny tracks for them to drive on, of course. That’s exactly what [David] did when he created his fantastic rock crawling track that he has dubbed the ‘4×4 Arena’, and what’s even better is that he used leftover foam inserts and acrylic paints and materials to do it, and didn’t have to spend a penny.

The original track is only just visible in the back; the new track expands it considerably.

This isn’t [David]’s first track. He originally made a smaller rock-crawling track he called Rubble Wasteland for the tiny vehicles, and he liked it so much he expanded it considerably. The new track builds on the original and is three levels deep, sports tight cave-like passages, tunnels, tricky climbs, and and realistic terrain textures.

An enormous photo gallery is right here, and other than the first and final images, it’s roughly in chronological build order. If your curiosity has been piqued about the tiny 1:35 scale remote controlled vehicles that this track is built for, around gallery page nine is where pictures of what makes these tiny things tick begins.

We have seen some amazing projects in the RC field; like this tiny 3D printed truck, and in-depth details of a micro RC plane that weighs only 2.9 grams.

Hardware Hacker’s Marie Kondo: How Many LM386s Is Too Many?

We’re running a contest on Making Tech at Home: building projects out of whatever you’ve got around the house. As a hacker who’s never had a lab outside of my apartment, house, or hackerspace, I had to laugh at the premise. Where the heck else would I hack?

The idea is that you’re constrained to whatever parts you’ve got on hand. But at the risk of sounding like Scrooge McDuck sitting on a mountain of toilet paper, I’ve got literally hundreds of potentiometers in my closet, a couple IMUs, more microcontrollers than you can shake a stick at, and 500 ml of etching solution waiting for me in the bathroom. Switches, motors, timing belts, nichrome wire…maybe I should put in an order for another kilogram of 3D printer filament. In short, unless it’s a specialty part or an eBay module, I’m basically set.

But apparently not everyone is so well endowed. I’ve heard rumors of people who purchase all of the parts for a particular project. That ain’t me. The guru of household minimalism asks us to weigh each object in our possession and ask “does it spark joy?”. And the answer, when I pull out the needed 3.3 V low-dropout regulator and get the project built now instead of three days from now, is “yes”.

And I’m not even a hoarder. (I keep telling myself.) The rule that keeps me on this side of sanity: I have a box for each type of part, and they are essentially fixed. When no more motors fit in the motor box, no more motors are ordered, no matter how sexy, until some project uses enough of them to free up space. It’s worked for the last 20 years, long before any of us had even heard of Marie Kondo.

So if you also sit atop a heap of VFD displays like Smaug under the Lonely Mountain, we want to see what you can do. If you do win, Digi-Key is sending you a $500 goodie box to replenish your stash. But even if you don’t win, you’ve freed up space in the “Robot Stuff” box. That’s like winning, and you deserve some new servos. Keep on hacking!

This article is part of the Hackaday.com newsletter, delivered every seven days for each of the last 200+ weeks. It also includes our favorite articles from the last seven days that you can see on the web version of the newsletter.

Want this type of article to hit your inbox every Friday morning? You should sign up!

Roll Your Own Automation With ESPHome

There are several different paths to a smart home, and [Marcus] eventually settled on using ESPHome and ESP8266/ESP32 based devices to create a complete DIY smart home solution which covers his garage door, sprinklers, LED strips, light bulbs, and outlets. There’s even an experimental (and very economical) ESP32-CAM based camera, shown here.

In fact, [Marcus]’s write-up could double as a sort of reference design. If you’re curious about ESPHome, be sure to read what he has to say because he explains exactly how he configured each device and any challenges he encountered in the process.

Beyond the software guidance, the post is also a great resource on how to flash a new firmware onto several different smart devices. [Marcus] provides nicely labeled images of the boards that show where you need to connect your programmer, which just might save you some trouble down the line. Though he did manage to set fire to one of the bulbs, so keep an eye out for that.

Tasmota is another open source option for controlling ESP8266-based devices, and if you’d like to explore that direction don’t forget that flashing Sonoff devices with Tasmota firmware recently got much, much easier.

DIY Magsafe Charger Feeds Off 12 V Solar Battery

[Steve Chamberlin] has a spiffy solar-charged 12 V battery that he was eager to use to power his laptop, but ran into a glitch. His MacBook Pro uses Apple’s MagSafe 2 connector for power, but plugging the AC adapter into the battery via a 110 VAC inverter seemed awfully inefficient. It would be much better to plug it into the battery directly, but that also was a problem. While Apple has a number of DC power adapters intended for automotive use, none exist for the MagSafe 2 connector [Steve]’s mid-2014 MacBook Pro uses. His solution was to roll his own MagSafe charger with 12 VDC input.

Since MagSafe connectors are proprietary, his first duty was to salvage one from a broken wall charger. After cleaning up the wires and repairing any frayed bits, it was time to choose a DC-DC converter to go between the MagSafe connector and the battery. The battery is nominally 12 volts, so the input of the DC-DC converter was easy to choose, but the output was a bit uncertain. Figuring out what the MagSafe connector expects took a little educated guesswork.

The original AC adapter attached to the charger claimed an output of 20 volts, another Apple adapter claimed a 14.85 V output, and a third-party adapter said 16.5 volts. [Steve] figured that the MagSafe connectors seemed fine with anything in the 15 to 20 V range, so it would be acceptable to use a 12 V to 19 V DC-DC boost converter which he had available. The result worked just fine, and [Steve] took measurements to verify that it is in fact much more efficient than had he took the easy way out with the inverter.

MagSafe has been displaced by USB-C nowadays, but there are plenty of MagSafe devices still kicking around. In a pinch, keep in mind that a little bit of filing or grinding is all that’s needed to turn MagSafe 1 into MagSafe 2.

Impractical Switches For The Bored Maker

Cabin fever: the inability to socialize with other humans does weird things to the human brain. Then again some of us are born to stand out, and one such amazing maker, [Lee], is spending time making weird switches from basically anything.

So what would you consider weird? How about using a piece of pasta? How about using the conductivity of an empty sink? There is even an experiment with breakfast cereal, though we do not recommend it for production use. [Lee] continues to pour experiments into Twitter and recently has gotten some conductive tape. Stick some on a game joystick and you got yourself an instant switch on a switch.

These experiments prove that there is a lot you can do with the stuff you have around your house and the other end of the circuit doesn’t necessarily need to be a humble LED. You could get more interesting results with adding the likes of a microcontroller like an ATtiny. Coupling it with a DIY LED badge would be a great idea and we’d love to see what you come up with.