Drawing Lines In The Sand: Taking Beach Graffiti To The Next Level

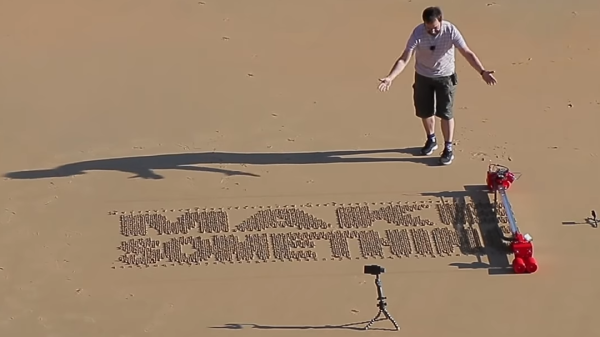
When strolling down the beach, there’s always an urge to draw in the sand – it seems compulsory to make your mark by inscribing something. But there’s a dilemma: how do you go about physically drawing it? You could opt to remain standing and attempt to deploy a toe, but that requires a level of dexterity few possess. The only other option is to bend down and physically use your hands. Ultimately, there’s no way to draw anything in the sand without losing your dignity.

The solution? A robot, of course – the brainchild of [Ivan Miranda]. The idea is simple and elegantly executed: make a large linear actuator, place it on wheels, and attach a servo which can position an etching tool to be either in the sand or above it. The whole contraption moves forward one column at a time, making a vertical pass with the marker being engaged or disengaged as required. The columns are quite thin, giving relatively high-resolution text, though this does mean it take a while. Adding another servo and marking two adjacent columns at the same time would be an easy way to instantly double the speed.

The wheels are big and chunky, to ensure the horizontal distance travelled does not change between the top and the bottom. Of course, when making big parts like these it always helps if you’ve already built a giant custom 3D printer. If you want to read more of [Ivan]’s large scale 3D printing antics, checkout his tank with suspension, or plus-sized seven-segment clock.

Continue reading “Drawing Lines In The Sand: Taking Beach Graffiti To The Next Level”

Truly Terrible Dimensioned Drawings

I’m in the planning stages of a side project for Hackaday right now. It’s nothing too impressive, but this is a project that will involve a lot of electromechanical parts. This project is going to need a lot of panel mount 1/8″ jacks and sockets, vertical mount DIN 5 connectors, pots, switches, and other carefully crafted bits of metal. Mouser and Digikey are great for nearly every other type of electrical component, but when it comes to these sorts of electromechanical components, your best move is usually to look at AliExpress or DealExtreme, finding something close to what you need, and buying a few hundred. Is this the best move for a manufacturable product? No, but we’re only building a few hundred of these things.

I have been browsing my usual Internet haunts in the search for the right bits of stamped brass and injection molded plastic for this project, and have come to a remarkable conclusion. Engineers, apparently, have no idea how to dimension drawings. Drafting has been a core competency for engineers from the dawn of time until AutoCAD was invented, and now we’re finally reaping the reward: It’s now rare to find a usable dimensioned drawing on the Internet.

This post is going to be half rant, half explanation of what is wrong with a few of the dimensioned drawings I’ve found recently. Consider this an example of what not to do.  There is no reason for the state of engineering drawing to be this bad.

Continue reading “Truly Terrible Dimensioned Drawings”

Impressive Drawing Machine For One Made So Simply

Not all of us have CNC machines, laser cutters and 3D printers, and I’ll bet most of us didn’t start out that well equipped. The low-cost drawing machine that [jegatheesan] made for his daughter reminds us that you can prototype, and then make a functioning mechanical Da Vinci with very basic materials and mostly hand tools. He also wrote his own drawing software, with an interface that has its own simplicity.

There really are a lot of things to like about [jegatheesan]’s project. He first works out the math himself by doing something the likes of which we’ve all enjoyed, digging out the old school trigonometry and algebra books for a refresher. Then he got started on his prototype, made using a cardboard tube for the main support and straws and safety pins for the drawing arms. He already had a motor shield for his Arduino but it supported only 2 servos, so he made his own 3-servo shield. In the end, the prototype told him he had to redo some calculations, allowing him to move on to the final machine.

One thing we can say about the final machine is that hot glue must truly be the maker’s connect-all — you won’t find many screws here. Even the servos are held in place with copious quantities of glue. And the mechanism for lifting the pen is also quite clever. The whole thing is mounted on two vertical guide rods, so that it can easily slide up and down. To get it to actually move up and down, he glued a toy car wheel off-center on a servo arm. When the servo turns, the off-center wheel acts like a cam, pushing down on the wooden base to either lift the machine up or lower it down, depending on where the wheel is in its rotation.

See his hackaday.io page for the full step-by-step development process. But first check out the videos below to see how impressive such a simply made machine is in action.

Continue reading “Impressive Drawing Machine For One Made So Simply”

Robot Draws Using Robust CNC

While initially developed for use in large factory processes, computer numeric control (CNC) machines have slowly made their way out of the factory and into the hands of virtually anyone who wants one. The versatility that these machines have in automating and manipulating a wide range of tools while at the same time maintaining a high degree of accuracy and repeatability is invaluable in any setting. As an illustration of how accessible CNC has become, [Arnab]’s drawing robot uses widely available tools and a CNC implementation virtually anyone could build on their own.

Based on an Arudino UNO and a special CNC-oriented shield, the drawing robot is able to execute G code for its artistic creations. The robot is capable of drawing on most flat surfaces, and can use almost any writing implement that will fit on the arm, from pencils to pens to brushes. Since the software and hardware are both open source, this makes for an ideal platform on which to build any other CNC machines as well.

In fact, CNC is used extensively in almost everything now, and are so common that it’s not unheard of to see things like 3D printers converted to CNC machines or CNC machines turned into 3D printers. The standards used are very well-known and adopted, so there’s almost no reason not to have a CNC machine of some sort lying around in a shop or hackerspace. There are even some art-based machines like this one that go much further beyond CNC itself, too.

Continue reading “Robot Draws Using Robust CNC”

Slow 3.5″ Raspberry Pi LCD Hacked To 40 MHz With ESP8266

As microcontrollers become more and more common, we see more ways to get a lot of performance out of one chip. A great example of this was the ESP8266 which was originally seen as a cheap WiFi card but has since blossomed into its own dev platform thanks to the horsepower hidden within. To that end, [Martin] is trying to push the now-ubiquitous WiFi chip even further by rolling out his own LCD driver for it from scratch.

The display of choice is the KeDei LCD 3.5″ module which was originally intended for use with a Raspberry Pi. [Martin] points out that this display isn’t optimized for speed, but after everything is said and done he has its clock line running at 40 MHz. To get this kind of speeds from the LCD, he depopulates the first shift register and adds his own fast-propagation circuit to establish a more-traditional serial addressing mode. With use of a WLCD driver that [Martin] also wrote, it is now relatively easy to draw on the screen very quickly with an ESP module. Check it out in the video below.

If you’re looking for your own tiny, cheap, fast display, this is one cool way to do it but we would suggest spinning a carrier board for both the ESP and the added circuitry. We’re looking forward to future projects which puts devices like these inside of really tiny magic mirrors, or uses them in other places where a small graphical display would be handy.

Continue reading “Slow 3.5″ Raspberry Pi LCD Hacked To 40 MHz With ESP8266”

Meet Cartesio, Robot Artist

[Robottini] released plans for his robot, Cartesio, that is essentially an Arduino-controlled plotter made to create artwork. The good part about Cartesio is the low cost. [Robottini] claims it cost about $60 to produce.

The robot has an A3-size drawing bed and is practically the XY part of a 3D printer. In fact, most of the parts are 3D printed and the mechanical parts including M8 smooth rod. LM8UU bearings, and GT2 belts and pulleys. If you’ve built a 3D printer, those parts (or similar ones) should sound familiar.

The Arduino uses GRBL to drive the motors from GCODE. [Robottini] has three different workflows to produce drawings from applications like Inkscape. You can see some of the resulting images below.

We’ve covered GRBL before, and it is the heart of many motion control projects. If you’d rather draw on something less permanent, you might try this project.

Continue reading “Meet Cartesio, Robot Artist”

An Excellent Primer For Sketching Mechanical Drawings

Mechanical drawings are an excellent way to convey design information, and while sophisticated 3D modeling is slowly taking over, with some companies accepting files over drawings, the mechanical drawing remains the written contract so to speak for complex parts with tolerances and non-modeled features.

But if you didn’t take a technical drawing class (typically Engineering Drawings 101), how do you learn? Well, if you have 15 minutes, this is an excellent video, which speaking from experience, covers the basics from the 101 course.

The lesson covers all the basics, from 2D projection, multi-view drawings, isometric projection, cross sectioning, linear dimensioning, basic tolerancing and alternate views.

Continue reading “An Excellent Primer For Sketching Mechanical Drawings”