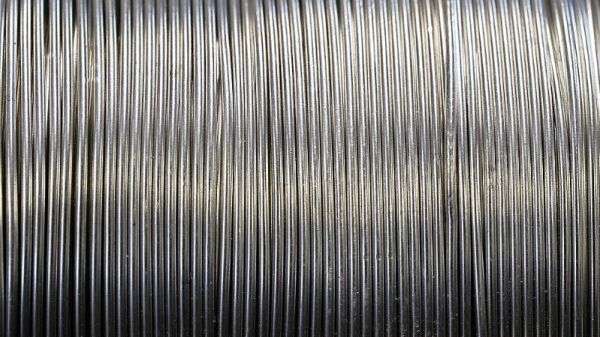
IBM PCjr Revived By An ATX Power Supply And Many False Starts

The IBM PCjr was a computer only the marketing geniuses of a multi-billion dollar corporation could love. On the face of it, it seemed like a great idea – a machine for the home market, meant to complement the “big boy” IBM PC in the office and compete against the likes of Apple and Commodore. What it ended up as was a universally hated, only partially PC-compatible machine which sold a mere half-million units before being mercifully killed off.

That doesn’t mean retrocomputing fans don’t still snap up the remaining machines, of course. [AkBKukU] scored a PCjr from a thrift store, but without the original external brick power supply. An eBay replacement for the 18-VAC supply would have cost more than the computer, so [AkBKukU] adapted a standard ATX power supply to run the PCjr. It looked as if it would be an easy job, since the external brick plugs into a power supply card inside the case which slots into the motherboard with a card-edge connector. Just etch up a PCB, solder on an ATX Molex connector, and plug it in, right? Well, not quite. The comedy of errors that ensued, from the backward PCB to the mysteriously conductive flux, nearly landed this one in the “Fail of the Week” bin. But [AkBKukU] soldiered on, and his hand-scratched adapter eventually prevailed; the video below tells the whole sordid tale, which thankfully ended with the sound of the machine booting from the 5-1/4″-floppy drive.

In the end, we’ve got to applaud [AkBKukU] for taking on the care and feeding of a machine so unloved as to be mentioned only a handful of times even on these pages. One of those articles marks the 25th anniversary of the PCjr, and lays out some of the reasons for its rapid disappearance from the market.

Continue reading “IBM PCjr Revived By An ATX Power Supply And Many False Starts”

Flux Capacitor Prop With Christopher Lloyd’s Stamp Of Approval

We love our props here at Hackaday, and whenever we come across a piece from the Back To The Future fandom, it’s hard to resist showcasing it. In this case, [Xyster101] is showing of his build of Doc Brown’s Flux Capacitor.

[Xyster101] opted for a plywood case — much more economical than the $125 it would have cost him for a proper electrical box. Inside, there’s some clever workarounds to make this look as close as possible to the original. Acrylic rods and spheres were shaped and glued together to replicate the trinity of glass tubes, 3/4″ plywood cut by a hole saw mimicked the solenoids, steel rods were sanded down for the trio of points in the centre of the device and the spark plug wires and banana connectors aren’t functional, but complete the look. Including paint, soldering and copious use of hot glue to hold everything in place, the build phase took about thirty hours.

The LEDs have multiple modes, controlled by DIP switches hidden under a pipe on the side of the box. There’s also motion sensor on the bottom of the case that triggers the LEDs to flicker when you walk by. And, if you want to take your time-travel to-go, there’s a nine volt plug to let you show it off wherever — or whenever — you’re traveling to. Check out the build video after the break.

Continue reading “Flux Capacitor Prop With Christopher Lloyd’s Stamp Of Approval”

What The Flux: How Does Solder Work Anyway?

I’ve been soldering for a long time, and I take pride in my abilities. I won’t say that I’m the best solder-slinger around, but I’m pretty good at this essential shop skill — at least for through-hole and “traditional” soldering; I haven’t had much practice at SMD stuff yet. I’m confident that I could make a good, strong, stable joint that’s both electrically and mechanically sound in just about any kind of wire or conductor.

But like some many of us, I learned soldering as a practical skill; put solder and iron together, observe results, repeat the stuff that works and avoid the stuff that doesn’t. Seems like adding a little inside information might help me improve my skills, so I set about learning what’s going on mechanically and chemically inside a solder joint.

Continue reading “What The Flux: How Does Solder Work Anyway?”

Iron Tips: Soldering Headphones And Enamel Wire

We’ve all had that treasured pair of headphones fail us. One moment we’re jamming out to our favorite song, then, betrayal. The right ear goes out. No wait. It’s back. No, damn, it’s gone. It works for a while and then no jiggling of the wire will bring it back. So we think to ourselves, we’ve soldered before. This is nothing. We’ll just splice the wire together.

So we open it up only to be faced with the worst imaginable configuration: little strands of copper enamel wire intertwined with nylon for some reason. How does a mortal solder this? First you try to untwine the nylon from the strands. It kind of works, but now the strands are all mangled and weird. Huh. Okay. well, you kind of twist them together and give a go at soldering. No dice. Next comes sandpaper, torches, and all sorts of work-a-rounds. None of them seem to work. The best you manage is sound in one ear. It’s time to give up.

Soldering this stuff is actually pretty easy. It just takes a bit of knowledge about how assembly line workers do it. Let’s take a look.

Continue reading “Iron Tips: Soldering Headphones And Enamel Wire”

Let’s Play…Wheel Of Solder!

Solder is solder right? Just spin the wheel and whatever comes up will work fine. Well, not so fast. If you’re new to electronics, or are looking at getting started, there is a bit to learn first. [Mr Carlson] has the info you need with this youtube video you can watch after the break.

He begins with a discussion of solder diameter. For most through hole work, something around 0.03 inch is pretty universal. When your ready to step up to SMD work, we find 0.02″ inch to be a much better match to the smaller pad sizes. [Mr Carlson] goes on to talk about the types of flux used inside the solder. Rosin(R), Rosin-Midly-Activated(RMA) and Rosin Activated(RA) in order of least to most aggressive.

He rounds out the video with information and a warning about using “organic” core solder. If you’re new to the world of solder, this video is a good jumping off point. TLDR; If you’re just starting out, a 0.03″ RMA solder would be a good place to start – but if you want to learn a bit more, the 20 minute video is worth the watch for those of you just getting your feet iron tip wet. It’ll serve you well at least until solderless metal glue becomes affordable.

Continue reading “Let’s Play…Wheel Of Solder!”

Homemade Soldering Station for cheap Soldering Irons

Homemade Soldering Stations For Cheapy Irons

Everyone reading this post has had a cheap pencil-style soldering irons that plug straight into the wall at some point in their lives. Even if you’ve upgraded to a professional soldering station, you probably have one of these cheapy irons kicking around that are slow to heat up to an unknown temperature. [Pantelis] thought he could fix the latter problem with his Homemade Soldering Station for those basic soldering irons.

Since the intent of the soldering station was to control the temperature of the iron [Pantelis] had to figure out a way to sense the temperature. He did this by strapping a thermocouple to the iron near the tip. The wires were run back through the handle and then along the power cord.

Homemade Soldering Station for cheap Soldering Irons

Both the stock iron plug and the thermocouple leads plug into a box put together specifically for this project. In the photo you’ll notice the LCD screen that displays both the target and actual temperatures. The linear potentiometer below the LCD screen is used to set the target temperature. The LED to the right alerts the operator that the iron is heating up and when it is at temperature and read to go.

Although there isn’t a lot of schematic or part list information, [Pantelis] did do a good job photo documenting his build. Check it out, it’s worth a gander.

DIY Flux Comes Straight From The Tree

[Tom] needed more solder flux and instead of buying it he thought he’d try making his own. The thing is, he didn’t have any rosin on hand. But knowing its source let him acquire it for free. He took a sample of tree sap and turned it into his own solder flux.

We’ve seen a few different DIY flux recipes this year. The most recent guide suggests sourcing rosin from the hardware store because of the quality, or if that fails you’ll find some at the music store. [Tom] was lucky enough to find a large dollop leaking from a pine tree in his neighborhood. He let it sit overnight in a container along with some isopropyl alcohol. In the morning the sap had fully dissolved, so he ran it through a coffee filter to get rid of any debris. He keeps it in a small jar, applying it to his projects using cotton swabs. You can see his short soldering demo after the break.

Continue reading “DIY Flux Comes Straight From The Tree”