Train Speed Signaling Adapted For Car

One major flaw of designing societies around cars is the sheer amount of signage that drivers are expected to recognize, read, and react to. It’s a highly complex system that requires constant vigilance to a relatively boring task with high stakes, which is not something humans are particularly well adapted for. Modern GPS equipment can solve a few of these attention problems, with some able to at least show the current speed limit and perhaps an ongoing information feed of the current driving conditions., Trains, on the other hand, solved a lot of these problems long ago. [Philo] and [Tris], two train aficionados, were recently able to get an old speed indicator from a train and get it working in a similar way in their own car.

The speed indicator itself came from a train on the Red Line of the T, Boston’s subway system run by the Massachusetts Bay Transportation Authority (MBTA). Trains have a few unique ways of making sure they go the correct speed for whatever track they’re on as well as avoid colliding with other trains, and this speed indicator is part of that system. [Philo] and [Tris] found out through some reverse engineering that most of the parts were off-the-shelf components, and were able to repair a few things as well as eventually power everything up. With the help of an Arduino, an I/O expander, and some transistors to handle the 28V requirement for the speed indicator, the pair set off in their car to do some real-world testing.

This did take a few tries to get right, as there were some issues with the power supply as well as some bugs to work out in order to interface with the vehicle’s OBD-II port. They also tried to use GPS for approximating speed as well, and after a few runs around Boston they were successful in getting this speed indicator working as a speedometer for their car. It’s an impressive bit of reverse engineering as well as interfacing newer technology with old. For some other bits of train technology reproduced in the modern world you might also want to look at this recreation of a train whistle.

Continue reading “Train Speed Signaling Adapted For Car”

A Vernier Take On A 3D Printer Extruder Indicator

A common way to visualize that a 3D printer’s extruder motor — which feeds the filament into the hot end — is moving is to attach a small indicator to the exposed end of the motor’s shaft. As the shaft turns, so does the attached indicator.

Small movements of the motor are therefore turned into larger movements of something else. So far, so simple. But what about visualizing very small extrusions, such as those tiny ones made during ironing?

[Jack]’s solution is a Vernier indicator for the extruder. Even the smallest movements of the extruder motor’s shaft are made clearly visible by such a device, as shown in the header image above. Vernier scales are more commonly found on measurement tools, and the concept is somewhat loosely borrowed here.

The usual way these lightweight indicators are attached is with a small magnet, and you can read all about them and see examples here.

This new design is basically the same, it simply has a background in a contrasting color added into the mix. [Jack]’s design is intended for the Bambu A1 printer, but the idea can be easily adapted. Give it a look if you find yourself yearning for a bit more visibility in your extruder movements.

A 555 Can Even Make Your Car Indicator More Visible

Modern cars often come with white marker lights or daytime running lights that are on all the time, as a supplement to the primary headlights. The problem is that in some vehicle designs, these additional lights tend to make it harder to see the indicators when they’re on. [nibbler] had this very problem, and decided to solve it with a special interrupter circuit that cuts the daytime running light when the indicator is on. Even better, they used a 555 to do it!

The circuit is a simple monostable 555 circuit with an active low output. It’s triggered by the indicator signal. When the indicator is on, the circuit drives a relay to switch off the power to the daytime running light. Two copies of the circuit were built, one for the left side, and one for the right side of the car. This means that when the orange indicator is lit, it’s not being overwhelmed by the white daytime running light next to it. In fact, many automakers now program this behavior into their lighting by default.

It’s a nifty hack with a real positive safety impact. We’ve featured some other neat indicator hacks of late, like these tidy sequential indicators. Meanwhile, if you’re hacking on your own automotive lighting solutions, don’t hesitate to let us know!

Do-Everything LED Indicator Light Runs From 4V To 60V

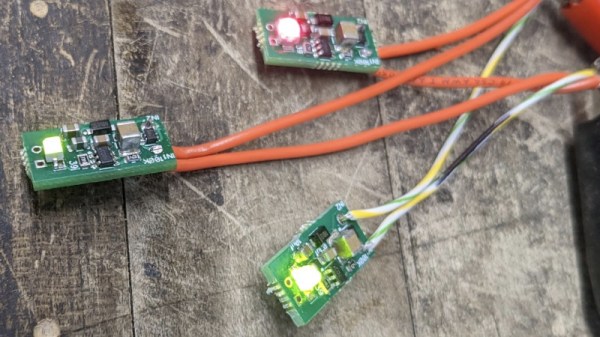
If you’re working with 3.3V or 5V circuits, it’s easy for you to throw on a power or status LED here or there. [Tom Gralewicz] has found himself in a pickle, though, often working on projects with voltages like 36V or 48V. Suddenly, it’s no longer practical to throw an LED and a resistor on a line to verify if it’s powered or not. Craving this simplicity, [Tom] invented the Cheap Universal LED Driver, or CULD, to do the job instead.

The CULD is designed as a simple LED indicator that will light up anywhere from 5V to 50V. It’s intended to be set-and-forget, requiring no fussing with different resistor values and no worries for the end user that excessive current draw will result.

The key part ended up being the LV2862XLVDDCR – a cheap switching regulator. It can output 1 mA to 600 mA to drive one or several LEDs, and it can do so anywhere from a 4V to 60V input. Assemble this on a coin-sized PCB with some LEDs, and you’ve got your nifty do-everything indicator light. With a bridge rectifier onboard, it’ll even work on AC circuits, too.

[Tom] has built a handful himself, but he open-sourced the design in the hopes it will go further. By his calculations, it would be possible to build these in quantities of 1000 for a BOM cost of less than $0.50 each, not counting assembly or the PCB itself. We’d love to see them become a standard part of hacker toolkits, too. If you’ve got a pick-and-place plant that’s looking for work this week, maybe get them on to something like this and see what you can do! If it turns out to be a goer, maybe drop us a note on the tipsline, yeah?

A cat skull enclosed in a domed security camera enclosure with green LEDs illuminating the eye sockets, sitting on a table with other skulls and rocks.

Cat Skull For Internet Connection Divination

[Emily Velasco] has an internet provider that provides sub-par connectivity. Instead of repeatedly refreshing a browser tab to test if the network is up, [Emily] decided to create an internet status monitor by embedding indicator lights in a cat skull…for some reason.

The electronics are straightforward, with the complete parts list consisting of an Arduino Nano 33 IoT device connected to a pair of RGB LEDs and 50 Ohm resistors. The Nano attempts to connect to a known site (in this case, the Google landing page) every two seconds and sets the LEDs to green if it succeeds or red if it fails.

The cat skull is thankfully a replica, 3D printed by one of [Emily]’s Twitter acquaintances, and the whole project was housed in a domed security camera enclosure. [Emily] mounts the LEDs into the skull to create a “brain in a jar” effect.

The source is available on GitHub for those wanting to take a look. We’ve featured internet connectivity status indicators in the form of traffic lights here before, as well as various network status monitors and videoconferencing indicator lights.

Interfacing An Old Engine Cowl Flaps Indicator To USB

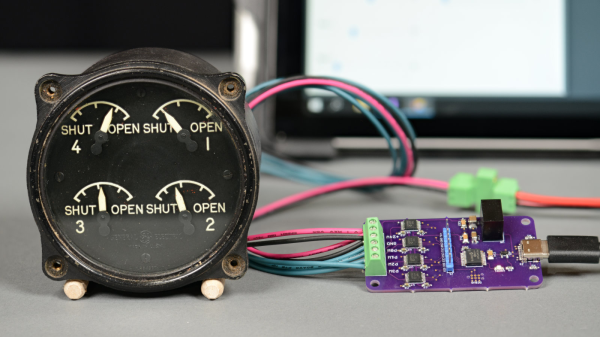
[Glen Akins] had a WW2-era aircraft engine cowl flap indicator lying around (as you do) and thought it would make a jolly fine USB-attached indicator. The model in question is a General Electric model 8DJ4PBV DC Selsyn, which was intended for four-engined aircraft. For those not familiar with the purpose [Glen] explains in his detailed writeup, that piston-engine aircraft of that era were air-cooled, and during conditions of maximum engine power — such as during take-off — flaps on the side of the engine cowling could be opened to admit additional cooling airflow. These indicator dials were connected to a sender unit on each of the flap actuators, providing the pilots an indication of the flaps’ positions. Continue reading “Interfacing An Old Engine Cowl Flaps Indicator To USB”

Magic Eye Tubes Go Solid State With This Plug-In Replacement

Perhaps nothing added quite so much to the charm of vacuum tube circuits from back in the heyday of the vacuum tube as did the “Magic Eye” indicating tube. With the ghostly green glow of its circular face, magic eyes stood in for more expensive moving-coil meters for things like tuning indicators and VU meters. And while they may be getting hard to come by today, fear not — this solid-state replacement for the magic eye tube is ready to stand in for your restoration projects.

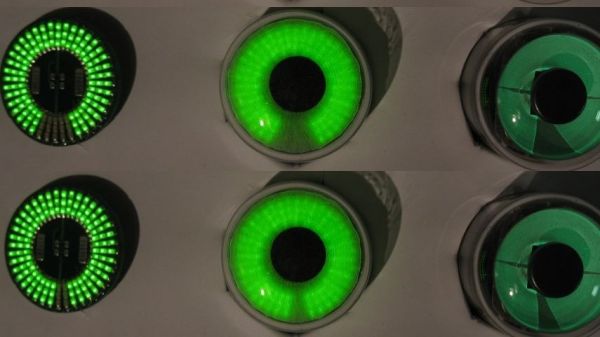
To pull off this clever build, [Gord Rabjohn] started with original 6E5 and 6U5 magic eye tubes, presumably ones that either no longer worked or had become too weak to see. The glass envelopes of the cathode-ray tubes were carefully cut from the sockets, and the guts of the tubes were discarded to make room for the replacement circuit, which lives on two PCBs. A rectangular control board holds an LM3915 bar graph LED driver chip, while a round display PCB holds 120 surface-mount green LEDs. The circular display board is mounted at the top of the control board and perpendicular to it, with a diffuser mounted above the LEDs. Everything is stuffed back into the original glass envelope and socket, making this a plug-in replacement for the tube.

The effect is quite convincing, as shown in the video below. True, you can see some evidence of the individual LEDs even with the diffuser, but honestly this just makes the display look more like the iris of an eye. We really like the look of this and we appreciate the work [Gord] put into it, especially the documentation. For a little more on how the tubes worked, check out [Al Williams]’ article.

Continue reading “Magic Eye Tubes Go Solid State With This Plug-In Replacement”