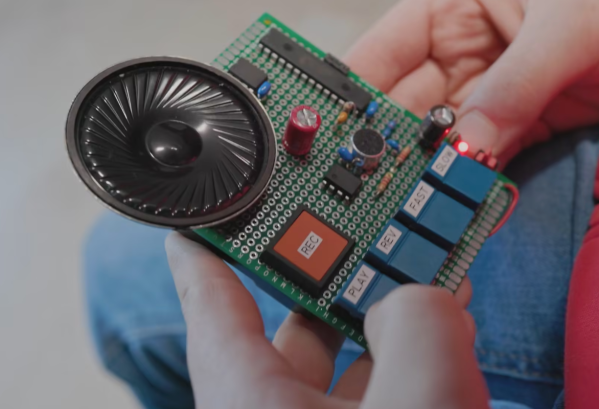
Custom Calculator Brings Us Back To The 70s

There are certain design aesthetics from every era that manage to survive the fads of their time and live throughout history. Ancient Greek architecture is still drawn upon for design inspiration in modern buildings, the mid-century modern style from the 60s still inspires various designs of consumer goods, and the rounded, clean looking cars from the 90s are still highly desirable qualities in automotive design. For electronics, though, we like this 70s-inspired calculator that [Aaron] recently built.

The calculator hearkens back to the days of calculators like the HP-29C with its large buttons and dot-matrix display. [Aaron] built the case out of various woods with a screen angled towards the user, and it uses a LCD display similar to those found in antique calculators. The brain of the calculator is an Arduino which fits easily into the case, and [Aaron] also built the keyboard from scratch with Cherry MX-style mechanical keys soldered together into a custom shape.

The software to run the calculator is fairly straightforward, but we are most impressed with the woodworking, styling, and keyboard design in this build. [Aaron] is also still ironing out some bugs with the power supply as it uses a DC-DC converter to power the device from a single lithium battery. For those who are more fond of early 2000s graphing calculators instead, be sure to take a look at this graphing calculator arcade cabinet.

Continue reading “Custom Calculator Brings Us Back To The 70s”

A ’70s TV With ’20s Parts

Keeping older technology working becomes exponentially difficult with age. Most of us have experienced capacitor plague, disintegrating wire insulation, planned obsolescence, or even the original company failing and not offering parts or service anymore. To keep an antique running often requires plenty of spare parts, or in the case of [Aaron]’s vintage ’70s Sony television set, plenty of modern technology made to look like it belongs in a machine from half a century ago.

The original flyback transformer on this TV was the original cause for the failure of this machine, and getting a new one would require essentially destroying a working set, so this was a perfect candidate for a resto-mod without upsetting any purists. To start, [Aaron] ordered a LCD with controls (and a remote) that would nearly fit the existing bezel, and then set about integrating the modern controls with the old analog dials on the TV. This meant using plenty of rotary encoders and programming a microcontroller to do the translating.

There are plenty of other fine details in this build, including audio integration, adding modern video and audio inputs like HDMI, and adding LEDs to backlight the original (and now working) UHF and VHF channel indicators. In his ’70s-themed display wall, this TV set looks perfectly natural. If your own display wall spotlights an even older era, take a look at some restorations of old radios instead.

Continue reading “A ’70s TV With ’20s Parts”

Programmable Resistance Box

For prototype electronics projects, most of us have a pile of resistors of various values stored somewhere on our tool bench. There are different methods of organizing them for easy access and identification, but for true efficiency a resistance substitution box can be used on the breadboard to quickly change resistance values at a single point in a circuit. Until now it seemed this would be the pinnacle of quickly selecting differently-sized resistors, but thanks to this programmable resistor bank there’s an even better option available now.

Unlike a traditional substitution box or decade box, which uses switches or dials to select different valued resistors across a set of terminals, this one is programmable and uses a series of sealed relays instead. That’s not where the features stop, though. It also comes equipped with internal calibration circuitry which take into account the resistance of the relay contacts and internal wiring to provide a very precise resistance value across its terminals. It’s also able to be calibrated manually to account for temperature or other factors.

For an often-overlooked piece of test equipment, this one surely fits the bill of something we didn’t know we needed until now. Even though digital resistor substitution boxes are things we have featured in the past, the connectivity and calibration capabilities of this one make it intriguing.

Kved: An Embeddable Key/Value Datastore

At some point when developing embedded applications, you’re going to want to store unique values in non-volatile memory, values that can’t be fixed at compilation time. Many microcontrollers have a small amount of EEPROM memory for this very purpose, but it’s usually rather limited if it’s provided at all. Even if you do have a bit of space on an EEPROM at your disposal, actually formatting your values into the memory and dealing with the pesky problem of wear leveling (necessary for parameters that need to change often) can be a bit of a hassle.

Lucky for us, [Marcelo Barros] decided to share his own implementation, Kved (key/value database) which uses the flash memory instead for such storage. Kved implements a dictionary type data structure, using numeric keys and values, supporting a few integer types. Using the library should be straightforward enough, as [Marcelo] says, all you need are a pair of spare flash sectors and the ability to port the flash the sector read, write, and erase functions. There are plenty of examples of such code available for practically any microcontroller out there, so that should be no barrier. For those who want to play with it right now, the repo currently has ports for the STM32L433RC and STM32F411CE, as well as a simulated version you can compile and run on your computer.

From an implementation perspective, the write algorithm uses a COW (Copy On Write) method. Changed values are invalidated by over-writing the storage location with all-zeros, and re-writing the changed value to a new location, cycling through the unused locations until the sector is full. Data-integrity mechanisms are implemented, preventing corruption of the data structure due to power fail situations, so incorrectly written values will be corrected on start-up and not affect the integrity of the configuration.

When looking around, we found a similar project, Embedis, over on hackaday.IO, as well as this article on the subject of embedded filesystems from a little while back.

Universal TFT Display Backpack Helps Small Displays Shine

TFT technology might be ancient news for monitors and TVs, but it’s alive and well when it comes to hobbyist electronics and embedded devices. They’ve now become even easier to integrate, thanks to the Universal TFT Display Backpack design by [David Johnson-Davies].

Breakout board, compatible with pinouts of most small TFT displays.

Such displays are affordable and easy to obtain, and [David] noticed that many seemed to have a lot in common when it came to pinouts and hookup info. The result is his breakout board design, a small and easy-to-assemble PCB breakout board that can accommodate the pinouts of a wide variety of TFT displays available from your favorite retailers or overseas sellers.

The board has a few quality-of-life features such as an optional connection for a backlight, and a staggered pin pattern so that different TFT boards can be pushed in to make a solid connection without soldering. That’s very handy for testing and evaluating different displays.

Interested? Head on over to the GitHub repository for the project, and while you’re at it, check out [David]’s Tiny TFT Graphics Library 2 which is a natural complement to the display backpack. [David] sure knows his stuff when it comes to cleverly optimized display work; we loved his solution for writing to OLED displays without needing a RAM buffer.

Electronic Dice Is Introduction To Microcontroller Programming

By now most of us are familiar with the Arduino platform. It’s an inexpensive and fairly easy way into the world of microcontrollers. For plenty of projects, there’s no need to go beyond that unless you have a desire to learn more of the inner workings of microcontrollers in general. [Cristiano] was interested in expanding some of his knowledge, so he decided to build this electronic dice using a PIC microcontroller instead of the Arduino platform he was more familiar with.

As a result, this project is set up as a how-to for others looking to dive further into the world of microcontrollers that don’t have the same hand-holding setup as the Arduino. To take care of the need for a random number for the dice, the PIC’s random number generator is used but with the added randomness of a seed from an internal timer. The timer is started when a mercury tilt switch signals the device that it has been rolled over, and after some computation a single digit number is displayed on a seven-segment display.

While it might seem simple on the surface, the project comes with an in-depth guide on programming the PIC family of microcontrollers, and has a polish not normally seen on beginner projects, including the use of the mercury tilt switch which gives it a retro vibe. For some other tips on how to build projects like this, take a look at this guide on how to build power supplies for your projects as well.

Continue reading “Electronic Dice Is Introduction To Microcontroller Programming”

Network Time Protocol On The ESP32

Network Time Protocol (NTP) is one of the best ways to keep networked computers synchronized to the same time. It’s simple, lightweight, and not only allows computers to maintain a time standard together, but it also allows some computer manufacturers to save some money on hardware costs. The Raspberry Pi is perhaps the most well-known example of a low-cost computer without the extra expense of a real-time clock (RTC). While the Pi sets up NTP essentially automatically, other microcontrollers like the ESP32 don’t, but it is possible to configure them to use this time standard with some work.

For this project the MicroPython implementation for the ESP32 is required. MicroPython is a way of running Python code on microcontrollers or other embedded systems without all of the overhead that Python would normally require. Luckily enough, the NTP libraries are built right in so once MicroPython is running on the ESP32 it’s nearly as easy as calling the library. Of course you will have to make sure there is an internet connection, and then grab the time, sync it to the machine, and then set the timezone.

For a bonus exercise, the project’s creator [Bhavesh] suggests attempting to configure Daylight Savings Time, although this can be a surprisingly difficult problem to solve. In the meantime, there are a few other ways of installing a clock on a microcontroller like this one. An RTC module is an obvious choice, but you can also get incredibly accurate time by using a GPS module as well.