FPGA Drives Old Laptop Screen

Every year, new models of laptops arrive on the shelves. This means that old laptops usually end up in landfills, which isn’t exactly ideal. If you don’t want to waste an old or obsolete laptop, though, there’s a way to reuse at least the screen out of one. Simply grab an FPGA off the shelf and get to work.

[Martin] shows us all how to perform this feat on our own, and goes into great detail about how all of the electronics involved work. Once everything was disassembled and the FPGA was wired up, it took him a substantial amount of time just to turn the display on. From there it was all downhill: [Martin] can now get any pattern to show up on the screen, within reason. The only limit to his display now seems to be the lack of external RAM. He currently uses the setup to drive an impressive-looking clock.

This is a big step from days passed where it was next to impossible to repurpose a laptop screen. Eventually someone discovered a way to drive these displays, and now there are cheap electronics from China that can usually get a screen like this running. It’s impressive to see it done from scratch, though, and the amount of detail in the videos are a great way to understand how everything is working.

Continue reading “FPGA Drives Old Laptop Screen”

Spit Out VGA With Non-Programmable Logic Chips

It’s not uncommon to bitbang a protocol with a microcontroller in a pinch. I2C is frequently crunched from scratch, same with simple serial protocols, occasionally complex systems like Ethernet, and a whole host of other communication standards. But VGA gets pretty tricky because of the timing requirements, so it’s less common to bitbang. [Sven] completely threw caution to the wind. He didn’t just bitbang VGA on an Arduino, but he went one step further and configured an array of 7400 logic chips to output a VGA signal.

[Sven]’s project is in two parts. In part one, he discusses choosing a resolution and setting up the timing signal. He proceeds to output a simple(-ish) VGA signal that can be displayed on a monitor using a single gate. At that point only a red image was displayed, but getting signal lock from the monitor is a great proof of concept and [Sven] moved on to more intricate display tricks.

With the next iteration of the project [Sven] talks about adding in more circuitry to handle things like frame counting, geometry, and color. The graphics that are displayed were planned out in a simulator first, then used to design the 7400 chip configuration for that particular graphic display. It made us chuckle that [Sven] reports his monitor managed to survive this latest project!

We don’t remember seeing non-programmable integrated circuits used for VGA generation before. But bitbanging the signal on an Arduino or from an SD card slot is a great test of your ability to calculate and implement precise timings with an embedded system. Give it a try!

Continue reading “Spit Out VGA With Non-Programmable Logic Chips”

Simplest Electricity Monitoring Solution Yet

Monitoring your home’s energy use is the best way to get a handle on your utility bills. After all, you can’t manage what you can’t measure! The only problem is that most home energy monitoring systems are cumbersome, complicated, or expensive. At least, until now. [Kevin] has created a new electricity meter based on Particle Photons which should alleviate all of these problems.

The Particle Photon (we get confused on the naming scheme but believe this the new version of what used to be called the Spark Core) is a WiFi-enabled development board. [Kevin] is using two, one to drive the display and one to monitor the electricity usage. This part is simple enough, each watt-hour is accompanied by a pulse of an LED on the meter which is picked up by a TLS257 light-to-voltage sensor. The display is a Nextion TFT HMI (touch screen) which is pretty well suited for this application. The data is corralled by emoncms, part of the OpenEnergyMonitor platform, which ties everything together.

For a project that has been done more than a few times, this one does a great job of keeping the price down while maintaining a great aesthetic. Make sure to check out the video below to see it in action.

Continue reading “Simplest Electricity Monitoring Solution Yet”

ESP8266 Keeps An Eye On Your Batteries

There are many more things to know about a battery than its voltage and current output at any given moment, and most of them can’t be measured with a standard multimeter unless you also stand there for a long time with an Excel spreadsheet. The most useful information is battery capacity, which can tell you how much time is left until the battery is fully charged or fully discharged. [TJ] set out to create a battery data harvester, and used the ubiquitous ESP8266 to make a fully-featured battery monitor.

Measuring battery capacity is pretty straightforward but it does take time. A battery is first benchmarked to find its ideal capacity, and then future voltage and current readings can be taken and compared to the benchmark test to determine the present capacity of the battery. The ESP8266 is a relatively good choice for this kind of work. Its WiFi connection allows it to report its information to a server which will store the data and make it available for the user to see.

The first page of this project details building the actual module, and the second page outlines how to get that module to communicate with the server. Once you’ve built all of this, you can use it to monitor your whole-house UPS backup system or the battery in your solar-powered truck. There is quite a bit of information available on the project site for recreating the build yourself, and there’s also a video below which shows its operation.

Continue reading “ESP8266 Keeps An Eye On Your Batteries”

Excruciating Quest Turns Chromebook Pixel IPS Into Exquisite Extra Monitor

[Shen] wanted an extra monitor at his desk, but not just any monitor. He wanted something particularly special and unquestionably refined. Like any super-power-possessing engineer he set out to scratch his hacking itch and was sucked into a multi-year extravaganza. For the love of everything hardware we’re glad this one came in on the weekend. If we had spent all that time drooling during a weekday we’d be so far behind.

The final product is a desktop monitor on an articulated arm. It features a Chromebook Pixel’s IPS display in a custom-crafted case everything. The journey started out with two different LCD units, the first from a Dell L502x replacement display using a generic LVDS board. The results were meh; washed out colors and obvious pixellation, with display adjustments that left [Shen] with a grimace on his mug. Installment two was an iPad Retina display. This iteration required spinning his own boards (resulting in [Shen’s] discovery of OSH Park). Alas, 9.7″ was too small coupled with short-cable-requirements making this version a no-go.

chromebook-pixel-ips-driver-board
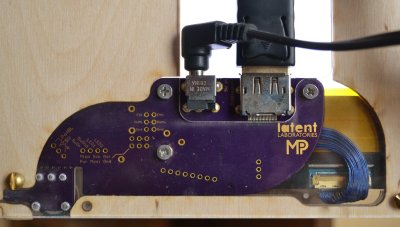
And so we arrive at the meat and potatoes of this one. [Shen] identified the IPS LCD display on Google’s first Chromebook Pixel laptop as the object of his desire. The hack takes him through sourcing custom display cables, spinning rev after rev of his own board, and following Alice down the rabbit hole of mechanical design. Nothing marginal is good enough for [Shen], we discovered this with his project to get real audio out of a computer. He grinds away at the driver board, the case design, the control presentation, and everything else in the project until perfection was reached. This work of art will stand the test of time as a life fixture and not just an unappreciated workhorse.

This one is not to me missed. Head over to [Shen’s] project entry on Hackaday.io (don’t forget to give him a skull for this) and his blog linked at the top. We need to celebrate not only the people who can pull off such amazing work. But also the ones who do such a great job of sharing the story both for our enjoyment, and to inspire us.

Bluetooth Fuel Monitor

Bluetooth Enabled Fuel Consumption Monitor

[Malebuffy] bought himself a used boat last year. Fuel isn’t exactly cheap where he lives, so he wanted a way to monitor his fuel consumption. He originally looked into purchasing a Flowscan off the shelf, but they were just too expensive. In the interest of saving money, [Malebuffy] decided to build his own version of the product instead.

To begin, [Malebuffy] knew he would need a way to display the fuel data once it was collected. His boat’s console didn’t have much room though, and cutting holes into his recently purchased boat didn’t sound like the best idea. He decided he could just use his smart phone to display the data instead. With that in mind, [Malebuffy] decided to use Bluetooth to transmit the data from the fuel sensors to his smart phone.

The system uses an older Arduino for the brain. The Arduino gets the fuel consumption readings from a Microstream OF05ZAT fuel flow sensor. The Arduino processes the data and then transmits it to a smart phone via a Bluetooth module. The whole circuit is powered from the boat battery using a DC adapter. The electronics are protected inside of a waterproof case.

[Malebuffy’s] custom Android apps are available for download from his website. He’s also made the Arduino code available in case any one wants to copy his design.

RasPi Traffic Monitor

Dedicated Automobile Traffic Monitor With Raspberry Pi

[j3tstream] wanted an easier way to monitor traffic on the roads in his area. Specifically, he wanted to monitor the roads from his car while driving. That meant it needed to be easy to use, and not too distracting.

[j3tstream] figured he could use a Raspberry Pi to run the system. This would make things easy since he’d have a full Linux system at his disposal. The Pi is relatively low power, so it’s run from a car cigarette lighter adapter. [j3tstream] did have to add a custom power button to the Pi. This allows the system to boot up and shut down gracefully, preventing system files from being corrupted.

After searching eBay, [j3tstream] found an inexpensive 3.2″ TFT LCD touchscreen display that would work nicely for displaying the traffic data. The display was easy to get working with the Pi. [j3tstream] used the Raspbian linux distribution. His project page includes a link to download a Raspbian image that already includes the necessary modules to work with the LCD screen. Once the image is loaded, all that needs to be done is to calibrate the screen using built-in operating system functions.

The system still needed a data connection. To make things simple and inexpensive, [j3tstream] used a USB WiFi dongle. The Pi then connects to a WiFi hot spot built into his 4G mobile phone. To view the traffic map, [j3tstream] just connects to a website that displays traffic for his area.

The last steps were to automate as much as possible. After all, you don’t want to be fumbling with a little touch screen while driving. [j3tstream] made some edits to the LXDE autostart file. These changes automatically load a browser in full screen mode to the traffic website. Now when [j3tstream] boots up his Pi, it automatically connects to his WiFi hotspot and loads up local traffic maps.