[miko_tarik] wearing diy AR goggles in futuristic setting

Pi Zero To AR: Building DIY Augmented Reality Glasses

If you’re into pushing tech boundaries from home, this one’s for you. Redditor [mi_kotalik] has crafted ‘Zero’, a custom pair of DIY augmented reality (AR) glasses using a Raspberry Pi Zero. Designed as an affordable, self-contained device for displaying simple AR functions, Zero allows him to experiment without breaking the bank. With features like video playback, Bluetooth audio, a teleprompter, and an image viewer, Zero is a testament to what can be done with determination and creativity on a budget. The original Reddit thread includes videos, a build log, and links to documentation on X, giving you an in-depth look into [mi_kotalik]’s journey. Take a sneak peek through the lens here.

[miko_tarik] wearing diy AR gogglesCreating Zero wasn’t simple. From designing the frame in Tinkercad to experimenting with transparent PETG to print lenses (ultimately switching to resin-cast lenses), [mi_kotalik] faced plenty of challenges. By customizing SPI displays and optimizing them to 60 FPS, he achieved an impressive level of real-time responsiveness, allowing him to explore AR interactions like never before. While the Raspberry Pi Zero’s power is limited, [mi_kotalik] is already planning a V2 with a Compute Module 4 to enable 3D rendering, GPS, and spatial tracking.

Zero is an inspiring example for tinkerers hoping to make AR tech more accessible, especially after the fresh news of both Meta and Apple cancelling their attempts to venture in the world of AR. If you are into AR and eager to learn from an original project like this one, check out the full Reddit thread and explore Hackaday’s past coverage on augmented reality experiments.

Continue reading “Pi Zero To AR: Building DIY Augmented Reality Glasses”

Portable Pi Palmtop Provides Plenty

We’ve seen many portable laptops using the Raspberry Pi series of boards in the decade-plus since its launch. The appeal of a cheap board that can run a desktop Linux distro without requiring too much battery is hard not to fall for. Over the years, the bar has been raised from a Pi stuck to the back of one of those Motorola netbook accessories, through chunky laptops, to some very svelte and professional-looking machines. A recent example comes from [Michael Mayer], whose Portable Pi 80 is a palmtop design that we’d be happy to take on the road ourselves.

At its heart is a Pi Zero 2, combining as it does a tiny form factor with the useful power of its Pi 3-derived processor. This is mated to a Waveshare 7-inch display, and in the bottom half of the machine sits a 40% mechanical keyboard. Alongside this are a pair of 18650 cells and their associated power modules. The little Arduino, which normally handles the keyboard, has been relocated due to space constraints, which brings us to the case. A project like this one is, in many ways, a task of assembling a set of modules, and it’s in the case that the work here really shines. It’s a 3D-printable case that you can download from Printables, and it’s very nice indeed. As we said, we’d be happy to use one of these.

Portable computing has come a very long way. Often the keyboard can make it or break it.

Pi Zero Power Optimization Leaves No Stone Unturned

If you’ve ever designed a battery-powered device with a Pi Zero, you have no doubt looked into decreasing its power consumption. Generic advice, like disabling the HDMI interface and the onboard LED, is omnipresent, but [Manawyrm] from [Kittenlabs] goes beyond the surface-level, and gifts us an extensive write-up where every recommendation is backed with measurements. Armed with the Nordic Power Profiler kit and an SD card mux for quick experimentation, she aimed at two factors, boot time and power consumed while booting, and made sure to get all the debug information we could use.

Thanks to fast experimentation cycles and immediate feedback, we learn plenty of new things about what a Pi Zero does and when, and how we can tame various power-hungry aspects of its behavior. Disabling the GPU or its aspects like HDMI output, tweaking features like HAT and other peripheral probing, and even tactical overclocking during boot – it’s an extensive look at what makes a Pi Zero tick, and no chance for spreading baseless advice or myths.

All in all, this write-up helps you decrease the boot time from twelve seconds to just three seconds, and slash the power budget of the boot process by 80%. Some recommendations are as simple as config.txt entries, while others require you to recompile the kernel. No matter the amount of effort you can put into power optimization, you’ll certainly find things worth learning while following along, and [Manawyrm]’s effort in building her solar-powered Pi setup will help us all build better Pi-Zero-powered solar devices and handhelds.

The UMPC powered up, case-less showing the black PCB, with the display standing upwards and showing a blue colour scheme desktop with a CLI terminal open. To the right of it is one of the UMPCs that served as an inspiration for this project.

Bringing The UMPCs Back With A Pi Zero

Miss PDAs and UMPCs? You wouldn’t be the only one, and it’s a joy to see someone take the future into their own hands. [Icepat]’s dream is reviving UMPCs as a concept, and he’s bringing forth a pretty convincing hardware-backed argument in form of the Pocket Z project. For the hardware design, he’s hired two engineers, [Adam Nowak] and [Marcin Turek], and the 7-inch Pocket Z7 version is coming up quite nicely!

The Hackaday.io project shows an impressive gallery of inspiration devices front and center, and with these in mind, the first version of the 7-inch UMPC sets the bar high. With a 1024×600 parallel RGB (DPI) touchscreen display, an ATMega32U4-controlled keyboard, battery-ready power circuitry, and a socketed Pi Zero for brains, this device shows a promising future for the project, and we can’t wait to see how it progresses.

While it’s not a finished project just yet, this effort brings enough inspiration all around, from past device highlights to technical choices, and it’s worth visiting it just for the sentiment alone. Looking at our own posts, UMPCs are indeed resurfacing, after a decade-long hiatus – here’s a Sidekick-like UMPC with a Raspberry Pi, that even got an impressive upgrade a year later! As for PDAs, the Sharp memory LCD and Blackberry keyboard combination has birthed a good few projects recently, and, who can forget about the last decade’s introductions to the scene.

A Threat Level Monitor For Everyone

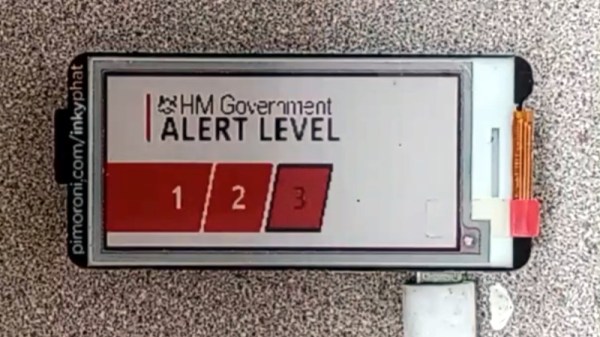
A TV news pundit might on any given evening in 2024 look at the viewers and gravely announce that we are living in uncertain times. Those of us who’ve been around for a bit longer than we’d like to admit would see that, scratch our heads, and ask “Have we ever not lived in uncertain times?” If all this uncertainty is getting to you though, you can now reassure yourself as [Ian Williams] has, with a threat level monitor which displays the UK’s current level of projected fear threat level.

The build is fairly straightforward in hardware terms, with a Raspberry Pi Zero and a Pimoroni e-paper display pHAT. The software grabs the current level of doom from in this case the UK government’s website with a nifty bit of Python code, and turns it into an easy to read alert level bar.

So if you’re genuinely worried that the sky might fall upon your head you can now gain reassurance from a small piece of electronic hardware. If you feel things are really going south though, how about converting your basement into a fallout shelter?

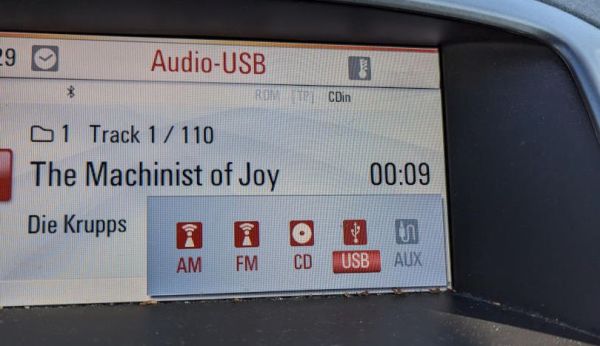
Infotainment system playing back from USB. (Folkert van Heusden)

Create Virtual USB Sticks With A Raspberry Pi Zero

Playing back music files from USB sticks is a common feature these days, and is built-into the infotainment system in [Folkert van Heusden]’s Opel Astra. Unfortunately such USB playback features often come with a range of limitations on things like audio codecs, and in the case of [Folkert]’s car, a 1000 file limit. This had him looking at an alternative to lugging a lot of USB sticks around to avoid the horror of hearing the same songs within a week while commuting. The solution? Make a Raspberry Pi Zero into a virtual USB mass storage device using the Mass Storage Gadget (MSG) driver in the Linux kernel.

Picking USB storage as the ideal option here comes mostly from the age of the infotainment system, which lacks Bluetooth, and the audio input jack is rather crackly. Of course, having the Raspberry Pi Zero pretend to be a storage device via the MSG driver wouldn’t solve the file limit, but to get around this two Python scripts were written: one which creates images from a folder of music files, and another which randomly picks one of the available images from the Zero’s SD card and configures the MSG driver to use it.

As for the list of future improvements, there is mounting the RPi Zero’s SD card as read-only to deal with the power-off when the car is shut down, and the creating of images requires to be run as root due to the use of loopback devices. As a Proof-of-Concept it does seem to be on the right track.

It’s not just the older infotainment systems that get to have all the fun. If you’re lucky enough to have Linux running in the dashboard, you might be little more than a Bash script away from bending the system to your will.

Pi Zero FPV Robot Uses Tiny Motor & Gears

We’ve seen plenty of first-person view (FPV) robots built using the Raspberry Pi Zero, but this one from [Shane] has an interesting twist: rather than directly driving the wheels from big motors, it uses small motors and gearboxes to drive the wheels, with some of the gears being 3D printed.

[Shane] has posted the full details of this cute little robot, complete with 3D models, code, and plans for the PCB that connects the Zero to the motors. These motors are N20 ones, which are much smaller and cheaper than what we usually see used in these projects, and run faster. They also often come with a gearbox that reduces the speed to something a bit more useful. Each motor drives the two wheels on one side through a 3D printed gear for tank-style steering.

To run the whole thing off a single LiPo battery, [Shane] also designed his own Pi Hat that converted the voltage to 5 V and added a couple of H bridge chips for the motors. It is a cute little build, but the requirement for a custom Pi hat perhaps puts it beyond most beginners, who might be interested in a cheap, straightforward build like this. Does anybody have any alternatives?

Continue reading “Pi Zero FPV Robot Uses Tiny Motor & Gears”