Not Your Average Nixie Tube Clock

When it comes to Nixie clocks, we all pretty much know what to expect: a bunch of Nixies with some RGB LEDs underneath, a wooden case of some sort, and maybe some brass gears or fittings for that authentic steampunk look. It’s not that we don’t appreciate these builds, but the convergent designs can be a little much sometimes. Thankfully, this 60-tube Nixie clock bears that mold, and in a big way.

The key to [limpkin]’s design is the IN-9 Nixie, which is the long, skinny tube that used to show up as linear indicators; think bar graph displays on bench multimeters or the VU meters on mixing boards. [limpkin] realized that 60 on the tubes could be arranged radially to represent hours or minutes, and potentially so much more. The length of the segment that lights up in the IN-9 is controlled by the current through the tube, so [limpkin] designed a simple driver for each segment that takes a PWM signal as its input. The job of a 60-channel, 14-bit PWM controller fell to an FPGA. An ESP8266 — all the rage five years ago when he started the project — took care of timekeeping and control, as well as driving a more traditional clock display of four 7-segment LEDs in the center of the clock face.

The custom PCB lives in a CNC-machined MDF wood face; the IN-9s shine through slots in the face, while the seven-segment display shows through a thinned area. It looks pretty cool, and there are a lot of display options, like the audio spectrograph shown in the video below. We’re glad [limpkin] decided to share this one after all this time.

Continue reading “Not Your Average Nixie Tube Clock”

Homebrew Doorknob Caps For High-Voltage Fun

Mouser and Digi-Key are great for servicing most needs, and the range of parts they offer is frankly bewildering. But given the breadth of the hardware hacking community’s interests, few companies could afford to be the answer to everyone’s needs.

That’s especially true for the esoteric parts needed when one’s hobby involves high voltages and homemade lasers, like [Les Wright]. He recently came up with a DIY doorknob capacitor design that makes the hard-to-source high-voltage caps much easier to obtain. We’ve seen [Les] use these caps in his transversely excited atmospheric (TEA) lasers, a simple design that uses high-voltage discharge across a long, narrow channel filled with either room air or nitrogen. The big ceramic caps are needed for the HV supply, and while [Les] has a bunch, they’re hard to come by online. He tried a follow-up using plain radial-lead ceramic capacitors, and while the laser worked, he did get some flashover between the capacitor leads.

[Les]’s solution was to dunk the chunky caps in acetone for a week or so to remove their epoxy covering. Once denuded, the leads were bent into a more axial configuration and soldered to brass machine screws. The dielectric slug is then put in a small section of plastic tubing and potted in epoxy resin with the bolts protruding from each end. The result is hard to distinguish from a genuine doorknob cap; the video below shows the build process as well as some testing.

Hats off to [Les] for taking pity on those of us who want to replicate his work but find ourselves without these essentials. It’s nice to know there’s a way to make unobtanium parts when you need them.

Continue reading “Homebrew Doorknob Caps For High-Voltage Fun”

Jigsaw Motor Uses PCB Coils For Radial Flux

Electric motors are easy to make; remember those experiments with wire-wrapped nails? But what’s easy to make is often hard to engineer, and making a motor that’s small, light, and powerful can be difficult. [Carl Bugeja] however is not one to back down from a challenge, and his tiny “jigsaw” PCB motor is the latest result of his motor-building experiments.

We’re used to seeing brushless PCB motors from [Carl], but mainly of the axial-flux variety, wherein the stator coils are arranged so their magnetic lines of force are parallel to the motor’s shaft – his tiny PCB motors are a great example of this geometry. While those can be completely printed, they’re far from optimal. So, [Carl] started looking at ways to make a radial-flux PCB motor. His design has six six-layer PCB coils soldered perpendicular to a hexagonal end plate. The end plate has traces to connect the coils in a star configuration, and together with a matching top plate, they provide support for tiny bearings. The rotor meanwhile is a 3D-printed cube with press-fit neodymium magnets. Check out the build in the video below.

Connected to an ESC, the motor works decently, but not spectacularly. [Carl] admits that more tweaking is in order, and we have little doubt he’ll keep optimizing the design. We like the look of this, and we’re keen to see it improved.

Continue reading “Jigsaw Motor Uses PCB Coils For Radial Flux”

Mechanisms: Mechanical Seals

On the face of it, keeping fluids contained seems like a simple job. Your fridge alone probably has a dozen or more trivial examples of liquids being successfully kept where they belong, whether it’s the plastic lid on last night’s leftovers or the top on the jug of milk. But deeper down in the bowels of the fridge, like inside the compressor or where the water line for the icemaker is attached, are more complex and interesting mechanisms for keeping fluids contained. That’s the job of seals, the next topic in our series on mechanisms.

Continue reading “Mechanisms: Mechanical Seals”

Mechanisms: Bearings

They lie at the heart of every fidget spinner and in every motor that runs our lives, from the steppers in a 3D printer to the hundreds in every car engine. They can be as simple as a lubricated bushing or as complicated as the roller bearing in a car axle. Bearings are at work every day for us, directing forces and reducing friction, and understanding them is important to getting stuff done with rotating mechanisms.

Continue reading “Mechanisms: Bearings”

Peculiar Radial Mill From Car Parts

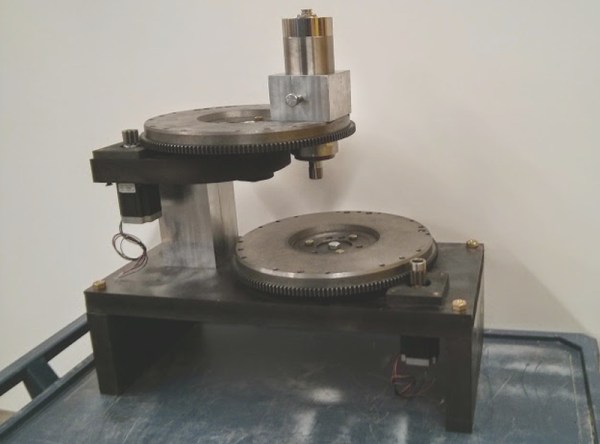
Whether 3D printer, lasercutter, or mill, most CNC machines use human-friendly, square-angle Cartesian geometry. This intriguing concept mill instead uses radial axes where motion is derived from scrap Chevy flywheels. It may look and feel weird at first, but it works – sort of.

Cartesian axes are intuitive. If you want to go to the right, increase X. If you want to go to away from you, increase Y. If you want to lift, increase Z. On a manual mill this is easy for making rectangles and blocks, or, with creative clamping, straight lines of any sort. But if you want to carve a circle? As we all learned on an Etch-A-Sketch, you increase your swearing and then throw it in the corner.

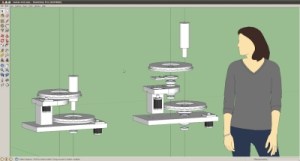
HAD - Radial Mill2[Jason] knew that with a CNC machine all geometry problems are reduced to math done by software. With two offset discs, any position is possible by rotating both the correct way. It may look odd that both plates drunkenly meander about just to draw a straight line but the computer is ambivalent. Software can be complicated without penalty and is free once written – more on that later. If a machine is physically simple then it can be built and repaired easily and cheaply. This design does away with almost all the familiar – and [Jason] argues complicated – components of normal hobby CNC machines. No slides, rails, carriages or belts here. His design uses only about a dozen parts.

Because automotive flywheels are made from cast iron the machine is rigid and naturally dampening. Sticking with the junkyard theme he pulled bearings from an F-450 truck, good for a few thousand pounds. Some steppers and a Raspberry Pi and he was done – well, sort of.

[Jason] let us know that his project has sat for long enough that he has become passionate about other things and decided to move on. He documented his progress and submitted the tip in hope to inspire someone else to continue the design further. Any type of CNC is possible, not just a mill. 3D printer perhaps?

Two big caveats: it needs a Z-axis (linear, probably standard) and there appears to be deeper-seated-than-expected G-code demands to chit-chat about rectangles and only rectangles. Nothing insurmountable, just nothing he has solved yet himself.

[Jason] said not to expect any further updates from him but he would love to see what the next person could do with it.

See the video after the break of the mill drawing our skull and wrenches logo, (soft of, without a Z-axis to lift).

Continue reading “Peculiar Radial Mill From Car Parts”

Hackaday Links Column Banner

Hackaday Links: November 2, 2014

Russians blowing up capacitors! As we all know, electronics only work because of blue smoke. [kreosan] is releasing this blue smoke from a few hundred caps. Fun times, even if they are a large number of inert tube shields in their collection of caps.

[mayhugh1] over on the home model engine machinist forum has built an 18 cylinder radial engine. It’s based on the Hodgson 9-cylinder radial engine that has been around for a while. The crank case is machined from a 5″ diameter rod of aluminum. There’s a Picassa album of the engine being constructed as well.

[Richard] wanted a Minecraft server, but not just any Minecraft server; this one demanded a custom case. A grass block was the inspiration, acrylic the medium, and a quad-core Mini-ITX the guts of the project.

Halloween was last Friday, and as always the tip line filled up with costume builds. [Leif] built a Ghostbusters costume complete with Muon trap, [Jeff] printed out some steampunk post-apocolyptic goggles, and [Green Gentleman] made a death-a-corn, although we’re struggling to figure out why the last one isn’t called an acorn-‘o-lantern.

[Matthias Wandel], a.k.a. the woodgears.ca dude,  is well-known in certain circles for being a wizard of wood. One of the first projects that put him on the map was a pantorouter – a router to cut mortises and tenons. He’s going back to his roots and building a bigger version. This version uses models of routers that are available outside North America, and in the latest video [Matthias] has it dialed in very well.

The Open Source Remote Control was an entry for The Hackaday Prize that didn’t make the final cut. It’s now an indiegogo project, and has some really cool tech we can’t wait to see in mainstream RC transmitters.