Novena Open Source Laptop Reborn As Desktop Machine

When your 5-year-old laptop dies it’s usually time for a replacement. But [Andrew Menadue]’s Novena laptop is fully open-source. He has full access to all the documentation, so he decided to try his hand at repairing it instead. The power supply circuit board went up in smoke one day — he attributes this to poor battery health due to him not using it frequently enough. Given his usage pattern, he decided to switch the Novena into a desktop machine.

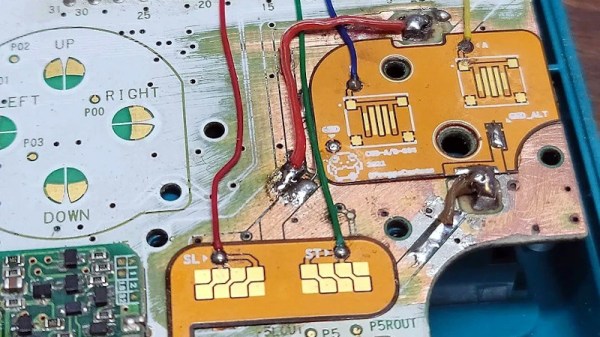
He made the conversion with a new pass-through power supply board, and the computer booted up but with no display. It seems that the power supply failure took out additional circuits as well. [Andrew] goes down a deep rabbit hole of board and chip swapping, all to no avail. Eventually the display suddenly springs to life, and he concludes the problem was with the EEPROM configuration settings and not LCD display hardware.

Experimenting with LCD Outputs on the Mainboard

It’s comforting to know that you can easily spin a replacement PCB for your computer when needed. But this situation is far from mainstream. Furthermore, all projects, open-sourced or not, face the issue of part obsolescence, even Novena. Back in 2019 founders [Bunnie] and [Xobs] issued an end-of-life announcement on the project’s five year anniversary for this very reason. The fact that Novena availability even lasted five years was due to up-front purchases of critical parts.

We wrote about the Novena way back in 2014, and more recently the MNT Reform project. What are your thoughts on these open source laptop projects? Do you have any laptops that you’ve rehabilitated after five or more years? Let us know in the comments below.

Acid-Damaged Game Boy Restored

The original Game Boy was the greatest selling handheld video game system of all time, only to be surpassed by one of its successors. It still retains the #2 position by a wide margin, but even so, they’re getting along in years now and finding one in perfect working condition might be harder than you think. What’s more likely is you find one that’s missing components, has a malfunctioning screen, or has had its electronics corroded by the battery acid from a decades-old set of AAs.

That latter situation is where [Taylor] found himself and decided on performing a full restoration on this classic. To get started, he removed all of the components from the damaged area so he could see the paths of the traces. After doing some cleaning of the damage and removing the solder mask, he used 30 gauge wire to bridge the damaged parts of the PCB before repopulating all of the parts back to their rightful locations. A few needed to be replaced, but in the end the Game Boy was restored to its former 90s glory.

This build is an excellent example of what can be done with a finely tipped soldering iron while also being a reminder not to leave AA batteries in any devices for extended periods of time. The AA battery was always a weak point for the original Game Boys, so if you decide you want to get rid of batteries of any kind you can build one that does just that.

Continue reading “Acid-Damaged Game Boy Restored”

PCB internal bodge

PCB Microsurgery Puts The Bodges Inside The Board

We all make mistakes, and there’s no shame in having to bodge a printed circuit board to fix a mistake. Most of us are content with cutting a trace or two with an Xacto or adding a bit of jumper wire to make the circuit work. Very few of us, however, will decide to literally do our bodges inside the PCB itself.

The story is that [Andrew Zonenberg] was asked to pitch in debugging some incredibly small PCBs for a prototype dev board that plugs directly into a USB jack. The six-layer boards are very dense, with a forest of blind vias. The Twitter thread details the debugging process, which ended up finding a blind via on layer two shorted to a power rail, and another via shorted to ground. It also has some beautiful shots of [Andrew]’s “mechanical tomography” method of visualizing layers by slowly grinding down the surface of the board.

[Andrew] has only tackled one of the bodges at the time of writing, but it has to be seen to be believed. It started with milling away the PCB to get access to the blind via using a ridiculously small end mill. The cavity [Andrew] milled ended up being only about 480 μm by 600 μm and only went partially through a 0.8-mm thick board, but it was enough to resolve the internal short and add an internal bodge to fix a trace that was damaged during milling. The cavity was then filled up with epoxy resin to stabilize the repair.

This kind of debugging and repair skill just boggles the mind. It reminds us a bit of these internal chip-soldering repairs, but taken to another level entirely. We can’t wait to see what the second repair looks like, and whether the prototype for this dev board can be salvaged.

Thanks to [esclear] for the heads up on this one.

What Really Goes Wrong With Your Tablet

We’ve all seen our share of consumer electronic devices that need repair. It’s inevitable that, however well-cared-for it will be, there’s always the unforseen that brings its life to an end. Many of us will be using devices we’ve repaired ourselves, because often other people’s useless broken electronics can be our free stuff when we know how to fix them and they don’t. This is the arena the Restart Project operate in, as through their Restart Parties they provide repair services to save unnecessary landfill. Over nearly a decade in operation they’ve fixed a huge number of faulty items, and now they’re releasing some data and have analysed common fault modes and barriers to repair for some categories.

We’re restricted to tablets, printers, and batteries, and while many of the problems  are the wear-and-tear such as tablet screens, power supplies, charging connectors, and paper feeds that most of us would expect, it’s the barriers to repair which the Restart Project are keen to draw attention to. Products that are near-impossible to open without damage, parts such as batteries which are difficult to remove, and unavailability of spares. It’s to become part of their campaigning for legal repairability standards across Europe.

Aside from their own analysis, the full data is all available for download should you have any extra insights. We’ve made our position on this matter very clear indeed.

Fail Of The Week: Hackaday Writer Attempts XBox Repair

Like a lot of Hackaday readers, I pride myself on being “the fix-it guy” in my family. When something breaks, I get excited, because it’s a chance to show off my skills. It’s especially fun when something major breaks, like the fridge or the washing machine — repairs like that are a race against time, since I’ve got to get it fixed faster than it would take to hire someone to do it. I usually win the race; I can’t remember the last time I paid someone to work on something. Like I said, it’s a point of pride.

And so when my son came home on Thanksgiving break from his first semester away at college, eager to fire up his Xbox for some mindless relaxation from his biochemistry studies, only to be greeted with a black screen and no boot-up, it was go-time for me. I was confident that I’d be able to revive the dead box in time for him to have some fun. The fact that he’s back at school and the machine is still torn apart on my bench testifies to my hubris, but to be fair, I did get close to a fix, and may still yet get it done. But either way, the lessons I’ve learned along the way have been really valuable and worth sharing.

Continue reading “Fail Of The Week: Hackaday Writer Attempts XBox Repair”

Curious Marc Takes On Sewing Machine Repair

Even the most talented engineers can be stymied by simple repair projects. In this case, repairing a broken sewing machine has [CuriousMarc] all tangled up.  [Marc] is probably best known as a part of the team who managed to restore and boot up an apollo guidance computer, but he’s worked with plenty of other vintage machines.

This problem hit much closer to home. [Marc’s] daughter wanted to sew a Halloween costume. The machine would boot up fine, but when attempting to sew, it would make a bit of noise, then beep and display “The safety device has been activated”. Not very helpful.

The sewing machine in question is called “Baby Lock Decorator’s Choice” and is manufactured by Brother for Juken. [Marc] of course dug in, and quickly found himself stymied by a clamshell case that just didn’t want to come apart. This is the point where many of us would apply just a little too much force when prying and be rewarded with a broken case.

[CuriuosMarc] is thankfully the more patient sort. Rather than become [FuriousMarc], he carefully persevered to find a hidden screw holding things together. The screw could only be accessed by inserting a screwdriver through a tiny access hole on the front chassis of the machine.
With the screw out, a couple of molded clips were all that held the case sides together. After popping them, [Marc] was finally able to fix the real problem: A toothed belt that had slipped off its cog. That’s it — just a loose belt. The cryptic error code most likely was due to the machine realizing it the motor was on, but the machine wasn’t moving – which would generally indicate something stuck or tangled in the thread path.

This type of repair would be much easier if service manuals were readily available. We did a quick search for this model but didn’t find anything freely available.

Have you gotten stuck by a simple repair? Tell us about it down in the comments.

Continue reading “Curious Marc Takes On Sewing Machine Repair”

There’s Not A Cassingle Thing Missing From This Cassette Deck Masterclass

For [ke4mcl], this whole cassette craze of late is not a new discovery so much as it is a personal nostalgia machine. Since [ke4mcl] sees a lot of basic questions go unanswered, they made an incredible beginner’s guide to all things cassette deck. This concise wealth of information covers everything from terminology to operation, basic maintenance like repairing the belt and lubricating the motor, and appropriate cleaning methods for the various parts. Yep, we’re pretty sure this covers everything but the pencil winding technique, which you probably already knew about.

You don’t need a lot of tools and supplies to maintain a cassette deck or twelve (apparently they’re addictive) — mostly just head cleaning fluid, isopropyl, window cleaner, and a bunch of cotton swabs. And given this guide, you’ll enter the enclosure confidently, armed with knowledge about everything from the belts to the capstan to the head. This is valuable information, the kind of stuff your older brother wouldn’t take the time to explain to you in the 80s. But maybe he didn’t know reverse bias from the holes in the top of the tape.

Don’t care for the quality of audio cassettes? Tapes are good for lots of stuff, like data storage and decoration.