Cramming A Pi Zero Into A Cheap Handheld Game

At this point, we’ve seen the Raspberry Pi jammed into what amounts to every retro game system, handheld or otherwise, that was ever released. While they’re always fun builds, invariably somebody will come along who is upset that the original hardware had to be gutted to create it. It seems as if with each post, a classic gaming aficionado out there has his or her heart broken just a bit more. Will no one put an end to the senseless slaughter of Game Boys?

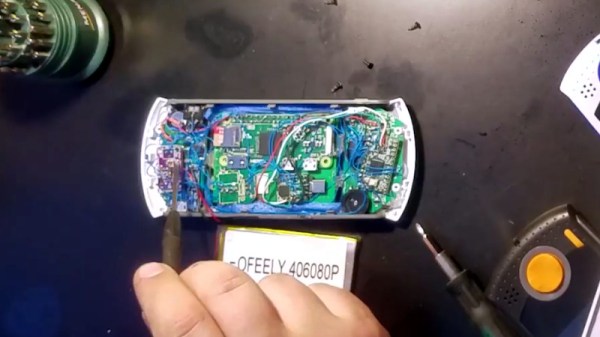
As it so happens, not all hardware modders are such unconscionable brutes. [Starfire] recently sent his latest creation into the tip line, and it’s designed specifically to address the classic gaming massacre in which Hackaday has so shamefully been a collaborator.  His build sacrifices a portable Genesis built by AtGames, and turns it into a Raspberry Pi Zero portable running RetroPie.

Opening up the back panel of his portable Pi shows an incredible amount of hardware smashed into the tiny package. Beyond the obvious Pi Zero, there’s a iUniker 2.8-inch LCD, a 2,200 mAh battery, a two-port USB hub, a Teensy microcontroller, a USB sound card, an audio amplifier, a LiPo charging module, and a boost converter. [Starfire] measured peak power consumption to be 500 mA, which should give about a 3.5 hour run time on the 2,200 mAh battery.

This is all the more impressive when you realize the original AtGames PCB is still in the system, albeit with the center cut out for the Pi’s LCD to fit in. Rather than having to figure out a new way to handle input, [Starfire] simply connected the existing inputs to the digital pins on the Teensy and used some code to convert that into USB HID for the Pi. A few case modifications were necessary, namely the removal of the battery compartment from the back panel and covering up the original SD card slot and ports; but otherwise the finished product looks completely stock.

If you don’t mind tearing into a real Game Boy to make your portable Pi, you can check out a few of the stand out examples which we’ve covered here in the past.

Continue reading “Cramming A Pi Zero Into A Cheap Handheld Game”

Game Gear, Console Edition

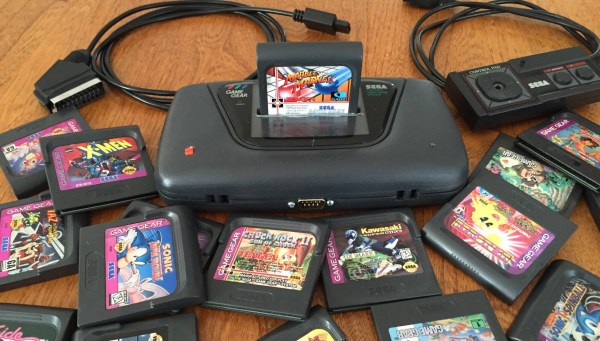
What if the Game Gear had been a console system? [Bentika] answered that question by building a consolized version of this classic handheld. For those not in the know when it comes to 1980s Sega consoles, the Game Gear is technically very similar to the Master System. In fact, the Game Gear can even play Master System games with a third-party adapter. However, the reverse isn’t the case as the screen aspect ratios were different and the Game Gear had a larger palette, which meant the Master System wasn’t compatible with Game Gear titles.

Sega’s decision to omit an AV connection meant that Game Gear games were forever locked into a tiny LCD screen. [EvilTim] changed that with his AV board, so [Bentika] decided to take things to their natural conclusion by building a proper console version of the Game Gear.

He started by ditching the screen and wiring in [EvilTim’s] video adapter board. The cartridge slot was then removed and reconnected atop the PCB. This turned the system into a top loader. [Bentika] then went to work on the case. He used Bondo to fill in the holes for the d-pad and buttons. After a spray paint finish failed, [Bentika] went back to the drawing board. He was able to get paint color matched to the original Game Gear gray at a household paint store. Careful priming, sanding, and painting resulted in a much nicer finish for this classic build. Check out [Bentika’s] video after the break!

Continue reading “Game Gear, Console Edition”

Gaming Beyond Retropie

Looking for something a bit more from your Raspberry Pi? Tired of the usual console and arcade games? Eltech’s Exagear Desktop is a virtual machine that runs on your Raspberry Pi and allows you to run x86 games. [Dmitry]’s done a write-up about running more modern games on your Raspberry Pi.

Up until now, the Pi has been a great platform for retro gaming. By running MAME or EmulationStation, you can play classic arcade games as well as the great console games you played as a kid. Exagear Desktop goes one further, allowing you to use Wine to play more modern PC games on your Raspberry Pi 3.

The Pi 3 is still a bit underpowered for bleeding edge games, but is powerful enough that it can play some of the PC games from a few years ago. [Dmitry]’s example shows how to get Arcanum, Disciples II, and Fallout running on the Raspberry Pi. In the second part of the write-up, [Dmitry] shows you how to get Heroes of Might and Magic 3, Sid Meier’s Alpha Centauri, and Caesar 3 installed and running as well.

Obviously they will always lag behind today’s gaming machines, but the power now available in a computer the size of a credit card is pretty impressive. It’s nice to have a tool that allows one to play more than just the console games from years gone by — this opens up a whole range of great PC games to add to our library. Maybe it’s time to fabricate that new PC game controller.  Or, if the Raspberry Pi seems like too much power, you could consider playing retro games on an Arduino.

Thwomp Drops Brick On Retro Gaming

[Geeksmithing] wanted to respond to a challenge to build a USB hub using cement. Being a fan of Mario Brothers, a fitting homage is to build a retro-gaming console from cement to look just like your favorite Mario-crushing foe. With a Raspberry Pi Zero and a USB hub embedded in it, [Geeksmithing] brought the Mario universe character that’s a large cement block — the Thwomp — to life.

[Geeksmithing] went through five iterations before he arrived at one that worked properly. Initially, he tried using a 3D printed mold; the cement stuck to the plastic ruining the cement on the face. He then switched to using a mold in liquid rubber (after printing out a positive model of the Thwomp to use when creating the mold). But the foam board frame for the mold didn’t hold, so [Geeksmithing] added some wood to stabilize things. Unfortunately, the rubber stuck to both the foam board and the 3D model making it extremely difficult to get the model out.

Like [Han] in carbonite, that's a Rapsberry Pi Zero being encased in cement
Like [Han] in carbonite, that’s a Raspberry Pi Zero being encased in cement
Next up was regular silicone mold material. He didn’t have enough silicone rubber to cover the model, so he added some wood as filler to raise the level of the liquid. He also flipped the model over so that he’d at least get the face detail. He found some other silicone and used it to fill in the rest of the mold. Despite the different silicone, this mold worked. The duct tape he used to waterproof the Raspberry Pi, however, didn’t. He tried again, this time he used hot glue – a lot of hot glue! – to waterproof the Pi. This cast was better, and he was able to fire up the Pi, but after a couple of games his controller stopped working. He cracked open the cement to look at the Pi and realized that a small hole in the hot glue caused a leak that shorted out the USB port on the Pi. One last time, he thought, this time he used liquid electrical tape to waterproof the Pi.

The final casting worked and after painting, [Geeksmithing] had a finished cement Thwomp console that would play retro games. He missed the deadline for the USB Hub Challenge, but it’s still a great looking console, and his video has a lot of detail about what went wrong (and right) during his builds. There’s a great playlist on YouTube of the other entries in the challenge, check them out along with [Geeksmithing]’s video below!

Continue reading “Thwomp Drops Brick On Retro Gaming”

SNES Micro Is A Pi Z Of Art

Clay is a shapeless raw material that’s waiting to be turned into awesomeness by your creativity. So is the Raspberry Pi. [Dorison Hugo] brought the two together in his artfully crafted SNES micro – a tiny retro gaming console sculpted from clay.

Continue reading “SNES Micro Is A Pi Z Of Art”

Amazing Meccano Pinball Machine Fully Functional Before Meeting Its Fate

[Brian Leach] of the South East London Meccano Club has put an impressive amount of ingenuity into making his pinball machine almost entirely out of Meccano parts. He started in 2013 and we saw an earlier version of the table back in 2014, but it has finally been completed. It has all the trappings of proper pinball: score counter, score multiplier with timeout, standing targets, kickouts, pot bumpers, drop targets, and (of course) flippers and plunger.

The video (embedded below) is very well produced with excellent closeups of the different mechanisms as [Brian] gives a concise tour of the machine. Some elements are relatively straightforward, others required workarounds to get the right operation, but it’s all beautifully done. For example, look at the score counter below. Meccano electromagnets are too weak to drive the numbers directly, so a motor turns all numbers continuously with a friction drive and electromagnets are used to stop the rotation at specific points. Reset consists of letting the numbers spin freely to 9999 then doing a last little push for a clean rollover to zero.

meccano-pinball-anim-wide

Continue reading “Amazing Meccano Pinball Machine Fully Functional Before Meeting Its Fate”

Vintage 16mm Film Editor Is Now Retro Arcade

When [Douglas Welcome] found a disposed Kalart Craig 16 mm Projecto-Editor on the curb, he knew it was destined for retro-greatness. This vintage looking device was once used to view and cut 16 mm film strips, and still in mint condition, it was just too cool to pass up. With help of a similarly historic Raspberry Pi 1 Model B, and a little LCD screen, [Douglas] now turned the little box into an awesome retro arcade game console

Continue reading “Vintage 16mm Film Editor Is Now Retro Arcade”