New Years Circuit Challenge: Make This RFID Circuit

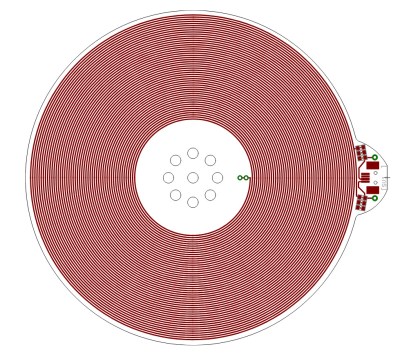
A 125kHz PCB antenna, a spiral pattern on a PCB.
The Proxmark3 PCB 125kHz antenna., GNU GPL version 2, GitHub link.

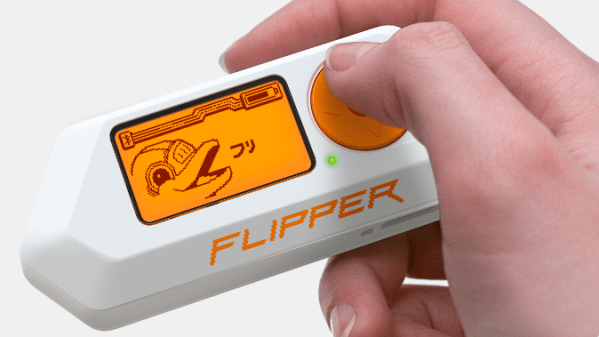
Picture this: It’s the end of the year, and a few hardy souls gather in a hackerspace to enjoy a bit of seasonal food and hang out. Conversation turns to the Flipper Zero, and aspects of its design, and one of the parts we end up talking about is its built-in 125 kHz RFID reader.

It’s a surprisingly complex circuit with a lot of filter components and a mild mystery surrounding the use of a GPIO to pulse the receive side of its detector through a capacitor. One thing led to another as we figured out how it worked, and as part of the jolity we ended up with one member making a simple RFID reader on the bench.

Just a signal generator making a 125 kHz square wave, coupled to a two transistor buffer pumping a tuned circuit. The tuned circuit is the coil scavenged from an old RFID card, and the capacitor is picked for resonance in roughly the right place. We were rewarded with the serial bitstream overlaying the carrier on our ‘scope, and had we added a filter and a comparator we could have resolved it with a microcontroller. My apologies, probably due to a few festive beers I failed to capture a picture of this momentous event. Continue reading “New Years Circuit Challenge: Make This RFID Circuit”

RFID From First Principles And Saving A Cat

[Dale Cook] has cats, and as he readily admits, cats are jerks. We’d use stronger language than that, but either way it became a significant impediment to making progress with an RFID-based sensor to allow his cats access to their litterbox. Luckily, though, he was able to salvage the project enough to give a great talk on RFID from first principles and learn about a potentially tragic mistake.

If you don’t have 20 minutes to spare for the video below, the quick summary is that [Dale]’s cats are each chipped with an RFID tag using the FDX-B protocol. He figured he’d be able to build a scanner to open the door to their playpen litterbox, but alas, the read range on the chip and the aforementioned attitude problems foiled that plan. He kept plugging away, though, to better understand RFID and the electronics that make it work.

To that end, [Dale] rolled his own RFID reader pretty much from scratch. He used an Arduino to generate the 134.2-kHz clock signal for the FDX-B chips and to parse the returned data. In between, he built a push-pull driver for the antenna coil and an envelope detector to pull the modulated data off the carrier. He also added a low-pass filter and a comparator to clean up the signal into a nice square wave, which was fed into the Arduino to parse the Differential Manchester-encoded data.

Although he was able to read his cats’ chips with this setup, [Dale] admits it was a long road compared to just buying a Flipper Zero or visiting the vet. But it provided him a look under the covers of RFID, which is worth a lot all by itself. But more importantly, he also discovered that one cat had a chip that returned a code different than what was recorded in the national database. That could have resulted in heartache, and avoiding that is certainly worth the effort too.

Continue reading “RFID From First Principles And Saving A Cat”

Phoniebox: A Family-Friendly Simple Music Box

Ever hear of the Phoniebox project? If not – tune in, that’s a hacker’s project your entire family will appreciate. Phoniebox is a software suite and tutorial for building a jukebox controlled through RFID cards, and it can play audio from a wide variety of sources – music and playlists stored locally, online streams like internet radio stations, Spotify, podcasts of your choice, and so on. It’s super easy to build – get a Raspberry Pi board, connect an NFC reader to it, wire up a pair of speakers, and you’re set. You can assemble a PhonieBox together with your kids over the weekend – and many do.

Want some inspiration, or looking to see what makes Phoniebox so popular? Visit the Phoniebox gallery – it’s endearing to see just how many different versions have been built over the six years of project’s existence. Everyone’s Phoniebox build is different in its own special way – you bring the hardware, Phoniebox brings well-tested software and heaps of inspiration.

You already have a case to house a  Phoniebox setup – if you think you don’t, check the gallery, you’ll find that you do. Experiencing a problem? There’s a wealth of troubleshooting advice and tutorials, and a helpful community. Phoniebox is a mature project and its scale is genuinely impressive – build one for your living room, or your hacker’s lair, or your hackerspace. RFID-controlled jukeboxes are a mainstay on Hackaday, so it’s cool to see a project that gives you all the tools to build one.

Swapping Vinyl For Cardboard With This ESP32 Turntable

Cardboard is a surprisingly durable material, especially in its corrugated form. It’s extremely lightweight for its strength, is easy to work, can be folded and formed into almost any shape, is incredibly inexpensive, and when it has done its duty it can be recycled back into more paper. For these reasons, it’s often used in packaging material but it can be used to build all kinds of things outside of ensuring that products arrive at their locations safely. This working cardboard record player is one example.

While the turntable doesn’t have working records in the sense that the music is etched into them like vinyl, each has its own RFID chip embedded that allows the ESP32 in the turntable’s body to identify them. Each record corresponds to a song stored on an SD card that instructs the ESP32 to play the appropriate song. It also takes care of spinning the record itself with a small stepper motor. There are a few other details on this build that tie it together too, including a movable needle arm held on with a magnet and a volume slider.

As far as a building material goes, cardboard is fairly underrated in our opinion. Besides small projects like this turntable, we’ve also seen it work as the foundation for a computer, and it even has the strength and durability to be built into a wall or even used as shelving material. And, of course, it’s a great material to use when prototyping new designs.

Continue reading “Swapping Vinyl For Cardboard With This ESP32 Turntable”

Paperless RFID Tags Are Carbon-Based

RFID tags are great little pieces of technology, but unfortunately, the combination of paper, metal, and silicon means they are as bad as some modern pregnancy tests — single-use electronic devices that can’t be recycled.

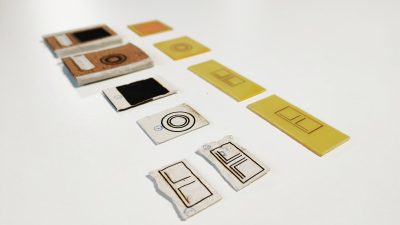
Some prototypes of the RFID tags.

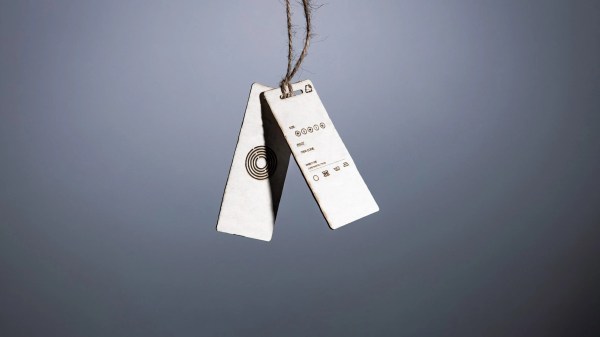
A team of design program graduates from London’s Royal College of Art aim to change that. They’ve devised a mostly-paper RFID tag that’s as safe to recycle as a piece of paper with a pencil doodle on it.

The team’s startup, PulpaTronics have created a design that uses paper as its only material. The circuitry is marked on the paper with a laser set to low power, which doesn’t burn or cut the paper, but instead changes to composition to be conductive.

PulpaTronics were also able to create a chip-less RFID tag much the same way, using a pattern of concentric circles to convey information. The company estimates that these tags will reduce carbon dioxide emissions by 70%, when compared with traditional RFID tags. They’ll also cost about half as much.

RFID is used in many industries, but it’s also great for hacking. Here’s an 8-track player that harnesses the power of RFID tags to play songs off of an SD card.

Thanks for the tip, [gir.st]!

KaboomBox Is A Firecracker Of A Music Player

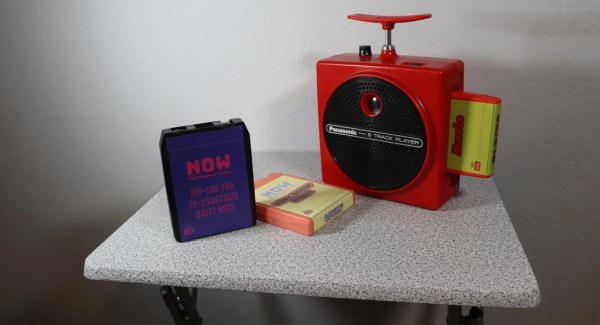
Ka-chunk. Let’s face it, 8-tracks were not that great. But the players, that’s another story. The Panasonic RQ-830S, aka the dynamite or TNT player is just one of many lovely designs that used to grace the shelves of electronics stores. Hackaday alum [Cameron Coward] came across a non-working model and used it to create the KaboomBox.

Just like before, all [Cameron] has to do is stick a tape in, and music starts playing. But now, instead of using rust on tape, the music is accessed via RFID and lives on an SD card inside the 8-track player.

Power it on, and a tiny LCD screen showing through the track number window first displays the KaboomBox logo, then shows a timer whenever it’s waiting for a tape. And just like before, pushing down on the plunger skips to the next track.

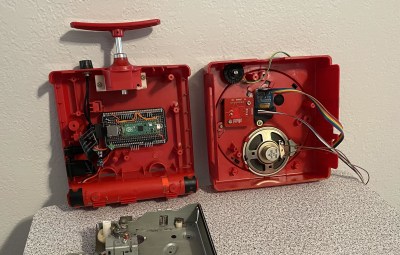
The new guts include a Raspberry Pi Pico and an RFID reader, plus a DF Player Mini to handle the digital-to-analog conversion and amplify the signal, and an SD card to store the music. Now, [Cameron] is only limited by the size of the SD card. Check out the demo video after the break.

We’ve seen all kinds of boomboxen around here, from the lit to the Bluetooth to the payphone variety.

Continue reading “KaboomBox Is A Firecracker Of A Music Player”

Bespoke Implants Are Real—if You Put In The Time

A subset of hackers have RFID implants, but there is a limited catalog. When [Miana] looked for a device that would open a secure door at her work, she did not find the implant she needed, even though the lock was susceptible to cloned-chip attacks. Since no one made the implant, she set herself to the task. [Miana] is no stranger to implants, with 26 at the time of her talk at DEFCON31, including a couple of custom glowing ones, but this was her first venture into electronic implants. Or electronics at all. The full video after the break describes the important terms.

The PCB antenna in an RFID circuit must be accurately tuned, which is this project’s crux. Simulators exist to design and test virtual antennas, but they are priced for corporations, not individuals. Even with simulators, you have to know the specifics of your chip, and [Miana] could not buy the bare chips or find a datasheet. She bought a pack of iCLASS cards from the manufacturer and dissolved the PVC with acetone to measure the chip’s capacitance. Later, she found the datasheet and confirmed her readings. There are calculators in lieu of a simulator, so there was enough information to design a PCB and place an order.

The first batch of units can only trigger the base station from one position. To make the second version, [Miana] bought a Vector Network Analyzer to see which frequency the chip and antenna resonated. The solution to making adjustments after printing is to add a capacitor to the circuit, and its size will tune the system. The updated design works so a populated board is coated and implanted, and you can see an animated loop of [Miana] opening the lock with her bare hand.

Biohacking can be anything from improving how we read our heart rate to implanting a Raspberry Pi.

Continue reading “Bespoke Implants Are Real—if You Put In The Time”