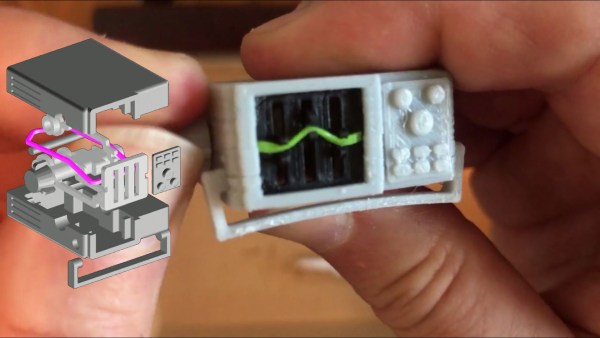
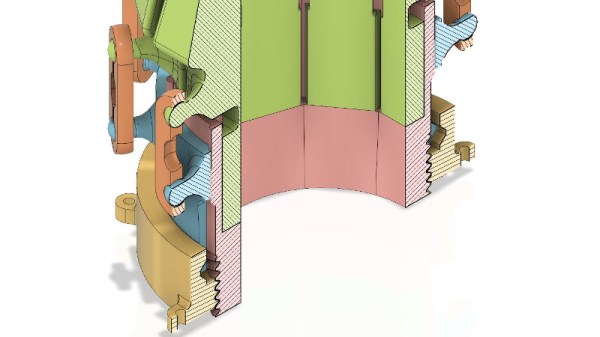
Not many of our childhood doll and action figure’s accessories revolved around lab equipment except maybe an Erlenmeyer flask if they were a “scientist.” No, they tended to be toasters, vehicles, and guns. When we were young, our heroes made food, drove sexy automobiles, and fought bad guys. Now that we’re older, some of our heroes wield soldering irons, keyboards, and oscilloscopes. [Adrian Herbez] made a scale model oscilloscope that outshines the beakers and test tube racks of yesteryear. Video also shown below. Continue reading “Toy O-Scope Is Dope”
scale model14 Articles
Wooden Tank’s Movement Hinges On Hinges
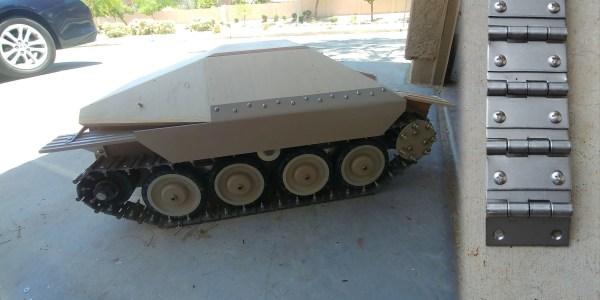
When we first looked at this tank, we thought it was pretty cool. The sides are unpainted 1/2″ (12mm) plywood, so it is not flashy. The dimensions came from Google-fu-ing the heck out of the WWII Hetzer and scaling them to 1:6. What knocks our socks off is how much [Bret Tallent] made use of parts you would find in a hardware store or bicycle shop. He uses twin motors from electric bikes, and the wheels look like replacement shopping cart wheels. The best part is the treads, which are dozens of hinges fastened with pairs of bolts and nylon-insert nuts. Something is reassuring about knowing that a repair to your baby is no further than a bike ride.
We don’t know what started [Bret] on his path to sidewalk superiority, but we suspect he is cooped up like the rest of us and looking to express himself. Mini-Hetzer is not licensed by Power Wheels and never will be, so it probably won’t turn into a business anytime soon. There is a complete gallery starting with an empty plywood base, and the pictures tell the story of how this yard Jäger got to this point. There are plans to add a paintball gun and streaming video, so we’d advise that you don’t mess with the jack-o-lanterns on his block this year. Give his gallery a view and see if you don’t become inspired to cobble something clever from the hardware store too. Then, tell us about it.
Another creative hacker used wood for their tank body and the treads as well. If you like your treaded vehicles functional, we have one meant to taxi small planes over the tarmac.
Recreating Classic Model Kits With Modern Tech
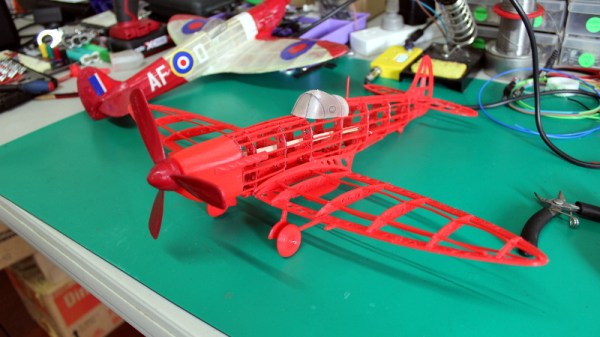
It used to be that if you wanted to make a nice scale model of an airplane, you’d be building the frame out of thin balsa ribs and covering it all up with tissue paper. Which incidentally was more or less how they built most real airplanes prior to the 1930s, so it wasn’t completely unreasonable to do the same on a smaller scale. But once injection molded plastics caught on, wood and tissue model kits largely went the way of the dodo.
[Marius Taciuc] wanted to share that classic model building experience with his son, but rather than trying to hunt down balsa kits in 2019, he decided to recreate the concept with modern techniques. His model of the Supermarine Spitfire, the vanguard of the British RAF during the Second World War, recreates the look of those early model kits but substitutes 3D printed or laser cut components for the fragile balsa strips of yore. The materials might be high-tech, but as evidenced by the video after the break, building the thing is still just as time consuming as ever.
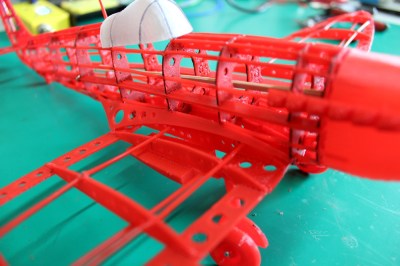 Using a laser cutter to produce the parts would be the fastest method to get your own kit put together (you could even cut the parts out of balsa in that case), but you’ll still need a 3D printer for some components such as the propeller and cowling. On the other hand, if you 3D print all the parts like [Marius] did, you can use a soldering iron to quickly and securely “weld” everything together. For anyone who might be wondering, despite the size of the final plane, all of the individual components have been sized so everything is printable on a fairly standard 200 x 200 mm print bed.
While there’s no question the finished product looks beautiful, some might be wondering if it’s really worth the considerable effort and time necessary to produce and assemble the dizzying number of components required. To that end, [Marius] says it’s more of a learning experience than anything. Sure he could have bought a simplified plastic Spitfire model and assembled it with his son in an afternoon, but would they have really learned anything about its real-world counterpart? By assembling the plane piece by piece, it gives them a chance to really examine the nuances of this legendary aircraft.
We don’t often see much from the modeling world here on Hackaday, but not for lack of interest. We’ve always been in awe of the lengths modelers will go to get that perfect scale look, from the incredible technology packed into tiny fighter planes to large scale reproductions of iconic engines. If you’ve got some awesome model making tips that you think the Hackaday readership might be interested in, don’t be shy.
Continue reading “Recreating Classic Model Kits With Modern Tech”
Raspberry Pi Breathes Life Into A Scale Model SEGA
Miniature game consoles are all the rage right now. Many of the big names in gaming are releasing their own official “mini” versions of their classic machines, but naturally we see plenty of DIY builds around these parts as well. Generally they’re enclosed in a 3D printed model of whatever system they’re looking to emulate, but as you might expect that involves a lot of sanding and painting to achieve a professional look.
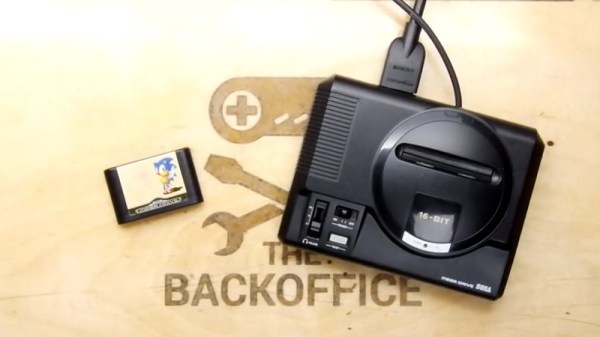
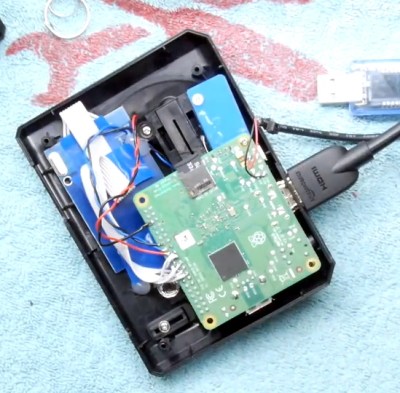 But for SEGA Genesis (or Mega Drive as it was known outside the US) fans, there’s a new option. A company by the name of Retro Electro Models has released a high-fidelity scale model of SEGA’s classic console, so naturally somebody hacked it to hold a Raspberry Pi. Wanting to do the scale detailing of the model justice, [Andrew Armstrong] went the extra mile to get the power button on the front of the console working, and even added support for swapping games via RFID tags.
[Andrew] uses the Raspberry Pi 3 A+ which ended up being the perfect size to fit inside the model. Fitting the Pi Zero would have been even easier, but it lacks the horsepower of its bigger siblings. The RFID reader is connected to the Pi over SPI, and the reed switch used to detect when the power switch has been moved is wired directly to the GPIO pins. The system is powered by a USB cable soldered directly to Pi’s PCB and ran out a small hole in the back of the case.
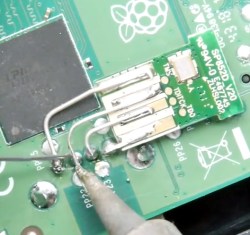 For input, [Andrew] is using a small wireless keyboard that includes a touch pad and gaming controls. Unfortunately, it has a proprietary receiver which had to be integrated into the system. In a particularly nice touch, he used snipped off component leads to “wire” the receiver’s PCB directly to the pins of the Pi’s USB port. Not only does it look cool, but provides a rigid enough connection that he didn’t even need to glue it down to keep it from rattling around inside the case. Definitely a tip to keep in the back of your mind.
The software side of this project is about what you’d expect for an emulation console, though with the added trickery of loading games based on their RFID tag. At this point [Andrew] only has a single “cartridge” for the system, so he simply drops the tags into the cartridge slot of the console to load up a new title. It doesn’t look like Retro Electro Models is selling loose cartridges (which makes sense, all things considered), so there might still be a job for your 3D printer yet if you want to have a library of scale cartridges to go with your console.
For those of you who were on Team Nintendo in the 1990’s, we’ve seen a similar build done with a 3D printed case. Of course, if even these consoles are a bit too recent for your tastes, you could build a miniature Vectrex instead.
Continue reading “Raspberry Pi Breathes Life Into A Scale Model SEGA”
The Fine Art Of Restoring Matchbox Cars
Did you have anything planned for the next hour or so? No? That’s good because if you’re anything like us, watching even one of the restorations performed on [Marty’s Matchbox Makeovers] is likely to send you down a deep dark rabbit hole that you never knew existed. Even if you can’t tell the difference between Hot Wheels and Matchbox (seriously, that’s a big deal in the community), there’s something absolutely fascinating about seeing all the little tips and tricks used to bring these decades-old toy cars back into like new condition.
You might think that all it takes to restore a Matchbox car is striping the paint off, buffing up the windows, and respraying the thing; and indeed you wouldn’t be too far off the mark in some cases. But you’ve got to remember that these little cars have often been through decades of some of the worst operating conditions imaginable. That is, being the plaything of a human child. While some of the cars that [Marty] rebuilds are in fairly good condition to begin with, many of them look like they’ve just come back from a miniature demolition derby.
The ones which have had the hardest lives are invariably the most interesting. Some of the fixes, like heating up the interior and manually bending the steering wheel back into shape, are fairly simple. But what do you do when a big chunk of the vehicle is simply gone? In those cases, [Marty] will combine cyanoacrylate “super glue” with baking powder to fill in voids; and after filing, sanding, and painting, you’d never know it was ever damaged.
When a car needs more than just paint to finish it off, [Marty] will research the original toy and make new water slide decals to match what it would have looked like originally. If it’s missing accessories, such as the case with trucks which were meant to carry scale cargo, he’ll take careful measurements so he can design and print new parts. With some sanding and a touch of paint, you’d never know they weren’t original.
There’s plenty of arcane knowledge to be gained from folks like [Marty] who have experience with scale models. We don’t often see much of that come our way, but when we do, we’re always impressed at the lengths individuals will go to get that perfect end result. Whether or not you think you’ll find yourself rebuilding a pocket-sized school bus anytime soon, we think there are lessons to be learned from those who might. Continue reading “The Fine Art Of Restoring Matchbox Cars”
3D Printed Variable Area Jet Nozzle
If you’ve ever seen the back end of a military jet, you’ve likely seen variable area nozzles. They’re used to adjust the exhaust flow out of the rear of a jet engine during supersonic flight and while the afterburner is engaged. Commercial aircraft, with the exception of the Concorde, don’t need such fancy hardware since a static exhaust nozzle works well enough for the types of flying they’ll be doing. For much the same reasons, RC aircraft don’t need variable area nozzles either, but it doesn’t keep builders from wanting them.
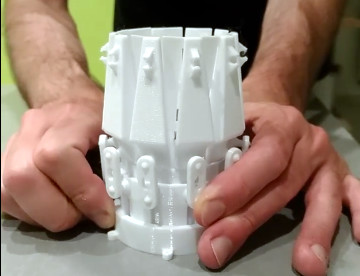 Which brings us to this utterly gorgeous design by [Marco Colucci]. Made up of 23 individual PETG parts, this variable area nozzle is able to reduce its diameter by 50% with just a twist of the rotating collar. When paired with a hobby servo, this mechanism will allow the operator to adjust the nozzle aperture with an extra channel on their RC transmitter. The nozzle hasn’t flown yet, but a test run is being planned with a 40mm Electric Ducted Fan (EDF) motor. But thanks to the parametric design, it shouldn’t be a problem to scale it up to larger motors.
But the big question: does it have an effect on the EDF’s performance? The answer is, of course, no. This doesn’t actually do anything. An EDF motor has no need for this sort of nozzle, and even if you tried to fit this on a scale jet engine, it would melt in seconds from the exhaust temperature. This is purely a decorative item, to give the plane a more accurate scale look. To that end, it looks fantastic and would definitely be impressive on the back of a large scale RC military fighter.
If anything, [Marco] says he expects performance to be worse with the nozzle fitted. Not only is it adding dead weight to the plane, but restricting the air coming out of the back of the fan isn’t going to do anything but reduce thrust. But on the bright side: if it’s flying slower, it will be easier to see how awesome your adjustable nozzles look.
This isn’t the first time somebody’s tried to make an electric RC plane look like it’s packing a proper turbine, but it certainly might be one of the slickest. Only way to top this is to build an actual jet engine for the thing.
Rocking Playmobil Wedding
Many of us have put our making/hacking/building skills to use as a favor for our friends and family. [Boris Werner] is no different, he set about creating a music festival stage with Playmobil figures and parts for a couple of friends who were getting married. The miniature performers are 1/24 scale models of the forming family. The bride and groom are on guitar and vocals while junior drums.
Turning children’s toys into a wedding-worthy gift isn’t easy but the level of detail [Boris Werner] used is something we can all learn from. The video after the break does a great job of showing just how many cool synchronized lighting features can be crammed into a tiny stage in the flavor of a real show and often using genuine Playmobil parts. Automation was a mix of MOSFET controlled LEDs for the stage lighting, addressable light rings behind the curtain, a disco ball with a stepper motor and music, all controlled by an Arduino.
Unless you are some kind of Playmobil purist, this is way cooler than anything straight out of the box. This is the first mention of Playmobil on Hackaday but miniatures are hardly a new subject like this similarly scaled space sedan.

