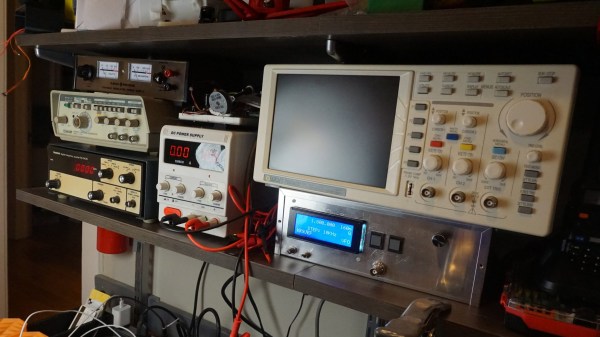
Homemade Magic Makes The Metcal Go

First soldering irons are often of the Radioshack or Maplin firestarter variety. They’re basically wall power shorted across a nichrome heater or similar with some inline resistance to make it harder to burn down the house. You plug them in, the current flows, and they get hot. Done.

If you stick with the hobby for a while, these eventually get replaced with something like the venerable HAKKO FX-888D or that one Weller everyone likes with the analog knob. These are much improved; having temperature control leads to a more consistently heated tip and much improved soldering experience.

Entering the electronics workplace one comes across the next level of quality soldering iron: high end HAKKOs, Metcals, JBCs, and the like. Using one of these irons is practically a religious experience; they heat in a flash and solder melts while you blink. They even turn off when you put the handpiece down! But they’re expensive to buy (hint: think used). What’s a hobbyist to do?

[SergeyMax] seems to have had this problem. He bit the bullet, figured out how the Metcal works, and made his own base. This is no mean feat as a Metcal might look like a regular iron but it’s significantly more complex than ye olde firestarter. The Metcal magic is based on a oscillating magnetic fields (notice the handpiece is connected via BNC?) interacting with a tip bearing a special coating. In the presence of the changing field the tip heats up until it hits its Curie temperature, at which point it stops interacting with the magnetic field and thus stops heating.

When the user solders, the tip cools by sinking its heat into the part and drops below the Curie temperature again, which starts the heating again. It’s like temperature control with the sensor placed absolutely as close to the part as possible and a nearly instant response time, without even a control loop! [SergeyMax] has a much more thorough description of how these irons work, which we definitely recommend reading.

So what’s the hack? Based on old schematics and some clever reverse engineering from photos [SergeyMax] built a new base station! The published schematic is as rich with capacitors and inductors as one could hope. He didn’t post source or fab files but we suspect the schematic and photos of the bare board combined with some tinkering are enough for the enterprising hacker to replicate.

The post contains a very thorough description of the reverse engineering process and related concerns in designing a cost efficient version of the RF circuitry. Hopefully this isn’t the last Metcal replacement build we see! Video “walkthrough” after the break.

Edit: I may have missed it, but eagle eyed commentor [Florian Maunier] noticed that [SergeyMax] posted the sources to this hack on GitHub!

Continue reading “Homemade Magic Makes The Metcal Go”

The Modern Analog Soldering Station

There is a certain sense of accomplishment one gets when building their own tools. This is what [Alejandro Velazquez] was going for when he built his own soldering station. Sure you can get a decent station for a pittance on Amazon, or eBay. You can even build your own microprocessor controlled station. [Alejandro] is currently interested in analog electronics, so he went that route to build his own closed-loop station.

The handle is a 50 watt, 24-volt affair with a thermocouple. You can find this handle on many Hakko 907 clone soldering stations, often referred to as the 907A. The station itself is completely analog. A triac switches the current going to the heater. The triac is controlled by a PWM signal. The PWM itself is generated and regulated by an LM324 quad op-amp, which is the heart of the station. The op-amp compares the setpoint with the current temperature read from the soldering handle’s thermocouple, then adjusts the duty cycle of the PWM signal to raise, or lower the temperature.

It’s a classic control system, and the schematic is definitely worth checking out if you want to understand how op-amps can be used to create complex operations.

You can find plenty more information on analog electronics right here on Hackaday — we’ve covered thermocouple amplifiers, as well as instrumentation amps. If you’re more of a digital man, check out this Arduino controlled soldering station!

Auction Finds Combined For A Unique Desoldering Station

If you are in the market for a high-quality soldering iron, a rewarding pursuit can be attending dispersal auctions. It is not unusual to see boxes of irons, as anything remotely iron-like is bundled up together by the auctioneer into a lot with little consideration for what combination has been gathered. [Stynus] found himself in this position, the proud owner of a Weller DSX80 desoldering iron from an auction, but without its accompanying solder station required for it to work. Fortunately, he had another Weller solder station, not suitable for the DSX80 as it stood, but which provided a perfect platform for a home-made Weller DSX set-up.

The old station had a side-mounted valve and a 24V input, so he had to install a toroidal mains transformer and move the valve frontwards. Fortunately, this style of Weller station case was frequently available with just such a transformer installed, so there was plenty of space in the enclosure. A custom board was then created for a temperature controller centered upon a PIC microcontroller, and a new front panel was crafted to accommodate a Nokia 5110-style LCD display.

The resulting unit with its upper half repainted, is a pleasing and professional-looking project. Heated desoldering irons are an extremely useful tool that anyone should consider for their arsenal, but not all of them are as good as this Weller-based one. We recently reviewed a much cheaper example, with comedic results.

Business On The Outside, Electronics Workstation On The Inside

As an electrical engineering student, [Brandon Rice] had the full suite of electronics tools you’d expect. Cramming them all into a dorm room was doable — but cramped — a labour to square everything away from his desk’s top when he had to work on something else. To make it easier on himself, he built himself a portable electronics workstation inside the dimensions of a briefcase.

Built from scratch, the workstation includes a list of features that should have you salivating by the end. Instead of messing with a bunch of cables, on-board power is supplied by a dismantled 24V, 6A power brick, using a buck converter and ATmega to regulate and display the voltage, with power running directly to  12V and 5V lines of a breadboard in the middle of the workstation. A wealth of components are stored in two dozen 3d printed 1″ capsules setting them in loops pinned to the lid.

If all this was not already enough, there’s more!

Continue reading “Business On The Outside, Electronics Workstation On The Inside”

DIY Power Supply And TS100 Outlet Combo Shows Off Great Layout

Here’s a combination of two important electronics workbench tools into a single, cleanly-assembled unit. [uGen] created a DC power supply complete with a plug for the popular TS100 soldering iron, and it looks great! Most of the main components are familiar offerings, like a LM2596 DC to DC buck converter board and a DPS3003 adjustable DC power supply unit (we previously covered a DIY power supply based around the similar DPS5005.) The enclosure is an economical, featureless desktop instrument case whose panels were carefully cut to fit the necessary components. There’s one limitation to the combo: the unit uses a switch to either power an attached TS100 iron, or act as a general DC power supply. It cannot do both at once. So long as one doesn’t mind that limitation, it’s a nice bundle made from very affordable components.

It’s easy for something to look like a hack job, but to look clean and professional involves thoughtful measurement, planning, and assembly. Fortunately, [uGen] has supplied all the drawings and bill of materials for the project so there’s no need to start from scratch. Also, don’t forget that if the capabilities of the DPS power supply units leave you wanting a bit more, there is alternative firmware in the form of OpenDPS; it even offers a remote control feature by adding an ESP8266.

Roll Your Own JBC Soldering Station

[Marco Reps] was soldering some boards with a lot of thermal mass and found his usual soldering iron was not up to the task. He noticed some professional JBC soldering stations that he liked, but he didn’t like the price. Even an entry-level JBC station is about $500 and they go up from there. He decided to build his own, but it did take awhile to complete. You can see two videos about the project, below.

How can you build your own soldering station and still claim it is a JBC? [Marco] noticed that the real performance of the iron came from the tip — what JBC calls a cartridge. In addition, the handle provides good ergonomics. You can buy the tips and handles from JBC for considerably less than a complete station. You just have to add the electronics to make it all work.

Continue reading “Roll Your Own JBC Soldering Station”

Field Expedient Quenches Your Thirst For A Soldering Station

In the category of first world problems, it seems that these days no one is happy with just a plain old soldering iron. Today, everyone wants a station with bells, whistles, and features. If all you have is the iron, take heart. Grab a soda, drink it, and then duplicate [Kalvin178’s] makeshift solder station.

The idea is simple: cut or tear a soda can and press in the sides to make a V-shaped holder for the iron. A smaller part of the can might hold a wet paper towel, a sponge, or some copper scrubbing pads to clean your tip.

Continue reading “Field Expedient Quenches Your Thirst For A Soldering Station”