A Brushless Motor On A PCB, Made From PCB

At Hackaday, we really appreciate it when new projects build on projects we’ve featured in the past. It’s great to be able to track back and see what inspires people to pick up someone else’s work and bring it to the next level or take it down a totally new path.

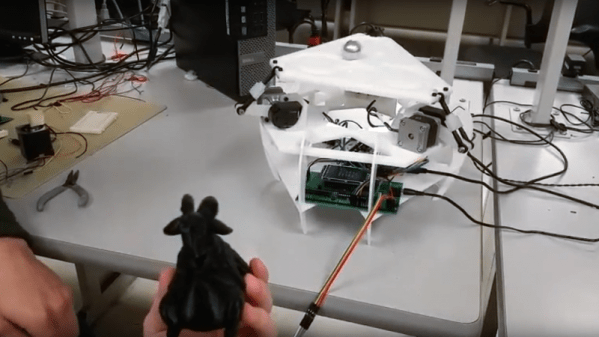
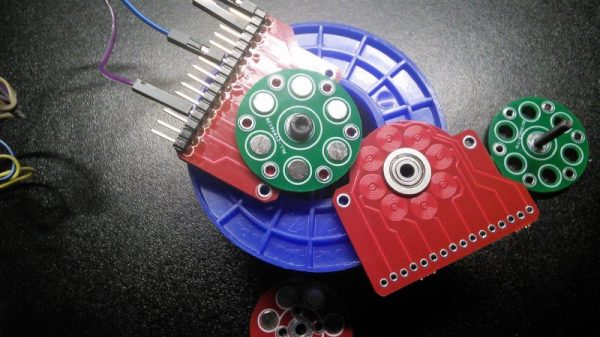
This PCB brushless motor is a great example of the soft collaboration that makes the Hackaday community so powerful. [bobricius] says he was inspired by this tiny PCB BLDC when he came up with his design. His write-up is still sparse at this point, but it looks like his motor is going to be used to drive a small robot. As with his inspiration, this motor has the stator coils etched right into the base PCB. But there are some significant improvements, like increasing the stator coil count from six to eight, as well as increasing the overall size of the motor. [bobricius] has also done away with the 3D-printed rotor of the original, opting to fabricate his rotor from stacked PCBs with cutouts for 5-mm neodymium magnets. We like the idea of using the same material throughout the motor, and it also raises the potential for stacking a second stator on the other side of the rotor, which might help mechanically and electrically. Even still, the prototype seems to hold its own in the video below.

This is [bobricius]’ second entry in the 2018 Hackaday Prize so far, after his not-a-Nixie tube display. Have you entered anything yet? Get to it! Prizes, achievements, and glory await.

Continue reading “A Brushless Motor On A PCB, Made From PCB”

Visible Light CT Scanner Does Double Duty

If you’ve ever experienced the heartbreak of finding a seed in your supposedly seedless navel orange, you’ll be glad to hear that with a little work, you can protect yourself with an optical computed tomography scanner to peer inside that slice before popping it into your mouth.

We have to admit to reading this one with a skeptical eye at first. It’s not that we doubt that a DIY CT scanner is possible; after all, we’ve seen examples at least a couple of times before. The prominent DSLR mounted to the scanning chamber betrays the use of visible light rather than X-rays in this scanner — but really, X-ray is just another wavelength of light. If you choose optically translucent test subjects, the principles are all the same. [Jbumstead]’s optical CT scanner is therefore limited to peeking inside things like slices of tomatoes or oranges to look at the internal structure, which it does with impressive resolution.

This scanner also has a decided advantage over X-ray CT scanners in that it can image the outside of an object in the visible spectrum, which makes it a handy 3D-scanner in addition to its use in diagnosing Gummi Bear diseases. In either transmissive or reflective mode, the DSLR is fitted with a telecentric lens and has its shutter synchronized to the stepper-driven specimen stage. Scan images are sent to Matlab for reconstruction of CT scans or to Photoscan for 3D scans.

The results are impressive, although it’s arguably more useful as a scanner. Looking to turn a 3D-scan into a 3D-print? Photogrammetry is where it’s at.

Continue reading “Visible Light CT Scanner Does Double Duty”

Easy, Modular Alphanumeric Displays Are Full Of Flappy Goodness

There are plenty of ways to make large alphanumeric displays that are readable at great distances. LED signboards come to mind, as do big flat-screen LCD displays. But such displays feel a little soulless, and nothing captures the atmosphere of a busy train station like an arrivals and departures board composed of hundreds of split-flap displays.

In a bid to make these noisy but intriguing displays practical for the home-gamer, [Scott Bezek] has spent the last couple of years on a simple, modular split-flap display unit, and from the look of the video below, it’s pretty close to ready. The build log details the design process, which started with OpenSCAD and took advantage of the parametric nature of the scripting language to support any number of characters, within reason. Costs are kept low with laser-cut MDF frames and running gear, and cheap steppers provide the motion. Character cards are just PVC ID badges with vinyl letters, and a simple opto-sensor prevents missed steps and incorrect characters. The modules can be chained together into multi-character displays, and the sound is satisfyingly flappy.

[Scott] has put a lot of thought into these displays, and even if it’s not the simplest split-flap display we’ve seen, it’s really worth checking out.

Continue reading “Easy, Modular Alphanumeric Displays Are Full Of Flappy Goodness”

Smooth stepper motor robot arm

Stepper Motor Robot Arm Has Smooth Moves

[Tobias Kuhn] had watched a YouTube video about a robot arm which used servo motors, and wanted to try making one himself. But he found it hard to get slow or smooth movements out of the servos. Even removing the microcontroller and trying to work with the servo’s driver-IC and potentiometer from an Arduino Nano didn’t get him satisfaction.

Then he found the very affordable 28BYJ-48 stepper motor. After some experimenting, he came up with a smooth moving robot arm with four steppers controlled from an Arduino Mega and A4988 stepper motor drivers. Rather than write a bunch of stepper motor code himself, he installed and ran a four-axis fork of grbl on the Arduino, turning it into a stepper motor controller. One minor hitch was that the A4988 motor drivers are for bipolar stepper motors but 28BYJ-48 steppers are unipolar. Luckily he knew of a very simple hack which our [Brian Benchoff] wrote about for turning a unipolar motor into a bipolar motor.

To tell the robot arm what to do, he built a replica arm with potentiometers in place of the stepper motors. As he manipulates the replica, the values of the potentiometers are read by a Raspberry Pi and some custom Python code which sends the appropriate G-code to the Arduino/grbl controlled robot arm. There’s a bit of a lag but when he moves the replica arm, the robot arm does the same move. See it in action in the video below.

Continue reading “Stepper Motor Robot Arm Has Smooth Moves”

Cable Cutting Machine Makes Fast Work Of A Tedious Job

We’ve all been there: faced with a tedious job that could be knocked out manually with a modest investment of time, we choose instead to overcomplicate the task and build something to do it for us. Such was the impetus behind this automated wire cutter, but in this case the ends justify the means.

That [Edward Carlson] managed to stretch a twenty-minute session with wire cutters and a tape measure into four days of building and tweaking this machine is pretty impressive. The build process was jump-started by modifying an off-the-shelf wire measuring machine, of the kind one finds in the electrical aisle of The Big Orange Store. Stripped of the original mechanical totalizer and with a stepper added to drive the friction wheels, the machine can now measure cable by counting steps. A high-torque servo drives a stout pair of cable shears through a nifty linkage, or the machine can just measure the length of cable without cutting. [Edward]’s solution in search of a problem ends up bringing extra value, so maybe the time spent was worth it after all.

If the overall design looks familiar, you may be thinking of a similar of another cable-cutting bot we featured a while back. That one used a filament extruder and was for lighter gauge wires than this machine. Continue reading “Cable Cutting Machine Makes Fast Work Of A Tedious Job”

A Stepper Motor For Two Dimensions

We’ve all heard linear motors, like those propelling Maglev trains, described as “unrolled” versions of regular electric motors. The analogy is apt and helps to understand how a linear motor works, but it begs the question: what if we could unroll the stator in two dimensions instead of just one?

That’s the idea behind [BetaChecker’s] two-axis stepper motor, which looks like it has a lot of potential for some interesting applications. Build details are sparse, but from what we can gather from the videos and the Hackaday.io post, [BetaChecker] has created a platen of 288 hand-wound copper coils, each of which can be selectively controlled through a large number of L293 H-bridge chips and an Arduino Mega. A variety of sleds, each with neodymium magnets in the base, can be applied to the platen, and depending on how the coils are energized, the sled can move in either dimension. For vertical applications, it looks like some coils are used to hold the sled to the platen while others are used to propel it. There are RGB LEDs inside the bore of each coil, although their function beyond zazzle is unclear.

We’d love more details to gauge where this is going, but with better resolution, something like this could make a great 3D-printer bed. If one-dimensional movement is enough for you, though, check out this linear stepper motor that works on a similar principle.

Continue reading “A Stepper Motor For Two Dimensions”

Balance Like A Mountain Goat On This Simple Stewart Platform

No goats were harmed in the making of this 3-DOF Stewart platform for [Bruce Land]’s microcontrollers course at Cornell.

If the name “Stewart platform” doesn’t ring a bell, the video below will help you out. [Team Microgoats] built a small version of the mechanical system commonly seen in flight simulators, opting for 3 DOF  to simplify the design. Their PIC32-controlled steppers can wobble and weave the table in response to inputs from an MPU-6050 six-axis accelerometer embedded in the base of a 3D-printed goat. Said goat appears to serve no other role in the build, but goats are cool, so why not? And if you’ve ever seen a mountain goat frolicking across a sheer vertical rock face like it was walking across a parking lot, you’ll understand the connection to the balance and control offered by a Stewart platform.

[Bruce Land]’s course is always a bonanza of neat projects that pop up in our tipline this time of year, like a POV box fan, a coin cell Rickrolling throwie, and a dynamometer for small electric motors.

Continue reading “Balance Like A Mountain Goat On This Simple Stewart Platform”