Hack Allows ESP-01 To Go To Deep Sleep

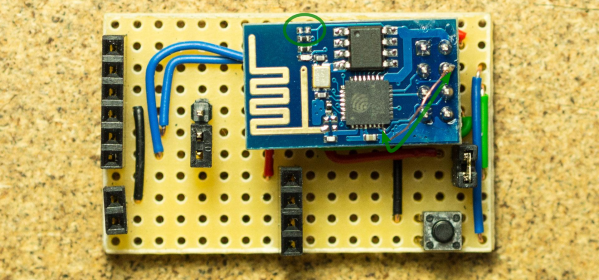
The ESP-01 module based on the ESP8266 is all the rage with IoT folks at the moment – and why not. For about 5 bucks, it can’t be beat on price for the features it offers. The one thing that such radios do a lot is suck power. So, it’s no surprise that ways to cut down on the juice that this device consumes is top priority for many people. [Tim] figured out a simple hardware hack to get the ESP-01 to go to deep sleep, effectively reducing its current draw to 78uA – low enough to allow battery powered deployment.

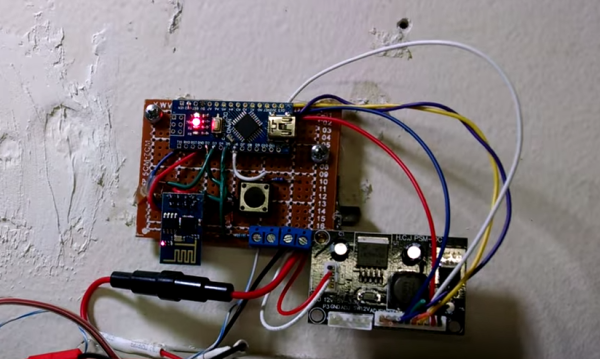
While [Tim] was working on understanding the ESP8266 tool chain (NodeMCU firmware > Lua interpreter > ESPlorer IDE), he realized that some essential pins weren’t accessible on the ESP-01 module. [Tim] built a Dev board on perf board that let him access these pins and also added some frills while at it. We’re guessing he (or someone else) will come up with a proper PCB to make things easier. But the real hack is on the ESP-01 module itself. [Tim] needed to hardwire the ‘post-sleep-reset-pin’ on the MCU to the Reset terminal. That, and also pry off the indicator LED’s with a screw driver! That sounds a bit drastic, and we’d recommend pulling out your soldering iron instead. If you’re one of the unlucky one’s to receive the “magic smoke” releasing ESP8266 modules, then you don’t need the LED anyway.

Transcend DrivePro 200 Hack To Stream And Script; Begs For More

Transcend markets their DrivePro 200 camera for use as a car dashcam. We’re a bit surprised at the quality and apparent feature set for something relegated to a rather mundane task as this. But [Gadget Addict] poked around and found a nice little nugget: you can live stream the video via WiFi; the framerate, quality, and low-lag are pretty impressive. In addition to that, the next hack is just waiting for you to unlock it.

As it stands right now you turn on the camera’s built-in WiFi AP, telnet into two different ports on the device (sending it into smartphone connected mode) and you’ll be able to live stream the view to your computer using RTSP. Great, that in itself is a good hack and we’re sure that before long someone will figure out an automatic way to trigger this. [GA] also found out how to get the thing into script mode at power-on. He hasn’t actually executed any code… that’s where you come in. If you have one of these pull it out and get hacking! It’s a matter put putting files on the SD storage and rebooting. Crafting this file to enable shell access would open up an entire world of hacks, from things like time-lapse and motion sensing to special processing and filtering in real time. We think there’s huge potential so keep us up-to-date as you find new ways to pwn this hardware.

Continue reading “Transcend DrivePro 200 Hack To Stream And Script; Begs For More”

A Wireless Web-Connected Morse Code Keyer

[Kevin] recently scored a Morse code keyer/sounder unit from the 1920s on eBay. While many hams would love to use an old keyer for CW, [Kevin] took a different route and repurposed it into a wireless web-connected morse code keyer.

[Kevin] mounted an Arduino Yun under the keyer, which listens for user input and provides web connectivity. The Yun connects to [Kevin]’s open-source web API he calls “morsel,” which allows it to send and receive messages with other morsel users. When a message is keyed in, the Yun publishes it to the API. When another keyer queries the API for incoming messages, the Yun downloads the morse sequence and replays it on the sounder.

[Kevin] also added some copper electrodes to the top of his enclosure, which act as capacitive buttons while keeping the keyer’s old-school appearance. The left button replays the most recently received message, and the right button sets the playback speed. Check out the video after the break to hear and see the keyer in action.

Thanks for the tip,  [Jarrod].

Continue reading “A Wireless Web-Connected Morse Code Keyer”

Wifi Antenna

Simple Directional WiFi Antenna

Back in 2007, [Stathack] rented an apartment in Thailand. This particular apartment didn’t include any Internet access. It turned out that getting a good connection would cost upwards of $100 per month, and also required a Thai identification card. Not wanting to be locked into a 12-month contract, [Stathack] decided to build himself a directional WiFi antenna to get free WiFi from a shop down the street.

The three main components of this build are a USB WiFi dongle, a baby bottle, and a parabolic Asian mesh wire spoon. The spoon is used as a reflector. The parabolic shape means that it will reflect radio signals to a specific focal point. The goal is to get the USB dongle as close to the focal point as possible. [Stathack] did a little bit of math and used a Cartesian equation to figure out the optimal location.

Once the location was determined, [Stathack] cut a hole in the mesh just big enough for the nipple of the small baby bottle. The USB dongle is housed inside of the bottle for weatherproofing. A hole is cut in the nipple for a USB cable. Everything is held together with electrical tape as needed.

[Stathack] leaves this antenna on his balcony aiming down the street. He was glad to find that he is easily able to pick up the WiFi signal from the shop down the street. He was also surprised to see that he can pick up signals from a high-rise building over 1km away. Not bad for an antenna made from a spoon and a baby bottle; plus it looks less threatening than some of the cantenna builds we’ve seen.

Alarm1

Adding WiFi And SMS To An Alarm System

[Don] wanted to bring his alarm system into the modern age. He figured that making it more connected would do the trick. Specifically, he wanted his alarm system to send him an SMS message whenever the alarm was tripped.

[Don] first had to figure out a way to trigger an event when the alarm sounds. He found a screw terminal that lead to the siren. When the alarm is tripped, this screw terminal outputs 12V to enable the siren. This would be a good place to monitor for an alarm trip.

[Don] is using an Arduino nano to monitor the alarm signal. This meant that the 12V signal needed to be stepped down. He ran it through a resistor and a Zener diode to lower the voltage to something the Arduino can handle. Once the Arduino detects a signal, it uses an ESP8266 WiFi module to send an email. The address [Don] used is the email-to-SMS address which results in a text message hitting his phone over the cell network.

The Arduino also needed power. [Don] found a screw terminal on the alarm system circuit board that provided a regulated 12V output. He ran this to another power regulator board to lower the voltage to a steady 5V. This provides just the amount of juice the Arduino needs to run, and it doesn’t rely on batteries. [Don] provides a good explanation of the system in the video below. Continue reading “Adding WiFi And SMS To An Alarm System”

TweetHeart Shows You Some Love

[Stacey] wanted a more interesting way to monitor events related to her Twitter account. What she ended up with is a beautiful animated heart light.

TweetboxShe started out by designing the enclosure. Having access to a laser cutter, she opted to make it out of thin plywood. [Stacey] used an online tool called BoxMaker to design the actual box. The tool is very simple to use. You simply plug in the dimensions of the box and it will provide you with a two dimensional template you can use with your laser cutter. The resulting plywood pieces fit together like a puzzle. The heart piece is made from frosted acrylic and was also cut by the laser.

To light up the heart, [Stacey] opted to use NeoPixels. These are like many of the RGB LED strips we’ve seen in the past, though the pixel density is higher than most. She cut up the LED strip into the appropriate sizes and glued them to a piece of plywood in a rough heart shape. She tested the lights during each step so she would know exactly when any errors were made.

[Stacey] opted to use a SparkCore to control the LEDs. This had the advantage of including WiFi connectivity out of the box.  [Stacey] started with NeoPixel example programs, but quickly realized they all relied on the Delay function. This was a problem for her, because she needed to constantly watch for new Twitter events. She ended up having to write her own functions that relied on interrupts instead.

[Stacey] then wrote a Node.js script to monitor twitter and control the Spark. The script watches for specific events, such as one of [Stacey’s] tweets being re-tweeted, or a user unfollowing [Stacey]. The script then sends a message to the Spark to tell it which event just occurred. The Spark will then repeat the event until a new one occurs. Check out the demonstration video below. Continue reading “TweetHeart Shows You Some Love”

A Better Way To Hack The Wink

If you’re looking for Home Automation appliances, you might want to check out the Wink Hub. It’s fifty bucks, and has six radios on board: WiFi, Bluetooth, Z-Wave, Zigbee, and 433MHz Lutron and Kidde. That’s an insane amount of connectivity in a very cheap package. It’s been pwnzor3d before, but dinnovative has a much better solution for getting root on this device.

Earlier methods of rooting the Wink involved passing commands via URLs – something that’s not exactly secure. The new method leverages what’s already installed on the Wink, specifically Dropbear, to generate public keys on the Wink hub and getting that key onto another computer securely. The complete exploit is just a few lines in a terminal, but once that’s done you’ll have a rooted Wink hub.

Even though the Wink hub has been rooted a few times before, we haven’t seen anything that leverages the capabilities of this hardware. There isn’t another device with a bunch of IoT radios on the market for $50, and we’re dying to see what people can come up with. If you’ve done something with your Wink, send it in on the tip line.