Auto-Tracking Sentry Gun Gives Deer A Super Soaking

Things rarely go well when humans mix with wildlife. The problems are exacerbated in the suburbs, where bears dine on bird feeders and garbage cans, raccoons take up residence in attics, and coyotes make off with the family cat. And in the suburbs, nuisance wildlife can be an intractable problem because the options for dealing with it are so limited.

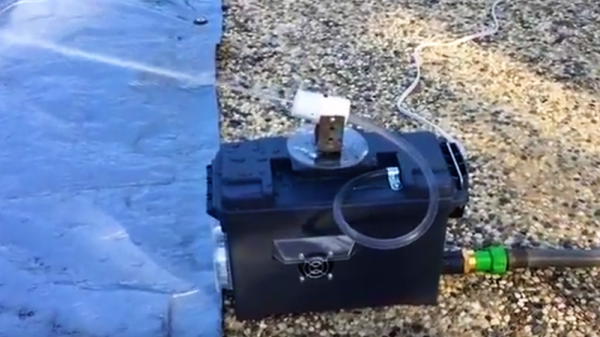
Not to be dissuaded in the battle to protect his roses, [dlf.myyta] built this motion-activated sentry gun to apply some watery aversion therapy to marauding deer. Shown in action below against a bipedal co-conspirator, the sentry gun has pretty much what you’d expect under the hood — Raspberry Pi, NoIR camera, a servo for aiming and a solenoid valve to control the water. OpenCV takes care of locating the intruders and swiveling the nozzle to center mass; since the deer are somewhat constrained by a fence, there’s no need to control the nozzle’s elevation. Everything is housed nicely in a plastic ammo can for portability and waterproofing. Any target that stands still for more than three seconds gets a hosing; we assume this is effective, but alas, no snuff films were provided.

We’re not sure if [dlf.myyta]’s code can discern friend from foe, and in this litigious world, hosing the neighbor’s kid could be a catastrophe. Perhaps version 2.0 can include image recognition for target verification.

Continue reading “Auto-Tracking Sentry Gun Gives Deer A Super Soaking”

Hackaday Prize Entry: Automated Wildlife Recognition

Trail and wildlife cameras are commonly available nowadays, but the Wild Eye project aims to go beyond simply taking digital snapshots of critters. [Brenda Armour] uses a Raspberry Pi to not only take photos of wildlife who wander into the camera’s field of view, but to also automatically identify and categorize the animals seen using a visual recognition API from IBM via the Node-RED infrastructure. The result is a system that captures an image when motion is detected, sends the image to the visual recognition API, and attempts to identify any wildlife based on the returned data.

The visual recognition isn’t flawless, but a recent proof of concept shows promising results with crows, a cat, and a dog having been successfully identified. Perhaps when the project is ready to move deeper into the woods, elements from these solar-powered networked birdhouses (which also use the Raspberry Pi) could help cut some cords.

Hackaday Prize Entry : DEER — An Electronic Repellent

Ultrasonic repellent devices used to keep away insects, rodents, birds, and even large animals have been around for quite a while, but their effectiveness depends on who you ask.  Some critters just don’t seem affected, while some others definitely will avoid being around such a device. Deploying a few of these devices to scare off animals seems to be working quite well for [Ondřej Petrlík]. Around where he lives, the fields of tall grass need to be mowed down during the spring. Unfortunately, the tall grass is ideal for young, newborn animals to stay hidden and safe. The mowing machines would often cripple and hurt such animals, and [Ondřej] desperately wanted to solve the problem and prevent these mishaps.

He built an electronic repeller to keep away wild animals and their young from his farm/ranch/range back in the Czech Republic. He used an Arduino Mini to drive a large piezo transducer to scare away the wild animals from the vicinity of the device. He likely used a high enough frequency beyond human range, but we’ll know more when he publishes his code and details. There are also a few large 10mm LED’s – either to visually locate the device or help drive the animals away in conjunction with the ultrasound, with an LDR that activates the LEDs at night. Using the Arduino helps to turn on the transducer at random intervals, and hopefully, he is using a range of different frequencies so the animals don’t become immune to the device.

His first prototype was cobbled together using vanilla, off the shelf parts. An Arduino, a step up converter, an LDR, a couple of LEDs, a reed switch for powering it on via a magnet, and a large ultrasonic transducer, all powered by three alkaline AA batteries. He stuffed it all inside a weatherproof molded enclosure, holding it all together with a lot of hot glue. This didn’t make it very rugged for the long-term, outdoor field use. While the prototype worked well, he needed several of the devices to be placed all around his farm. To make assembly easy and make it more reliable, he designed a custom PCB to fit in the weather proof enclosure. This allowed him to easily mount all the required parts for a more reliable result. His project is still a work in progress, so if you have worked with these types of ultrasonic repellent devices to keep away animals, and have any insights that may help him, do chime in with your comments. [Ondřej] seems pretty satisfied with the results so far.

A Field Guide To The North American Communications Tower

The need for clear and reliable communication has driven technology forward for centuries. The longer communication’s reach, the smaller the world becomes. When it comes to cell phones, seamless network coverage and low power draw are the ideals that continually spawn R&D and the eventual deployment of new equipment.

Almost all of us carry a cell phone these days. It takes a lot of infrastructure to support them, whether or not we use them as phones. The most recognizable part of that infrastructure is the communications tower. But what do you know about them?

Continue reading “A Field Guide To The North American Communications Tower”

Wildlife Camera

Remote Controlled Wildlife Camera With Raspberry Pi

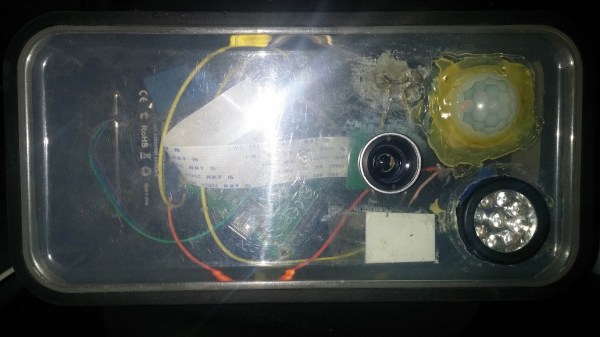
If you are interested in local wildlife, you may want to consider this wildlife camera project (Google cache). [Arnis] has been using his to film foxes and mice. The core components of this build are a Raspberry Pi and an infrared camera module specifically made for the Pi. The system runs on a 20,000 mAh battery, which [Arnis] claims results in around 18 hours of battery life.

[Arnis] appears to be using a passive infrared (PIR) sensor to detect motion. These sensors work by detecting sudden changes in the amount of ambient infrared radiation. Mammals are good sources of infrared radiation, so the sensor would work well to detect animals in the vicinity. The Pi is also hooked up to a secondary circuit consisting of a relay, a battery, and an infrared light. When it’s dark outside, [Arnis] can enable “night mode” which will turn on the infrared light. This provides some level of night vision for recording the furry critters in low light conditions.

[Arnis] is also using a Bluetooth dongle with the Pi in order to communicate with an Android phone. Using a custom Android app, he is able to connect back to the Pi and start the camera recording script. He can also use the app to sync the time on the Pi or download an updated image from the camera to ensure it is pointed in the right direction. Be sure to check out the demo video below.

If you like these wildlife cameras, you might want to check out some older projects that serve a similar purpose. Continue reading “Remote Controlled Wildlife Camera With Raspberry Pi”

Critter Cam Hacked From An Old Cellphone.

critter-cam-hacked-from-old-cellphone

[Art Barrios] kept having night-time visitors who were raiding his dog’s food storage bin. It’s a plastic tub with a lid that latches but the critters were knocking it over and popping that lid off. He wanted to find out which animal was the culprit so he hacked together an automatic camera system using an old cellphone.

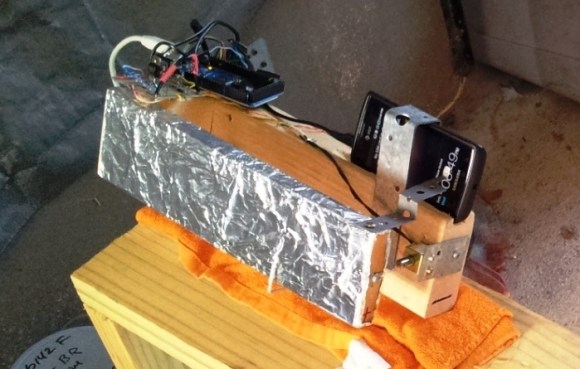
You can see the majority of the hardware he used in the image above. There’s an Arduino on the left. This monitors a switch which he added to the lid of the food storage container. It triggers the system when opened, switching on an LED light and snapping pictures.

The touchscreen button is used to trigger the shutter. That’s what all of that tin foil is about. Some experiments led [Art] to realize that a metal ‘finger’ could register on the screen if there was enough foil attached. To move the metal bracket he uses a solenoid. The last problem he faced was keeping the cellphone screen awake. He figured out that power cycling the charger does the trick. The Arduino manages this using a mains-rated relay.

The system successfully captured images of a family of raccoons feasting on the tasty morsels.

Quick And Easy Wildlife Camera

This wildlife camera is really easy to put together. You should keep it in mind if you’re ever tying to figure out what’s eating the heads off of all of your tulips. [Revoltlab] put it together, and although there’s one fatal flaw in this particular system, the concept is quite sound.

The build uses a camera, paired with an ultrasonic range finder. When something passes within the pre-set distance for the sensor, a servo motor clicks the shutter button on the camera. It’s all driven by an Arduino and powered from a 9V battery.

If you watch the video after the break you’ll discover the flaw we mentioned. This is a disposable film camera and requires winding between pictures. That hasn’t been implemented yet. But we’ve got an old digital camera with a broken LCD screen which would be perfect for the job. We’d have to do a bit more work to turn the camera on before taking the picture though.

There are a couple of possible upgrades to the idea. [Revoltlab] mentions removing the IR filter from the camera and adding an infrared flash for night-vision shots. But we would also recommend ditching the servo motor for a simple remote shutter solution as a way to avoid scaring the wildlife with the motor noise.

Continue reading “Quick And Easy Wildlife Camera”