High School Student Builds Inexpensive Centrifuge

Having a chemistry lab fully stocked with all necessary equipment is the dream of students, teachers, and professors alike, but a lot of that equipment can be prohibitively expensive. Even in universities, labs are often left using old or worn-out equipment due to cost. So one could imagine that in high schools this is even a more pronounced problem. High school student [Aidan Miller] has solved this problem with at least one piece of lab equipment, bringing the cost for a centrifuge down to around $10 USD.

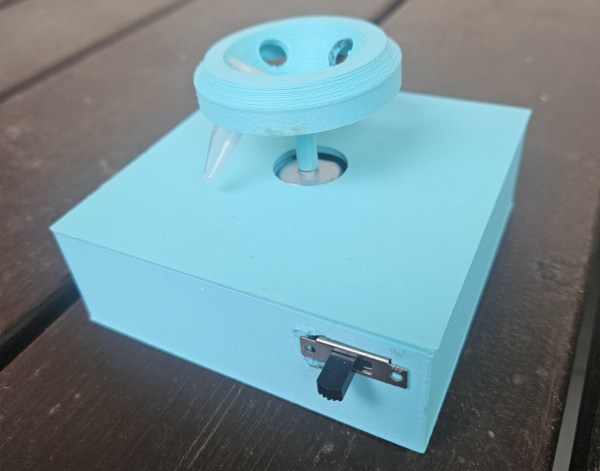
Part of the savings is due to the fact that [Aidan] has put together a smaller sized centrifuge, known as a micro-centrifuge. The function is still the same though, spinning samples to separate them out the constituents by weight. The 3D printed base of the centrifuge houses a switch and 9 V battery and also holds a small motor which spins the rotor. The rotor itself is also 3D printed, and needed to be a very specific shape to ensure that it could hold the samples properly at high RPM and maintain reasonable balance while spinning.

As a project it’s fairly simple and straightforward to build, but the more impressive thing here is how much it brings down the cost of lab equipment especially for high school labs that might otherwise struggle for funding. Of course it requires the use of a 3D printer but the costs of those have been coming down significantly as well, especially for things like this portable 3D printer which was also built by a high school student.

Continue reading “High School Student Builds Inexpensive Centrifuge”

BlocksCAD Is Browser-Based 3D Modeling That Teaches You CAD

Considering all of the projects the Raspberry Pi is used for now, the fact that it was originally envisioned to be an educational tool is sometimes forgotten. One of the tools commonly available with it is Scratch, a programming language that is easy to learn and can be seen as a gateway into other computer science realms. Building on this principle, MIT has come up with a new block-based educational tool called BlocksCAD.

BlocksCAD is essentially Scratch combined with OpenSCAD and allows the user to use blocks (similar to Scratch) to build a 3D model. The interface is fairly intuitive, and with some practice even complex shapes can be created using the tools available. Also, everything runs in a browser like the 3D modeling tool we featured a few days ago, so there isn’t anything to download or install.

The key to this project (like the key to Scratch) is that the user isn’t bogged down by syntax, which is often one of the largest hurdles for anyone who is just starting to learn to program. Since it’s possible to avoid syntax but still develop 3D models, this new tool should help anyone interested in the field of 3D modeling or CAD get a start without getting scared away too easily. Of course, if you do end up deep in the field of computer science and want to learn more about this project, the developers have opened up the source code as well.

Thanks for the tip, [Matt]!

ASL Glove

Electronic Glove Detects Sign Language

A team of Cornell students recently built a prototype electronic glove that can detect sign language and speak the characters out loud. The glove is designed to work with a variety of hand sizes, but currently only fits on the right hand.

The glove uses several different sensors to detect hand motion and position. Perhaps the most obvious are the flex sensors that cover each finger. These sensors can detect how each finger is bent by changing the resistance according to the degree of the bend. The glove also contains an MPU-6050 3-axis accelerometer and gyroscope. This sensor can detect the hand’s orientation as well as rotational movement.

While the more high-tech sensors are used to detect most characters, there are a few letters that are similar enough to trick the system. Specifically, they had trouble with the letters R, U, and V. To get around this, the students strategically placed copper tape in several locations on the fingers. When two pieces of tape come together, it closes a circuit and acts as a momentary switch.

The sensor data is collected by an ATmega1284p microcontroller and is then compiled into a packet. This packet gets sent to a PC which then does the heavy processing. The system uses a machine learning algorithm. The user can train the it by gesturing for each letter of the alphabet multiple times. The system will collect all of this data and store it into a data set that can then be used for detection.

This is a great project to take on. If you need more inspiration there’s a lot to be found, including another Cornell project that speaks the letters you sign, as well as this one which straps all needed parts to your forearm.
Continue reading “Electronic Glove Detects Sign Language”

Desk lamp

Sleek Desk Lamp Changes Colors Based On Sun Position

[Connor] was working on a project for his college manufacturing class when he came up with the idea for this sleek desk lamp. As a college student, he’s not fond of having his papers glowing brightly in front of him at night. This lamp takes care of the problem by adjusting the color temperature based on the position of the sun. It also contains a capacitive touch sensor to adjust the brightness without the need for buttons with moving parts.

The base is made from two sheets of aluminum and a bar of aluminum. These were cut and milled to the final shape. [Connor] found a nice DC barrel jack from Jameco that fits nicely with this design. The head of the lamp was made from another piece of aluminum bar stock. All of the aluminum pieces are held together with brass screws.

A slot was milled out of the bottom of the head-piece to make room for an LED strip and a piece of 1/8″ acrylic. This piece of acrylic acts as a light diffuser.  Another piece of acrylic was cut and added to the bottom of the base of the lamp. This makes for a nice glowing outline around the bottom that gives it an almost futuristic look.

The capacitive touch sensor is a pretty simple circuit. [Connor] used the Arduino capacitive touch sensor library to make his life a bit easier. The electronic circuit really only requires a single resistor between two Arduino pins. One of the pins is also attached to the aluminum body of the lamp. Now simply touching the lamp body allows [Connor] to adjust the brightness of the lamp.

[Connor] ended up using an Electric Imp to track the sun. The Imp uses the wunderground API to connect to the weather site and track the sun’s location. In the earlier parts of the day, the LED colors are cooler and have more blues. In the evening when the sun is setting or has already set, the lights turn more red and warm. This is easier on the eyes when you are hunched over your desk studying for your next exam. The end result is not only functional, but also looks like something you might find at that fancy gadget store in your local shopping mall.

The Lightgame Project: A Multiplayer Arduino Game

lightgame_3Summer is upon us. The Lightgame Project is a multiplayer reaction time based game built around the Arduino. It’s a perfect rainy day project for those restless kids (and adults!). Designed by two undergraduate students [Efstathios] and [Thodoris] for a semester long project, all the hard work has already been done for you.

There are tons of reasons we love games that you can build yourself. For one, it’s an amazing way to get children interested in hobby electronics, making, and hacking. Especially when they can play the game with (and show off to) their friends. Another reason is that it is a perfect way to share your project with friends and family, showcasing what you have been learning. The game is based on your reaction time and whether or not you press your button when another players color is shown. The project is built around two Arduinos connected via I2C. The master handles the mechanics of the game, while the slave handles the TFT LCD and playing music through a buzzer.

I2C is a great communication protocol to be familiar with and this is a great project to give it a try. [Efstathios] and [Thodoris] did a great job writing up their post, plus they included all the code and schematics needed to build your own. It would be great to see more university professors foster open source hardware and software with their students. A special thanks goes out to [Dr. Dasygenis] for submitting his student’s work to us!

Continue reading “The Lightgame Project: A Multiplayer Arduino Game”

Get Your Uni, School Or College Involved In The Hackaday Prize

We’ve been busy contacting design tech and electrical engineering education departments to tell them about The Hackaday Prize, but there are only so many of us and we could do with your help to get the word out.

Are you excited about The Hackaday Prize? Do you think more people at your school should know about it so they can take part? Either way, please help us help them by emailing prize@hackaday.com to let us know what program coordinators, student group, or other people we should contact. If appropriate, we have a bunch of promotional materials we would like to send out to some of these awesome hackers.

You can also help us by telling your hacker designer friends, posting about The Hackaday Prize on college social media (#HackadayPrize), or letting the student newspaper know. We want to get as many universities, colleges and high schools involved as possible. Many senior year project ideas would make great starting points for THP entries, and we want to make sure students take up this opportunity to show off what they can do (and hopefully win some stuff in the process). This makes a great summer project, and looks great when applying for colleges or jobs in the future.

Remember you have until August to get your entry in, but the sooner you post it on Hackaday Projects, the sooner you can potentially start winning rewards. We have hundreds of tshirts, stickers, patches, posters and other swag up for grabs on the way to winning The Hackaday Prize.


Student Soaker, Wireless Water Gun

[youtube http://www.youtube.com/watch?v=0aaQIkLkSIo%5D

As far as pranks go, [Austin Shaf’s] wireless hidden water gun is a real treat. The video above goes over a brief explanation and shows the setup in action. The prankster holds onto a wireless AVR remote, and when the unsuspecting victim walks by, he activates a second AVR controlling a pump; spraying water everywhere.

While most of us are out of school by now, the project would still be a fun office or perhaps street prank. If you’re one for registering, schematics and source code can be found at AVRFreaks. Alternatively, check after the jump for a copy of both.

Related: Office Pranks, and Water Guns.

Continue reading “Student Soaker, Wireless Water Gun”