Bike Helmet Plays Music Via Tiny Motors For Bone Conduction

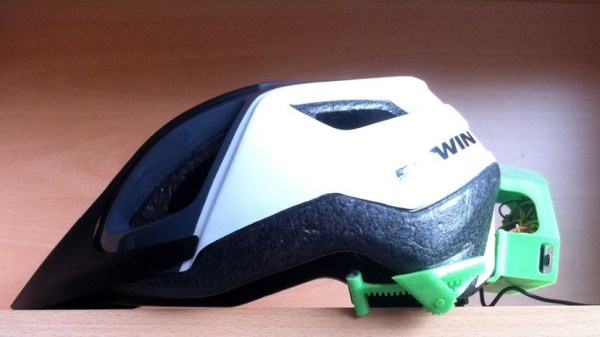
[Matlek] had an interesting problem. On one hand, a 40 minute bike commute without music is a dull event but in France it is illegal for any driver to wear headphones. What to do? Wanting neither to break the law nor accept the risk of blocking out surrounding sounds by wearing headphones anyway, and unwilling to create noise pollution for others with a speaker system, [Matlek] decided to improvise a custom attachment for a bike helmet that plays audio via bone conduction. We’ll admit that our first thought was a worrisome idea of sandwiching metal surface transducers between a helmet and one’s skull (and being one crash away from the helmet embedding said transducers…) but happily [Matlek]’s creation is nothing of the sort.

A 3D printed rack and pinon provides adjustability and stable contact with the “sweet spot” behind each ear.

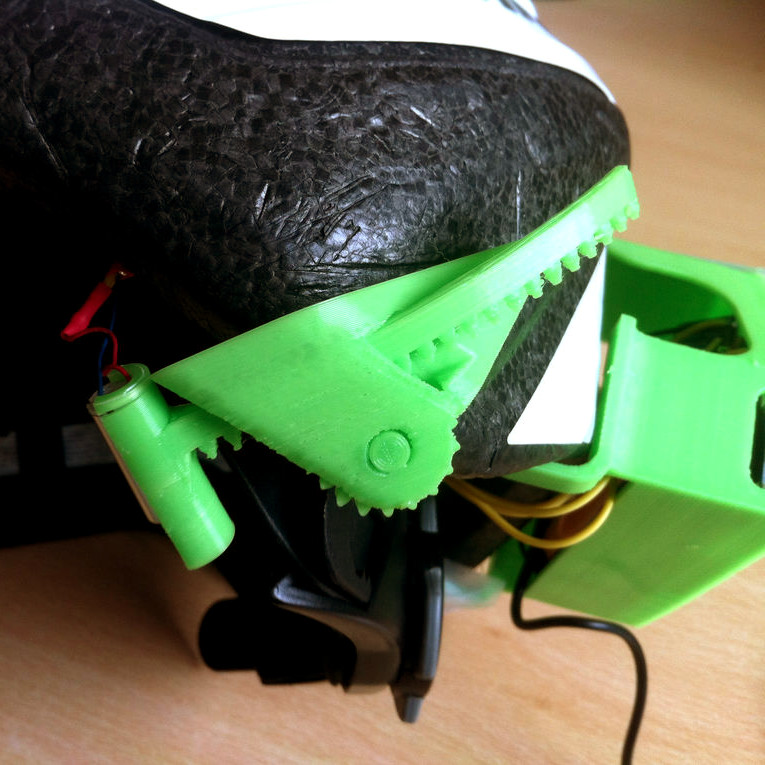
The bone conduction is cleverly achieved by driving small DC motors with an audio signal through a TPA2012 based audio amplifier, which is powered by a single 18650 cell. By using motors in place of speakers, and using a 3D printed enclosure to hold the motors up to a sweet spot just behind the ears, it’s possible to play music that only the wearer can hear and does not block environmental sounds.

[Matlek] didn’t just throw this together, either. This design was the result of researching bone conduction audio, gathering a variety of different components to use as transducers, testing which performed best, and testing different locations on the body. Just behind the ear was the sweet spot, with the bony area having good accessibility to a helmet-mounted solution. Amusingly, due to the contact between the motors and the rest of the hardware, the helmet itself acts as a large (but weak) speaker and faint music is audible from close range. [Matlek] plans to isolate the motors from the rest of the assembly to prevent this.

Another good way to get audio to transmit via bone conduction? Send it through the teeth. While maybe not the best option for a bike rider, biting down on this metal rod sends audio straight to your inner ear.

3D Printed Tank Has Slick Tread Design

Tank projects are great because while every tank design is the same in a fundamental way, there’s nevertheless endless variety in the execution and results. [Hoo Jian Li]’s 3D Printed Tank is smartly laid out and has an unusual tank tread that shows off some slick curves.

The tank itself is remotely controlled over Bluetooth with a custom controller that uses the common HC-05 Bluetooth radio units. The treads are driven by four hobby gearmotors with custom designed wheels, and run over an idler wheel in the center of the body. There isn’t any method of taking up slack in the track and a ripple in the top surface of the track is visible as it drives, but the tank is small enough that it doesn’t seem to mind much. STL files and source code is available on GitHub; unfortunately the repository lacks a wiring diagram but between the low component count, photos, and source code that’s not a show-stopper.

Tank treads see a lot of variation, from 3D printed designs for tracks that use a piece of filament as hinges to an attempt to use a conveyor belt as a tank tread for a go-kart. Some tank projects even eschew treads altogether and go for a screw drive.

A HID For Robots

Whether with projects featured here or out in the real world, we have a tendency to focus most upon the end product. The car, solar panel, or even robot. But there’s a lot more going on behind the scenes that needs to be taken care of as well, whether it’s fuel infrastructure to keep the car running, a semiconductor manufacturer to create silicon wafers, or a control system for the robot. This project is one of the latter: a human interface device for a robot arm that is completely DIY.

While robots are often automated, some still need human input. The human input can be required all the time, or can be used to teach the robot initially how to perform a task which will then be automated. This “keyboard” of sorts built by [Ahmed] comes with a joystick, potentiometer, and four switch inputs that are all fully programmable via an Arduino Due. With that, you can perform virtually any action with whatever type of robot you need, and since it’s based on an Arduino it would also be easy to expand.

The video below and project page have all the instructions and bill of materials if you want to roll out your own. It’s a pretty straightforward project but one that might be worth checking out since we don’t often feature controllers for other things, although we do see them sometimes for controlling telescopes rather than robots.

Continue reading “A HID For Robots”

Prestretched Fabric Prints Pop Into The Third Dimension

Printing on fabric might be a familiar trick, but adding stretch into the equation gives our fabric prints the ability to reconstitute themselves back into 3D. That’s exactly what [Gabe] has accomplished; he’s developed a script that takes open 3d meshes and converts them to a hexagonal pattern that, when 3D-printed on a stretched fabric, lets them pop into 3D upon relaxing the fabric.

[Gabe’s] algorithm first runs an open 3D surface through the “Boundary-First Flattening Algorithm,” which gives [Gabe] a 2D mesh of triangles. Triangles are then mapped to hexagons based on size, which produces a landscape of 2D hexagons. Simply printing this hexagonal pattern onto prestretched fabric defines the shape of the object that will surface when the fabric is allowed to relax. As for how to wrap our heads around the mapping algorithm, as [Gabe] explains it, “The areas that experienced the most shrinkage in the flattening process should experience the least shrinkage when the fabric contracts after printing, and the regions that experienced little to no shrinkage in the flattening process should contract as much as possible in the fabric representation.”

If that seems tricky to visualize, just imagine taking a cheap halloween mask and trying to crush it flat onto a table. To smush it perfectly flat, some sections need to stretch while others need to shrink. Once flat though, we can simply keep stretching to remove all the sections that needed to shrink. At this point, if our material were extremely elastic, we could simply let go and watch our rubber mask jump back into 3D. That’s the secret behind [Gabe’s] hexagonal pattern. The size and spacing of these hexagons limit the degree to which local regions of the fabric are allowed to contract. In our rubber mask example, the sections that we stretched out the furthest have the most to travel, so they should contract as much as possible, while the sections that shrank in the initial flattening (although we kept stretching until they too needed to stretch) should shrink the least.

We’ve seen some classy fabric-printing tricks in the past. If you’re hungry for more 3D printing on fabric, have a look at [David Shorey’s] flexible fabric designs.

Thanks for the tip, [Amy]!

An Electromagnet Brings Harmony To This Waving Cat

We’ve noticed waving cats in restaurants and stores for years, but even the happy bobbing of their arm didn’t really catch our attention. Maybe [Josh] had seen a couple more than we have when it occurred to him to take one apart to see how they work. They are designed to run indoors from unreliable light sources and seem to bob along forever. How do the ubiquitous maneki-neko get endless mechanical motion from one tiny solar cell?

Perhaps unsurprisingly given the prevalence and cost of these devices, the answer is quite simple. The key interaction is between a permanent magnet mounted to the end of the waving arm/pendulum and a many-turn wire coil attached to the body. As the magnet swings over the coil, its movement induces a voltage. A small blob of analog circuitry reacts by running current through the coil. The end effect is that it “senses” the magnet passing by and gives it a little push to keep things moving. As long as there is light the circuit can keep pushing and the pendulum swings forever. If it happens to stop a jolt from the coil starts the pendulum swinging and the rest of the circuit takes over again. [Josh] points to a similar circuit with a very nice write up in an issue of Nuts and Volts for more detail.

We’ve covered [Josh]’s toy teardowns before and always find this category of device particularly interesting. Toys and gadgets like the maneki-neko are often governed by razor-thin profit margins and as such must satisfy an extremely challenging intersection of product constraints, combining simple design and fabrication with just enough reliability to not be a complete disappointment.

For more, watch [Josh] describe his method in person after the break, or try flashing his code to an Arduino and make a waving cat of your own.

Continue reading “An Electromagnet Brings Harmony To This Waving Cat”

Trashed Vector Game Console Revived With Vintage IBM Monitor

We’ve all had the heartbreak of ordering something online, only to have it arrive in less than mint condition. Such are the risks of plying the global marketplace, only more so for used gear, which seems to be a special target for the wrath of sadistic custom agents and package handlers all along the supply chain.

This cruel fate befell a vintage Vectrex game console ordered by [Senile Data Systems]; the case was cracked and the CRT was an imploded mass of shards. Disappointing, to say the least, but not fatal, as he was able to make a working console from the remains of the Vectrex and an old IBM monitor. The Google translation is a little rough, but from what we can gather, the Vectrex, a vector-graphics console from the early 80s with such hits as MineStorm, Star Castle, and Clean Sweep, was in decent shape apart from the CRT. So with an old IBM 5151 green phosphor monitor, complete with a burned-in menu bar, was recruited to stand in for the damaged components. The Vectrex guts, including the long-gone CRT’s deflection yoke assembly, were transplanted to the new case. A little room was made for the original game cartridges, a new controller was fashioned from a Nintendo candy tin, and pretty soon those classic games were streaking and smearing across the long-persistence phosphors. We have to admit the video below looks pretty trippy.

If arcade restorations are your thing, display replacements like this are probably part of the fun. Here’s a post about replacing an arcade display with a trash bin CRT TV, an important skill to have is this business.

Continue reading “Trashed Vector Game Console Revived With Vintage IBM Monitor”

This Is Your Last Chance To Design The Greatest Robotics Modules

It’s Friday, and that means this is your last weekend to get your project together for the Robotics Module Challenge in this year’s Hackaday Prize. We’re looking for tools for robots that blow the doors off what is commercially available. If you have a project in mind that adds sensors or capabilities to our fine electronic friends, enter it in the Hackaday Prize.

The Hackaday community has thrown itself full-force into the Hackaday Prize, and right now we’re getting very close to eight hundred projects entered in this year’s Prize. Next week, we’ll choose the top twenty projects entered during the Robotics Module Challenge to advance to the finals. Each of those twenty projects will be awarded $1,000 and be in the running to win the Grand Prize of $50,000 and four other top cash prizes.

This is your last chance to get in on the Robotics Module Challenge. For this Challenge, we’re looking for modules that can be used in robotics projects across the world. This could be a motor driver, sensor package, or even 3D printed tweels. Don’t wait — start your entry now.

Continue reading “This Is Your Last Chance To Design The Greatest Robotics Modules”