SMT Part Counter Aims To Ease Taking Inventory

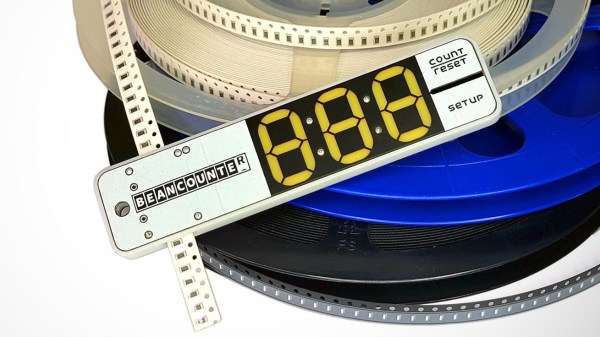
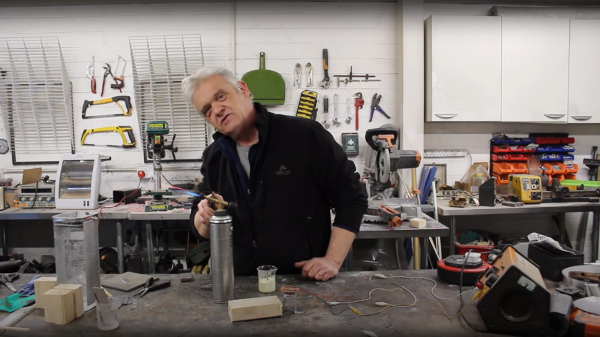
[Nick Poole] has an interesting idea for a new tool, one that has the simple goal of making accurate part counts of SMT reels as easy as pulling tape through a device. That device is the BeanCounter, an upcoming small handheld unit of his own design that counts parts as quickly as one can pull tape through a slot. The device is powered by a CR2032 cell and and works with 8 mm wide tapes up to 2 mm in height, which [Nick] says covers most 0805 or smaller sized parts, as well as things like SOT-23 transistors.

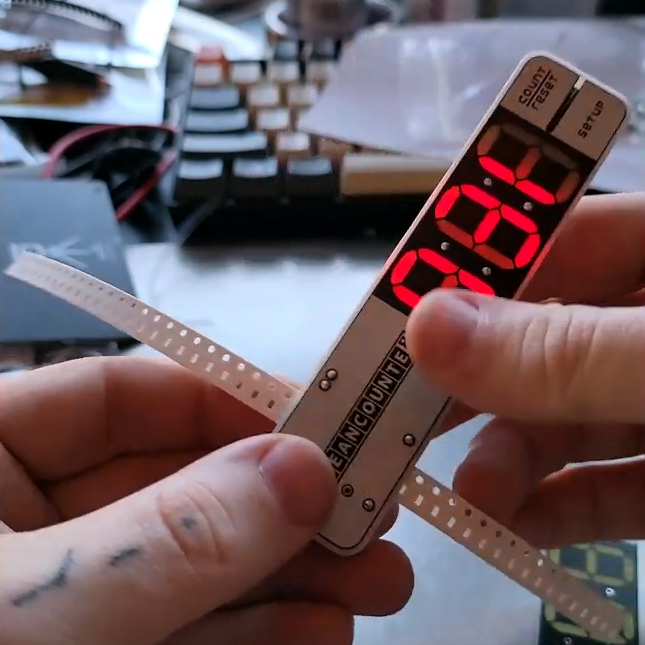
Why would one want to make such a task easier? Two compelling reasons for such a tool include: taking inventory of parts on partial reels or cut tape, and creating segments that contain a known number of parts.

The first is handy for obvious reasons, and the second is useful for things like creating kits. In fact, the usefulness of this tool for creating tape segments of fixed length is perhaps not obvious to anyone who hasn’t done it by hand. Sure, one can measure SMT tape with a ruler or a reference mark to yield a segment containing a fixed number of parts, but that involves a lot of handling and doesn’t scale up very well. In fact, the hassle of cutting tape segments accurately and repeatedly is a common pain point, so making the job easier has value.

If you looked at the photos and suspected that the big, 7-segment numeric display is done with clever PCB fabrication options (making segments by shining LEDs through PCB layers, a trick we always like to see) you’re not alone. After all, [Nick] has a lot of experience in getting clever with board fabrication, and eagle-eyed readers may even suspect that the reset and setup buttons on the edge of the tool are created by using flex PCB segments as switches. Want the nitty-gritty details? Visit the GitHub repository for the project and see it all for yourself at the CAD level.

Turning Scrap Copper Into Beautiful Copper Acetate Crystals

Crystals, at least those hawked by new-age practitioners for their healing or restorative powers, will probably get a well-deserved eye roll from most of the folks around here. That said, there’s no denying that crystals do hold sway over us with the almost magical power of their beauty, as with these home-grown copper acetate crystals.

The recipe for these lovely giant crystals that [Chase Lean] shares is almost too simple — just scrap copper, vinegar, and a bit of hydrogen peroxide — and just the over-the-counter strength versions of those last two. The process begins with making a saturated solution of copper acetate by dissolving the scrap copper bits in the vinegar and peroxide for a couple of days. The solution is concentrated by evaporation until copper acetate crystals start to form. Suspend a seed crystal in the saturated solution, and patience will eventually reward you with a huge, shiny blue-black crystal. [Chase] also shares tips for growing crystal clusters, which have a beauty of their own, as do dehydrated copper acetate crystals, with their milky bluish appearance.

Is there any use for these crystals? Probably not, other than their beauty and the whole coolness factor of watching nature buck its own “no straight lines” rule. And you’ll no doubt remember [Chase]’s Zelda-esque potassium ferrioxalate crystals, or even when he turned common table salt into perfect crystal cubes.

Bring Precision To The Woodshop With An Electronic Router Lift

One of the knocks that woodworkers get from the metalworking crowd is that their chosen material is a bit… compliant. Measurements only need to be within a 1/16th of an inch or so, or about a millimeter, depending on which side of the Atlantic you’re on. And if you’re off a bit? No worries, that’s what sandpaper is for.

This electronic router lift is intended to close the precision gap and make woodworking a bit less subjective. [GavinL]’s build instructions are clearly aimed at woodworkers who haven’t dabbled in the world of Arduinos and stepper motors, and he does an admirable job of addressing the hesitancy this group might feel when tackling such a build. Luckily, a lot of the mechanical side of this project can be addressed with a commercially available router lift, which attaches to a table-mounted plunge router and allows fine adjustment of the cutting tool’s height from above the table.

What’s left is to add a NEMA 23 stepper to drive the router lift, plus an Arduino to control it. [GavinL] came up with some nice features, like a rapid jog control, a fine adjustment encoder, and the ability to send the tool all the way up or all the way down quickly. Another really nice touch is the contact sensor, which is a pair of magnetic probes that attach temporarily to the tool and a height gauge to indicate touch-off. Check the video below to see it all in action.

One quibble we have with [GavinL]’s setup is the amount of dust that the stepper will be subjected to. He might need to switch out to a dustproof stepper sooner rather than later. Even so, we think he did a great job bridging the gap between mechatronics and woodworking — something that [Matthias Wandel] has been doing great work on, too.

Continue reading “Bring Precision To The Woodshop With An Electronic Router Lift”

Copper: Rectifying AC A Century Ago

[Robert Murray-Smith] presents for us an interesting electronic device from years gone by, before the advent of Silicon semiconductors, the humble metal oxide rectifier. After the electronic dust had settled following the brutal AC/DC current wars of the late 19th century — involving Edison, Tesla and Westinghouse to name a few of the ringleaders — AC was the eventual winner. But there was a problem. It’s straightforward to step down the high voltage AC from the distribution network to a more manageable level with a transformer, and feed that straight into devices which can consume alternating current such as light bulbs and electrical heaters. But other devices really want DC, and to get that, you need a rectifier.

It turns out, that even in those early days, we had semiconductor devices which could perform this operation, 
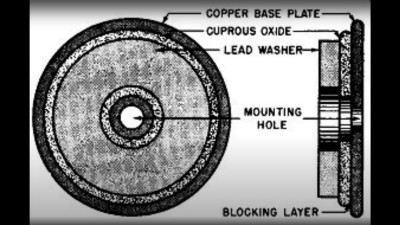
based not upon silicon or germanium, but copper. Copper (I) Oxide is a naturally occurring P-type semiconductor, which can be easily constructed by heating a copper sheet in a flame, and scraping off the outer layer of Copper (II) Oxide leaving the active layer below. Simply making contact to a piece of steel is sufficient to complete the device.

Obviously a practical rectifier is a bit harder to make, with a degree of control required, but you get the idea. A CuO metal rectifier can rectify as well as operate as a thermopile, and even as a solar cell, it’s just been forgotten about once we got all excited about silicon.

Other similar metallic rectifiers also saw some action, such as the Selenium rectifier, based on the properties of a Cadmium Selenide – Selenium interface, which forms an NP junction, albeit one that can’t handle as much power as good old copper. One final device, which was a bit of an improvement upon the original CuO rectifiers, was based upon a stack of Copper Sulphide/Magnesium metal plates, but they came along too late. Once we discovered the wonders of germanium and silicon, it was consigned to the history books before it really saw wide adoption.

We’ve covered CuO rectifiers before, but the Copper Sulphide/Magnesium rectifier is new to us. And if you’re interested in yet more ways to steer electrons in one direction, checkout our coverage of the history of the diode.

Continue reading “Copper: Rectifying AC A Century Ago”

2022 Sci-Fi Contest: Glowing LED Cubes Make Captivating Artifacts

LED cubes were once an exercise in IO mastery, requiring multiplexing finesse in order to drive arrays of many LEDs. Going RGB only increased the challenge. This build from [DIY GUY Chris] shows how much easier it is these days, when every LED has a smart addressable controller on board, and serves as a great sci-fi prop to boot.

Yes, the build relies on the venerable WS2812B addressable LEDs, soldered up in 5×5 grids on each of the six faces of the cube. Running the show is the Raspberry Pi RP2040 microcontroller, sourced here as an individual part rather than in its development board form. An SPI memory chip is on board for the code, along with a USB-C connector for programming. Signals pass around the cube via soldered connections along the edges of the custom PCBs that make up the faces of the solid.

Sitting on its 3D printed stand, the cube glows brightly while drawing a full 2 amps of power. [Chris] coded up a variety of animations, from simple color breathing routines to frantic dazzle animations sure to captivate any cyberpunk thieves that come to steal your magic glowing artifact.

If rectangular prisms aren’t your fancy, though, you can always consider building yourself a glowing D20 instead. Video after the break.

Continue reading “2022 Sci-Fi Contest: Glowing LED Cubes Make Captivating Artifacts”

A Rotary Encoder: How Hard Can It Be?

As you may have noticed, I’ve been working with an STM32 ARM CPU using Mbed. There was a time when Mbed was pretty simple, but a lot has changed since it has morphed into Mbed OS. Unfortunately, that means that a lot of libraries and examples you can find don’t work with the newer system.

I needed a rotary encoder — I pulled a cheap one out of one of those “49 boards for Arduino” kits you see around. Not the finest encoder in the land, I’m sure, but it should do the job. Unfortunately, Mbed OS doesn’t have a driver for an encoder and the first few third-party libraries I found either worked via polling or wouldn’t compile with the latest Mbed. Of course, reading an encoder isn’t a mysterious process. How hard can it be to write the code yourself? How hard, indeed. I thought I’d share my code and the process of how I got there.

There are many ways you can read a rotary encoder. Some are probably better than my method. Also, these cheap mechanical encoders are terrible. If you were trying to do precision work, you should probably be looking at a different technology like an optical encoder. I mention this because it is nearly impossible to read one of these flawlessly.

So my goal was simple: I wanted something interrupt driven. Most of what I found required you to periodically call some function or set up a timer interrupt. Then they built a state machine to track the encoder. That’s fine, but it means you eat up a lot of processor just to check in on the encoder even if it isn’t moving. The STM32 CPU can easily interrupt with a pin changes, so that’s what I wanted.

The Catch

The problem is, of course, that mechanical switches bounce. So you have to filter that bounce either in hardware or software. I really didn’t want to put in any extra hardware more than a capacitor, so the software would have to handle it.

I also didn’t want to use any more interrupts than absolutely necessary. The Mbed system makes it easy to handle interrupts, but there is a bit of latency. Actually, after it was all over, I measured the latency and it isn’t that bad — I’ll talk about that a little later. Regardless, I had decided to try to use only a pair of interrupts.

Continue reading “A Rotary Encoder: How Hard Can It Be?”

Picture of the setup described in the article, with PCI-E cards strewn around the desk, all interconnected, and a powered-up laptop, a large TV screen behind the laptop

This Laptop Gets All The PCIe Devices

Did you ever feel like your laptop’s GPU was sub-optimal, or perhaps that your laptop could use a SAS controller? [Rob Rogers] felt like that too, so now he has the only Dell Latitude business-class laptop that’s paired with an AMD RX580 GPU – and more. Made possible because of a PCIe link he hijacked from the WiFi card, he managed to get a SAS controller, a USB 3.0 expansion card, the aforementioned GPU and a dual-port server network adapter, all in a single, desk-top setup, as the video demonstrates.

First off, we see a PCIe packet switch board based on a PLX-made chip, wrapped in blue tape, splitting a single PCIe x1 link into eight. The traditional USB 3.0 cables carry the downstream x1 links to the four PCIe cards connected, all laid out on [Rob]’s desk. [Rob] demonstrates that all of the cards indeed function correctly – the SAS controller connected to a server backplane with whole 22 TB of storage in it, a few devices plugged into a USB 3.0 card, an Ethernet cable with an active link in the network card, and wrapping up the video showing 3DMark results of the RX580 clearly paired with the laptop’s mobile CPU. There’s four more spots on the PCIe switch card, so if you wanted to connect a few NVMe SSDs without the costly USB enclosures that usually entails, you absolutely could!

The setup on the desk, laptop-less, still interconnected and with the mini pci-e adapter visible
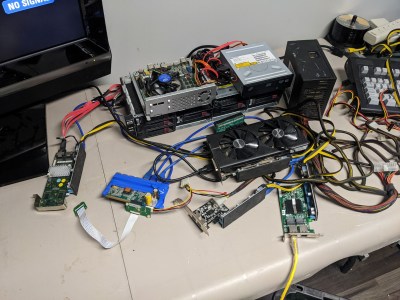
Now, there’s a reason why we don’t see more of such hacks. This seems to be a Latitude E5440 and the card is plugged into a mini-PCIe slot, which means the entire contraption is bound by a single PCI-E Gen2 x1 link, heavily offsetting the gains you’d get from an external GPU when, say, gaming. However, when it comes to the types and amount of peripherals, this is unbeatable – if you want to add an external GPU, high-speed networking and a SAS controller to the same computer that you usually lug around, there isn’t really a dock station you can buy for that!

Our collection of cool PCIe hacks has been growing, with hackers adding external GPUs through ExpressCard and mini PCIe alike, fitting PCIe slots where the factory refused to provide one, and extending the onboard M.2 slots for full-size PCIe cards. Nowadays, with these packet switches, it’s easy as ever to outfit any PCIe capable device with a whole slew of features – as this Raspberry Pi Computer Module motherboard with eleven PCIe slots demonstrates. Wonder how PCIe works, and why all of that is possible? We’ve written an entire article on that!

Continue reading “This Laptop Gets All The PCIe Devices”