Teardown: KC Bearifone Could Talk Circles Around Teddy Ruxpin

At the risk of dating myself, I will tell you that grew up in the 80s — that decade of excess that was half drab and half brightly colored, depending on where you looked, and how much money you had for stuff like Memphis design. Technology seemed to move quickly in almost every aspect of life as the people of the Me decade demanded convenience, variety, and style in everything from their toilet paper (remember the colors?) to their telephones. Even though long distance cost a fortune back then, we were encouraged to ‘reach out and touch someone’.

A Healthy Fear of Bears

Looking back, it’s easy to see how all that advanced technology and excess filtered down to children. I may be biased, but the 80s were a pretty awesome time for toys, and for children’s entertainment in general. Not only were the toys mostly still well-made, even those that came in quarter machines — many of them were technologically amazing.

Take Teddy Ruxpin, which debuted in 1985. Teddy was the world’s first animatronic children’s toy, a bear that would read stories aloud from special cassette tapes, which moved his eyes and mouth along with the words. One track contained the audio, and the other controlled three servos in his face.

I remember watching the commercials and imagining Teddy suddenly switching from some boring bedtime story over to a rockin’ musical number a là the animatronic Rock-afire Explosion band at ShowBiz Pizza (a Chuck E. Cheese competitor). That’s the kind of night I wanted to be having.

The current lineup of the Rock-afire Explosion. Image via Servo Magazine

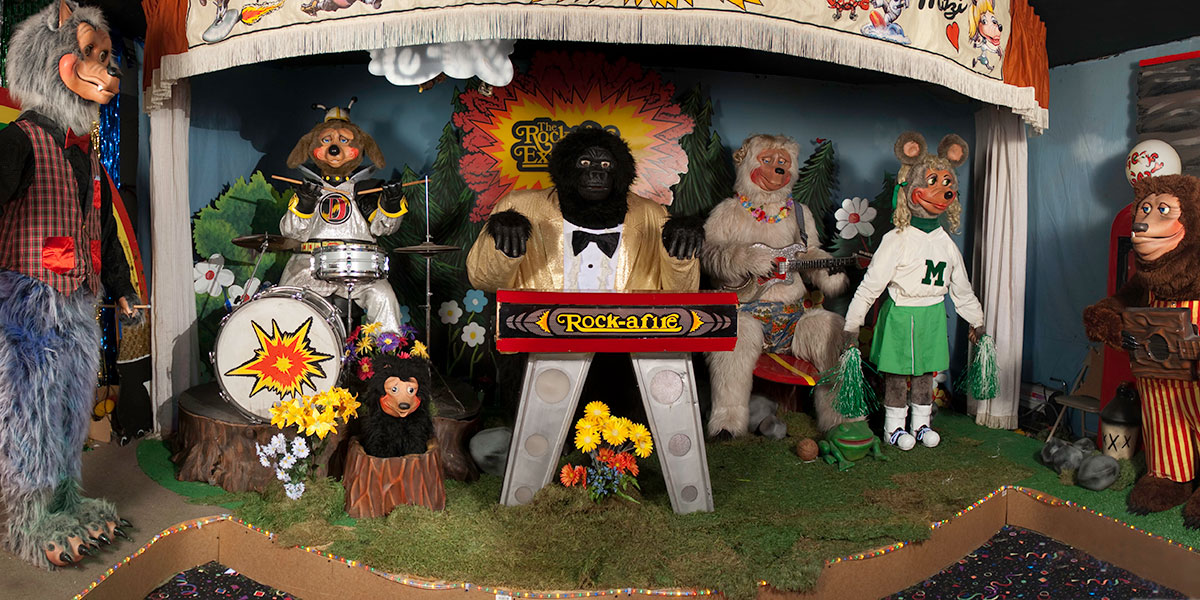
Although I went to ShowBiz a fair number of times to play Skee-Ball and stare at the Rock-afire Explosion animals and their cool set pieces, I never did have a Teddy Ruxpin. I remember being torn between wanting one and thinking they were kind of scary, which in turn made me a bit tangentially afraid of the Snuggle bear. When it came down to it, Teddy simply cost too much — $69.99 for the bear alone, and another $20 for a single cassette with storybook. And that’s 1985 dollars — according to my favorite inflation calculator, that’s $250 in today’s money for a talking bear and one lousy story.

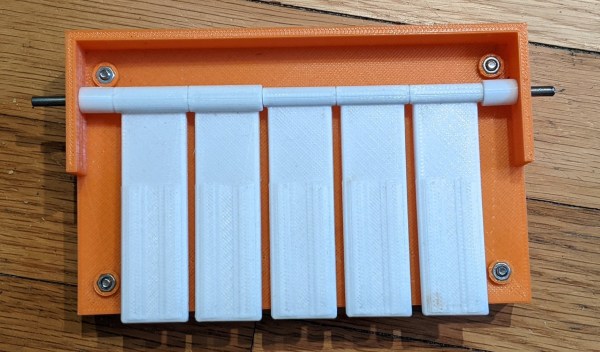
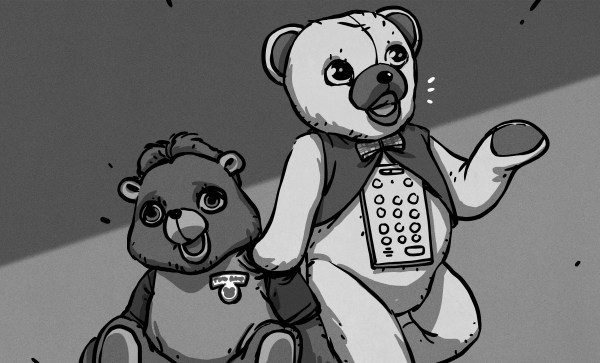
Which brings us to KC Bearifone, an animatronic teddy bear telephone. Honestly, part of the reason I bought the Bearifone was some sort of false nostalgia for Teddy. The main reason is that I wanted to own a Teleconcepts unit of some kind, and this one seemed like the most fun to mess around with. A robot teddy bear that only does speakerphone? Yes, please.

Continue reading “Teardown: KC Bearifone Could Talk Circles Around Teddy Ruxpin”

Sketch of the two proprietary carriers showing their differences - one of them has a cutout under the antenna, while the other one does not.

Design Your CM4 Carrier With WiFi Performance In Mind

The Raspberry Pi Compute Module 4 has a built-in WiFi antenna, but that doesn’t mean it will work well for you – the physical properties of the carrier board impact your signal quality, too. [Avian] decided to do a straightforward test – measuring WiFi RSSI changes and throughput with a few different carrier boards. It appears that the carriers he used were proprietary, but [Avian] provides sketches of how the CM4 is positioned on these.

There’s two recommendations for making WiFi work well on the CM4 – placing the module’s WiFi antenna at your carrier PCB’s edge, and adding a ground cutout of a specified size under the antenna. [Avian] made tests with three configurations in total – the CMIO4 official carrier board which adheres to both of these rules, carrier board A which adheres to neither, and carrier board B which seems to be a copy of board A with a ground cutout added.

Graph plotting WiFi RSSI for each of the three carriers in each of the six locations. CMIO4 consistently outperforms both, while carrier B outperforms the carrier A, but by a more narrow margin.
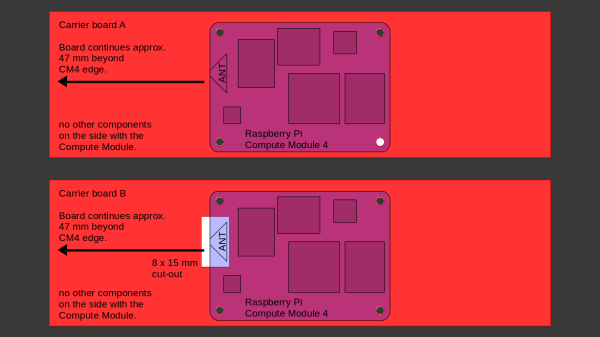
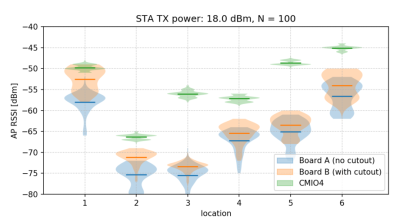
After setting up some test locations and writing a few scripts for ease of testing, [Avian] recorded the experiment data. Having that data plotted, it would seem that, while presence of an under-antenna cutout helps, it doesn’t affect RSSI as much as the module placement does. Of course, there’s way more variables that could affect RSSI results for your own designs – thankfully, the scripts used for logging are available, so you can test your own setups if need be.

If you’re lucky to be able to design with a CM4 in mind and an external antenna isn’t an option for you, this might help in squeezing out a bit more out of your WiFi antenna. [Avian]’s been testing things like these every now and then – a month ago, his ESP8266 GPIO 5V compatibility research led to us having a heated discussion on the topic yet again. It makes sense to stick to the design guidelines if WiFi’s critical for you – after all, even the HDMI interface on Raspberry Pi can make its own WiFi radio malfunction.

Injection Molds: Aluminum Or Resin?

[JohnSL] and his friend both have injection molding machines. They decided to compare the aluminum molds they usually use with some 3D printed molds created with a resin printer. They used two different resins, one on each side of the mold. You can see a video of the results below.

One half of the mold used ordinary resin while the other side used a resin that is made to hold up to higher temperatures. As you might expect, the lower-temperature resin didn’t stand up well to molten plastic. However, the higher temperature resin did somewhat better. It makes sense, though, that an aluminum mold draws more heat out of the plastic which is helpful in the molding process.

The higher temperature — and more expensive — resin did seem to hold up rather well, though. Of course, this was just to test. In real life, you’d want to use the better resin throughout.

No surprise, the resin molds didn’t last nearly as long as a proper mold. After 70 shots, the mold was worn beyond what you’d want to use. So not necessarily something you’d want to use for a real production run, but it should be enough for a quick prototype before you go to the expense of creating a proper mold.

We wonder if there are some other tricks to get better results. A comment from [TheCrafsMan] suggests that clear resin UV cures better, and that might produce better results. In fact, there are a lot of interesting comments on the video from people who have varied experiences trying to do the same thing.

If nothing else, watching the mill cut through the aluminum around the 15-minute mark is always interesting to watch.  If you don’t already have an injection molding setup, you can always build one. We’ve seen more than one design.

Continue reading “Injection Molds: Aluminum Or Resin?”

This Custom Workbench Will Make You Flip

In a recent video, [SomeSkillStudio] created a tidy tool storage system for their slim garage workbench. We have seen the “five knuckle” 270 degree hinges used here before and knew they’d enable some cool hacks. Here you’ll see how he puts this unique type of hardware to work building a densely packed work surface. For anyone who’s set up shop in a garage that’s somehow also supposed to still regularly host vehicles, you’ll know how important it is to have a place to put everything away and make it easy to do so.

The video has several great tips on making sure everything fits together, something key for anyone reproducing this with their own tool collection. If you have even less space, we have some great past workshop builds from portable, to tiny, to elaborate. Even if you’ve already established a place to work, we have tips on organizing your shop, giving each tool a home in a shadow board or across an infinite grid. Clearly, making a work space is one of our favorite kinds of projects.

Continue reading “This Custom Workbench Will Make You Flip”

DIY Night Vision, Where Four Is Better Than Two

Night vision projects are great, and the hardware available to hobbyists just gets better and better. [Just Call Me Koko] shows off just such a build using four low-light, IR-sensitive cameras, four displays, and four lenses in 3D printed enclosures mounted to a helmet. Why four? Well, mounting two cameras and displays per eye is the easiest way to yield a wider field of view, and for bonus points, it sure looks extra weird.

At its heart, each of the four segments is the same. A Foxeer Night Cat 3 camera is mounted at the front, its output is connected directly to a 2″ diagonal NTSC/PAL display, and at the rear is a DCX (double convex) lens 38 mm in diameter with a 50 mm focal length. Add a printed enclosure, and the result is a monocular night vision display. Do it three more times and arrange them around one’s eyeballs, and one can make a night vision system with a panoramic view that probably takes only a little getting used to.

How well does it work? [Just Call Me Koko] does some walking around and also tries some target practice while wearing them, and concludes that while they don’t have nearly the clarity of the real deal (the 320×240 resolution displays limit the details one can perceive), they do work fairly well for what they are. Also, the cost of parts is a small fraction of the cost of the real thing, making it a pretty enjoyable project in the end.

The kind of hardware available to hobbyists today is what makes this kind of night vision project accessible, but there’s always the good old high-voltage analog method.

Continue reading “DIY Night Vision, Where Four Is Better Than Two”

Hackaday Links Column Banner

Hackaday Links: June 26, 2022

Head for the hills!! We’re all doomed! At least that’s the impression you might get from the headlines about the monster Earth-facing sunspot this week. While any sunspot that doubles in size within a matter of days as AR3038 has done is worth looking at, chances are pretty low that it will cause problems here on Earth. About the best this class of sunspot can manage is an M-class solar flare, which generally cause radio blackouts only at the poles, and may present a radiation problem for the crew of the ISS. So no, this sunspot is probably not going to kill us all. But then again, this is the 2020s, and pretty much everything bad seems like it’s possible.

Speaking of bad outcomes, pity the poor Sonos customers and their ongoing battle with the company’s odd “glitches.” For whatever reason, customers have been getting shipments of Sonos products they never ordered, with at least one customer getting over $15,000 worth of products shipped. The customer reports ordering five Sonos items, but the company saw fit to fill the order six times, stuffing their apartment with goods. Sonos doesn’t appear to be doing much to make it right; while offering the customer free shipping labels to return the goods, they were expected to schlep the packages to a UPS store. And then there’s the money — Sonos charged the customer for all the unordered goods, and won’t issue a refund till it’s all returned.

If you’ve ever wondered exactly what the signals going up and down your cable line look like, you’ll want to check out this video from Double A Labs. Using an RTL-SDR dongle and some spectrum analyzer software they probed the RF signals on the cable, with some fascinating results. The first 11 minutes or so of the video are devoted to setting up the hardware and software, although there is some interesting stuff about broadband network architecture right up at the start. The scans are interesting — you can clearly see the 6-MHz quadrature amplitude modulation (QAM) digital channels. We were surprised to learn that these start at just about the FM broadcast band — about 108 MHz. There were a couple of little surprises hiding in the spectrum, like two unmodulated analog TV carriers in one spot, and the fact that there are over 400 virtual channels jammed into 41 6-MHz QAM channels. Broadband indeed.

Continue reading “Hackaday Links: June 26, 2022”

A 3D-printed five-key chorded keyboard

Odd Inputs And Peculiar Peripherals: Chorded Keyset Recreates Engelbart’s Vision

Douglas Engelbart’s 1968 “Mother of all Demos” introduced the world to a whole range of technologies we take for granted today, the most prominent being his great invention, the computer mouse. However, the MOAD also showcased things like cut-and-paste text editing, a point-and-click interface, video conferencing, and even online collaboration à la Google Docs. One of the innovations shown that for some reason didn’t stand the test of time was the chorded keyboard: an input device with five keys that can be pressed simultaneously in different combinations, the same way you would play chords on a piano.

A 3D-printed five-key chorded keyboard
The Engelbart Keyset comes with both USB host and USB client ports

While a handful of attempts have been made over the years to bring new life to the “chorder”, it failed to achieve mainstream appeal and remains a curiosity to this day. That makes it a natural fit for the Odd Inputs and Peculiar Peripherals contest, as we can see in [Russ Nelson]’s submission called the Engelbart Keyset, which aims to create a modern 3D printed chorder that works exactly as Engelbart intended it.

It’s important to note that the chorded keyboard was not meant to be just an additional set of five keys. Instead, Engelbart showed the clever interplay between the chorder and the mouse: the five keys under his left hand and the three mouse buttons under his right could be combined to create a full 8-bit input device. [Russ]’s device therefore includes a USB host interface to connect a USB mouse as well as a USB client interface that presents itself as a combination mouse/keyboard device to the PC.

The brains of the device are formed by a Teensy 4.1, which reads out the codes sent by the mouse as well as the five keys on top. If one or more of those keys are pressed together with a mouse button, then a keyboard code is generated corresponding to Engelbart’s original keycode mapping. We’re wondering how practical this whole setup would be in real life; it looks like something you’d have to try hands-on to find out. Fortunately, all the schematics, code and STL files are available on the project page, so with just a bit of work you can have your own MOAD setup on your desk today.

We’ve featured a couple of chorded keyboards on these pages; the Pico Chord, the Chordie and the BAT spring to mind. If you’re looking for a recap of Engelbart’s stunning presentation, check out our piece on the Mother of all Demos, 50 years on.