What The Scale? Mouse Teardown Throws Up A Few Surprises

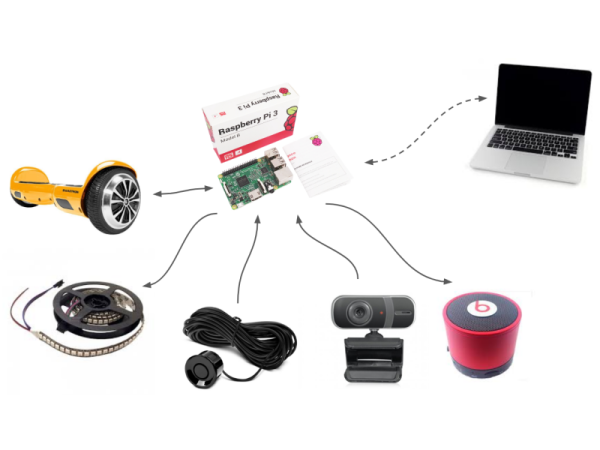
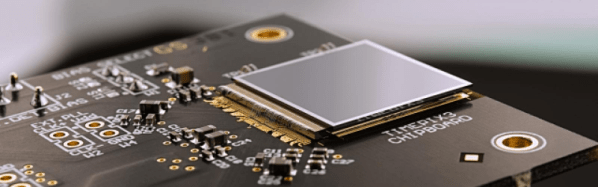
[Eric Weinhoffer] and his colleagues did a great comparative tear down of the MX Master 3 and the MX Master 2S mice from Logitech. Tear down’s are great fun and often end up teaching us a lot. Looking at the insides of a product can tell us a great deal about how to solve certain problems, or avoid pitfalls. Opening up two versions of the same product provides an even greater wealth of useful information on how product design evolves based on lessons learned from the earlier versions. Logitech is no greenhorn when it comes to Mice design, so the MX Master 2S was already almost perfect. But looking at the Master MX 3 shows where the earlier version fell short of expectations and how it could be improved upon.

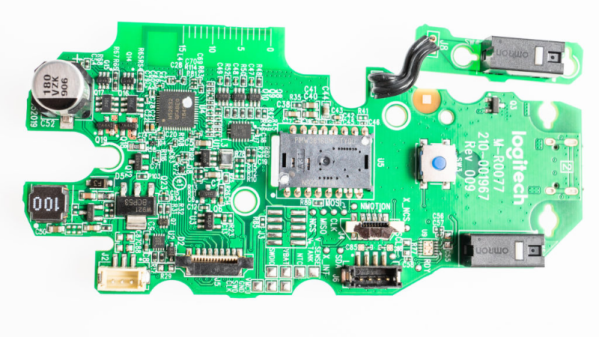
These mice have intelligent scroll wheels, which can rotate in either “detente” or “freewheel” modes. Detente allows slower, precise scrolling, while freewheeling allows rapid scrolling. The two mice models have completely different, and interesting, methods of achieving these actions. The older version has a rubber-coated wheel and uses a motor, which turns a cam. This forces a detent ball onto the inside of the wheel for detent mode and releases it for free mode. Once the rubber wears off, the mouse is pretty much headed for the dumpster. The new metal wheel does away with the rubber coating as well as the noisy, slow, and prone to wear-and-tear motor assembly. The actuation is now done using a bi-stable electromagnet. A 25 V pulse magnetizes the coil which sits inside the wheel and it pulls on little metal teeth on the inside rim of the wheel. This gives a noiseless detente feel, without any physical contact. A second 25 V spike de-magnetizes the coil, allowing the scroll wheel to spin freely.

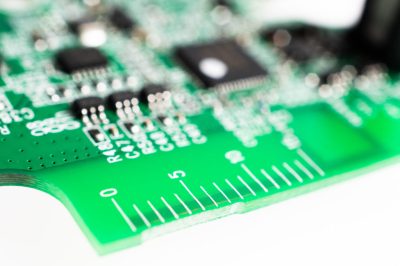
[Eric] points out several incremental changes in design which have resulted in improved ergonomics. He also uncovers a few nuggets of useful information. The use of interchangeable mold inserts help make molds last longer while still offering the flexibility to make changes in the molded part. It’s interesting to see special components being used for withstanding vibration and high-G forces. Some of these insights can be useful for those moving from prototyping to production. There’s one puzzling feature on the new PCB that [Eric] cannot figure out. There is a 15 mm scale screen-printed over the blue tooth antenna. If you have an answer on its purpose, let us know in the comments below.

If you are left-handed (which makes 10% of us), you’re out of luck with these right-handed mice and might like to sign one of the several online petitions demanding lefty versions.

Python Script Sends Each Speaker Its Own Sound File

When it comes to audio, the number of speakers you want is usually governed by the number of tracks or channels your signal has. One for mono, two for stereo, four for quadrophonic, five or more for surround sound and so on. But all of those speakers are essentially playing different tracks from a “single” audio signal. What if you wanted a single audio device to play eight different songs simultaneously, with each song being piped to its own speaker? That’s the job [Devon Bray] was tasked with by interdisciplinary artist [Sara Dittrich] for one of her “Giant Talking Ear” installation project. He built a device to play multiple sound files on multiple output devices using off the shelf hardware and software.

But maybe a hack like this could be useful in many applications other than just art installations. It could be used in an Escape room, where you may want the various audio streams to start in synchronicity at the same time, or as part of a DJ console, sending one stream to the speakers and another to the head phones, or a game where you have to run around a room full of speakers in the right sequence and speed to listen to a full sentence for clues.

His blog post lists links for the various pieces of hardware required, although all of it is pretty generic, and the github repository hosts the code. At the heart of the project is the Sounddevice library for python. The documentation for the library is sparse, so [Bray]’s instructions are handy. His code lets you “take a directory with .wav files named in numeric order and play them over USB sound devices attached to the host computer over and over forever, looping all files once the longest one finishes”. As a bonus, he shows how to load and play sound files automatically from an attached USB drive. This lets you swap out your playlist on the Raspberry Pi without having a use a keyboard/mouse, SSH or RDP.

Check the video after the break for a quick roundup of the project.

Continue reading “Python Script Sends Each Speaker Its Own Sound File”

New Part Day : A Sensor Chip For 3D Color X-Ray Imaging

We all know CERN as that cool place where physicists play with massive, superconducting rings to smash atoms and subatomic particles to uncover secrets of matter in the Universe. To achieve this aim, they need to do a ton of research in other areas, such as development of special particle detectors.

While such developments are essential to the core research needs of the Centre, they also lead to spinoff applications for the benefit of society at large. One such outcome has been the Medipix Collaborations – a family of read-out chips for particle imaging and detection that can count single photons, allowing X-rays and gamma rays to be converted to electrical signals. It may not be possible for us hackers to get our hands on these esoteric sensors, but these devices are pretty interesting and deserve a closer look. Medipix sensors work like a camera, detecting and counting each individual particle hitting the pixels when its electronic shutter is open. This enables high-resolution, high-contrast, noise hit free images – making it unique for imaging applications.

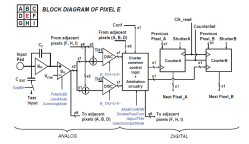
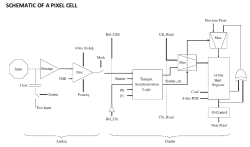
Some months back, CERN announced the first 3D color X-ray of a human made possible using the Medipix devices. The result is a high-resolution, 3D, color image of not just living structures like bones, muscular tissues and vessels, but metal objects too like the wrist watch, seen in the accompanying photograph. The Medipix sensors have been in development since the 1990’s and are presently in their 4th “generation”. Each chip consists of a top semiconducting sensor array, made from gallium arsenide or cadmium telluride. The charge collected by each pixel is transported to the CMOS ASIC electronics via “bump bonds”. The integration is vertical, with each sensing pixel connected via the bump bond to an analog section followed by a digital processing layer. Earlier versions were limited, by technology, in their tiling ability for creating larger matrices of multiple sensors. They could be abutted on three sides only, with the fourth being used for on-chip peripheral logic and wire-bond pads that permit electronic read-out. The latest Medipix4 Collaboration, still under some development, eliminates this short coming. Through-silicon-via (TSV) technology provides the possibility of reading the chips through copper-filled holes that bring the signals from the front side of the chip to its rear. All communication with the pixel matrix flows through the rear of the chip – the peripheral logic and control elements are integrated inside the pixel matrix.

The Analog front end consists of a pre-amplifier followed by a window discriminator which has upper and lower threshold levels. The discriminator has four bits for threshold adjustment as well as polarity sensing. This allows the capture window to be precisely set. The rest of the digital electronics – multiplexers, shift registers, shutter and logic control – helps extract the data.

Further development of the Medipix (Tech Brief, PDF) devices led to a separate version called Timepix (Tech Brief, PDF). These new devices, besides being able to count photons, are capable of two additional modes. The first mode records “Time-Over-Threshold”, providing rough analog information about the energy of the photon. It does this by counting clock pulses for the duration when the signal stays above the discrimination levels. The other mode, “Time of Arrival”, measures arrival time of the first particle to impinge on the pixel. The counters record time between a trigger and detection of radiation quanta with energy above the discrimination level, allowing time-of-flight applications in imaging.

Besides medical imaging, the devices have applications in space, material analysis, education and of course, high energy physics. Hopefully, in a few years, hackers will lay their hands on these interesting devices and we can get to know them better. At the moment, the Medipix website has some more details and data sheets if you would like to dig deeper. For an overview on the development of such single photon detectors, check out this presentation from CERN – “Single X-Ray Photon Counting Systems: Existing Systems, Systems Under Development And Future Trends” (PDF).

A Trove Of Cosplay Prop Making Tutorials And Blueprints

[CutTransformGlue] recently posted a build video for “Making Rey’s Star Wars Blaster“, embedded after the break. The construction uses layered MDF sheets to build up the blaster, and it’s a treat to see it taking shape, ending with an amazing paint job. It’s a good way to learn about the techniques used to bring such props to life and help you hone your skills. But digging deeper led us down an awesome rabbit hole.

[CutTransformGlue] got plans for Rey’s Blaster from the Punished Props Academy – a prop and costume making team from Seattle committed to “transforming passionate fans into confident, skillful makers”. These folks have built a wide variety of projects ranging from guns, weapons, costumes, props and more, and are obviously extremely skilled at what they do. But they aren’t keeping those skills to themselves and in a series of posts and videos they are sharing with us such varied skills as Foamsmithing (gotta love that coinage), Molding, Casting, Painting, 3D printing, Vacuum Forming and electronics. If you’d like more information about supplies, check out the Tools and Materials section. And if all of this has given you the itch to build a Skyrim Wuuthrad or a Halo4 Sniper Rifle, head over to the amazing Free Blueprints section for a treasure chest full of downloads.

Like we said earlier, if building such stuff is your thing, it’s a rabbit hole from which you’ll find it extremely difficult to extract yourself. Have fun.

Continue reading “A Trove Of Cosplay Prop Making Tutorials And Blueprints”

Hacking The Humble Roadster Bicycle

Think of bicycles, and your first mental image could be something pretty fancy. Depending on which side of the sport you favor, you could end up thinking of a road bike or an MTB, maybe DH, CX, BMX, TT, tandem or recumbent.

But for people in most parts of the World such as Asia, Africa and South America, the bicycle conjures up a very different image – that of the humble roadster. And this simple, hardy machine has spawned innumerable hacks to extend its usefulness and functionality by enterprising people with limited means. For them, it is not as much a means of transport, as a means for livelihood and survival.
Continue reading “Hacking The Humble Roadster Bicycle”

Simple Automata Extravaganza

[Federico Tobon] from [Wolfcat Workshop] spent Makevember in 2017 building a series of fascinating automata using the most basic of craft supplies and simple tools in his workshop. Using a combination of rigid materials such as wooden cubes, popsicle sticks, and paper clips and pliable ones like paper and rubber bands, his creations are way more delightful to play with compared to fidget spinners.

There are no assembly guides, instructions or building plans, but for a hacker, one look at these designs ought to be enough to glean how to build one, with some trial and error to get it right. And that is exactly what [Tobon] found to his delight. After sharing animated GIFs of his creations on social media, numerous other hackers built and shared their own versions of his designs as well as building some new ones.

He posts several other useful resources, some of which were the inspiration that got him started making these automata. All of them are pretty interesting, so do take a look at them too. There is a lot that young kids can learn from building these little machines, given some guidance and help from the elders. But the way we see it, it’s likely the old folks will enjoy them more.

The video after the break compiles all of the little machines for six minutes of viewing pleasure.

Continue reading “Simple Automata Extravaganza”

Turning That Old Hoverboard Into A Learning Platform

[Isabelle Simova] is building Hoverbot, a flexible robotics platform using Ikea plastic trays, JavaScript running on a Raspberry Pi and parts scavenged from commonly available hoverboards.

Self-balancing scooters a.k.a. Hoverboards are a great source of parts for such a project. Their high torque, direct drive brushless motors can drive loads of 100 kg or more. In addition, you also get a matching motor controller board, a rechargeable battery and its charging circuit. Most hoverboard controllers use the STM32F103, so flashing them with your own firmware becomes easy using a ST-link V2 programmer.

The next set of parts you need to build your robot is sensors. Some are cheap and easily available, such as microphones, contact switches or LDRs, while others such as ultrasonic distance sensors or LiDAR’s may cost a lot more. One source of cheap sensors are car parking assist transducers. An aftermarket parking sensor kit usually consists of four transducers, a control box, cables and display. Using a logic analyzer, [Isabelle] shows how you can poke around the output port of the control box to reverse engineer the data stream and decipher the sensor data. Once the data structure is decoded, you can then use some SPI bit-banging and voltage translation to interface it with the Raspberry Pi. Using the Pi makes it easy to add a cheap web camera, microphone and speakers to the Hoverbot.

Ikea is a hackers favourite, and offers a wide variety of hacker friendly devices and supplies. Their catalog offers a wide selection of fine, Swedish engineered products which can be used as enclosures for building robots. [Isabelle] zeroed in on a deep, circular plastic tray from a storage table set, stiffened with some plywood reinforcement. The tray offers ample space to mount the two motors, two castor wheels, battery and the rest of the electronics. Most of the original hardware from the hoverboard comes handy while putting it all together.

The software glue that holds all this together is JavaScript. The event-driven architecture of Node.js makes it a very suitable framework to use for Hoverbot. [Isabelle] has built a basic application allowing remote control of the robot. It includes a dashboard which shows live video and audio streams from the robot, buttons for movement control, an input box for converting text to speech, ultrasonic sensor visualization, LED lighting control, message log and status display for the motors. This makes the dashboard a useful debugging tool and a starting point for building more interesting applications. Check the build log for all the juicy details. Which other products from the Ikea catalog can be used to build the Hoverbot? How about a robotic Chair?

Continue reading “Turning That Old Hoverboard Into A Learning Platform”