Screenshot of the framework-built app, showing it running through Firefox

Turn A Webpage Into A Desktop App With Gluon

Electron is software for running web-written apps in the same way as native ones, and has gotten plenty of bad press for its RAM appetite around these parts. But while the execution might leave something to be desired, the concept itself is quite solid —  if you’ve already got code written for the web, a quick and easy way to bring it over to the desktop would be very valuable.

Which is why [CanadaHonk] is building a framework called Gluon, which aims to turn your web pages into desktop apps with little to no effort. We’ve seen their work a few months ago with the OpenASAR project, hacking the Discord desktop app to speed it up. Drawing from that experience, Gluon is built to be lean – with apps having low RAM and storage footprints, lightning-speed build times, and a no-nonsense API.

One of the coolest parts is that it’s able to use your system-installed browser, and not a bundled-in one like Electron. Firefox support is firmly on the roadmap, too, currently in experimental stage. Linux support is being worked on as well — the framework is Windows-born, but that’s to change. There’s also room to innovate; [CanadaHonk] recently added a hibernation feature with aggressive RAM and CPU footprint reduction when the app is minimized, something that other frameworks like this aren’t known for.

If you want to write user-facing software, JavaScript’s a decent language, and quite a few of you are going to be familiar with it. You aren’t limited to the software side of the tech world, either — tools like WebUSB and WebSerial will let you write a user interface for a board that you’ve just developed. For instance, here’s a WebSerial-based oscilloscope, a nifty serial terminal, or a hacker conference badge programming toolkit. For all that browsers have gotten wrong, they certainly don’t seem to become less abundant, and if that means you can quickly develop cross-platform hardware-facing apps, it’s certainly a useful addition to one’s toolkit.
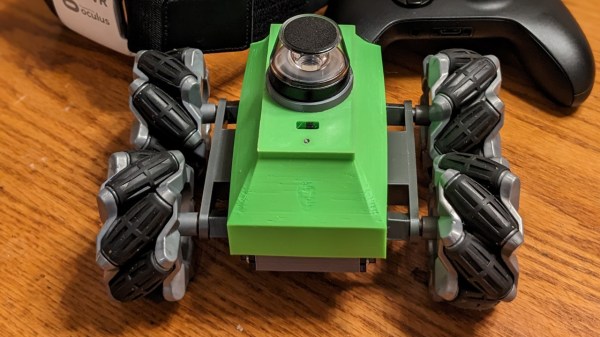
Showing the end result car, with mechanum wheels and a green chassis with what seems to be a camera window on top

2022 FPV Contest: ESP32-Powered FPV Car Uses Javascript For VR Magic

You don’t always need much to build an FPV rig – especially if you’re willing to take advantage of the power of modern smartphones. [joe57005] is showing off his VR FPV build – a fully-printable small Mechanum wheels car chassis, equipped with an ESP32-CAM board serving a 720×720 stream through WiFi. The car uses regular 9g servos to drive each wheel, giving you omnidirectional movement wherever you want to go. An ESP32 CPU and a single low-res camera might not sound like much if you’re aiming for a VR view, and all the ESP32 does is stream the video feed over WebSockets – however, the simplicity is well-compensated for on the frontend. Continue reading “2022 FPV Contest: ESP32-Powered FPV Car Uses Javascript For VR Magic” →

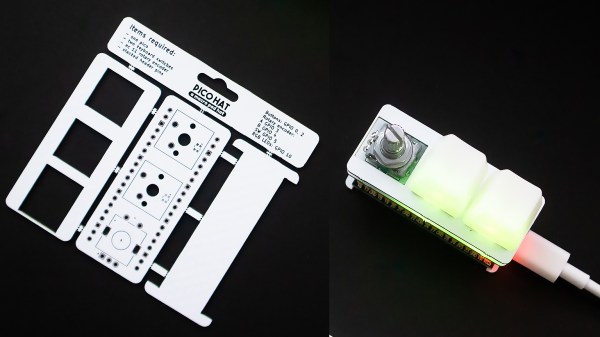
The macropad PCB panel next to an assembled macropad

A Fun Low-Cost Start For Your Macropad Hobby

If you were ever looking for a small relaxing evening project that you could then use day-to-day, you gotta consider the Pico Hat Pad kit by [Natalie the Nerd]. It fits squarely within the Pi Pico form-factor, giving you two buttons, one rotary encoder and two individually addressable LEDs to play with. Initially, this macropad was intended as an under-$20 device that’s also a soldering practice kit, and [Natalie] has knocked it out of the park.

You build this macropad out of a stack of three PCBs — the middle one connecting the Pi Pico heart to the buttons, encoders and LEDs, and the remaining ones adding structural support and protection. All the PCBs fit together into a neat tab-connected panel — ready to be thrown into your favorite PCB service’s shopping cart. Under the hood, this macropad uses KMK, a CircuitPython-based keyboard firmware, with the configuration open-source. In fact everything is open-source, just the way we like it.

If you find yourself with an unexpected affinity for macropads after assembling this one, don’t panic. It’s quite a common side-effect. Fortunately, there are cures, and it’s no longer inevitable that you’ll go bananas about it. That said, if you’re fighting the urges to go bigger, you can try a different hand-wireable Pico-based macropad with three more keys. Come to find that one not enough? Here’s a 2×4 3D printable one.

Now, if you eventually find yourself reading every single Keebin’ With Kristina episode as soon as it comes out, you might be too far gone, and we’ll soon find you spending hundreds of dollars building tiny OLED screens into individual keys — in which case, make sure you document it and share it with us!

Continue reading “A Fun Low-Cost Start For Your Macropad Hobby” →

A closeup picture showing the jagged edge of the cut

Debugging Laser Cut Wobble, The Scientific Way

[PWalsh] was using his lasercutter to cut acrylic, expecting the cuts to have a pleasantly smooth edge. Alas, the edges turned out to be wobbly and sandpaper-like, not smooth in the slightnest. Bummer! Internet suggested a stepper motor swap, but not much in the way of insights – and that would’ve been a royal pain for sure. How would you approach debugging such a problem? Well, [PWalsh] didn’t want to swap crucial components willy-nilly, going the scientific way instead, and breaks it down for us.

Having compiled an extensive list of possible places to look for a fault in, he started going through fundamental assumptions. Do other lasercutters experience this issue? No, even the cheap ones can cut things properly. Is it water level causing intermittent cooling? Nope, not that. Is it the stepping settings? Tweaked, not that. Laser pulsing frequency? No dice. Continue reading “Debugging Laser Cut Wobble, The Scientific Way” →

Showing a board with a Pi Pico plugged into it, a USB-A socket marked "USB host", and a character display that says "PASSED" referring to the board being the brains of a testing jig.

USB Host On RP2040 – With PIO

Folks from [Adafruit] are showing off a neat hack – USB host on RP2040, using the now-famous PIO peripheral. [Adafruit] builds a lot of RP2040 boards, and naturally, you gotta test them before you ship them to customers. They’ve been using very specific Teensies for that, and at some point, those became unobtainium. Based on the work of [sekigon-gonnoc] and with help of [Thach], they’ve made their TinyUSB library support bitbanging of USB over PIO, and successfully ported their test jig firmware to it!

The base Pico-PIO-USB repo by [sekigon-gonnoc] shows a pretty impressive state of affairs – with low-speed and full-speed USB host and full-speed USB device modes supported, and quite a few examples to get you started. [Adafruit]’s work integrates this code into their TinyUSB stack, specifically focusing on MST (mass storage) features – as this is what you need to program a RP2040. Of course, they also provide a mass storage example to boot!

Test jigs are pretty important to have when making multiple pieces of a board, and with RP2040 supporting more and more interfaces thanks to PIO, it sounds like the perfect chip for your next production testing-intended PCB. With the jig brains taken care of, you’ll want to look into building no less important mechanical part, and we’ve covered quite a few ways to sort that out – here’s an OpenSCAD script that generates lasercutting files out of KiCad boards, or a jig built out of scrap copperclad FR4, and a pretty extensive tutorial on making your own lasercuttable jigs, to boot.

Continue reading “USB Host On RP2040 – With PIO” →

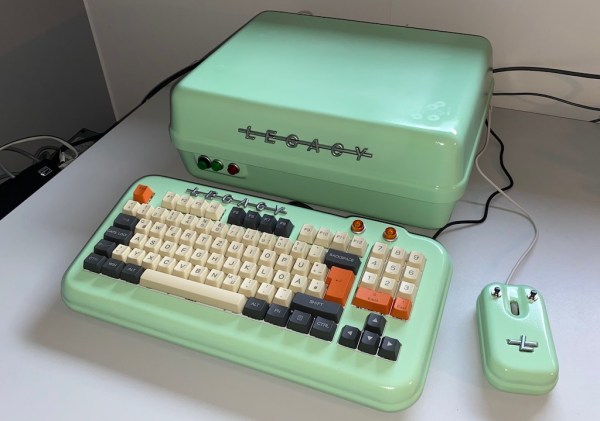
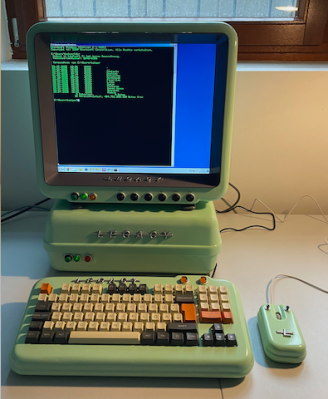
Showing the vintage PC, painted in 50s color scheme, matching custom-built keyboard and mouse next to it

Workbench PC With A 50s Twist

[HolGer71] had a Mini-ITX Intel Atom-powered mainboard that he found useful for its vintage interfaces like COM and LPT. On a whim, he decided to give it even more vintage of a look – transforming it into a device more akin to a 50s home appliance, complete with a fitting monitor, mouse and keyboard. The project, dubbed Legacy-PC Computer Case, imitates the sheet metal construction masterfully in its 3D-printed design. That’s not all there is to it, either – everything is open-source, and there is enough documentation that you can build your own!

[HolGer71] starts with general printing and finishing advice, and goes through every part of the setup from there. The mainboard-holding case builds around a small miniITX case frame, enclosing it and adding extensions for connectors and lightbulbs. For the monitor, he built a new frame around an old VGA-equipped 17″ desktop screen – most certainly easy to find. The keyboard‘s an inexpensive one yet equipped with mechanical switches, and the mouse‘s an old Fujitsu-Siemens, but of the kind you’d see manufactured under different labels. All in all, this combines quite generic components into a trusty and stylish device for your workshop needs.

Equipped with Windows 7 as, apparently, the earliest supported version, this machine is now on desk duty – ready to run obscure software for old programming dongles, and look absolutely fabulous while doing so. It’s rare that we see such effort put into creating designs from scratch and sharing them with the community – most of the time, we see PCs built into already existing devices, like this vintage radio, or a benchtop logic analyzer.

All About USB-C: Illegal Adapters

Let’s be clear – it’s not enough to have USB-C to USB-C cables. There’s a lot of cables that we might want to acquire for our day-to-day use, perhaps, for a transition period while we still own some amount of devices not adorned with a USB-C connector. However, the USB-C specification only accounts for a limited amount of kinds of cables, explicitly or implicitly excluding a range of cables that you might want to buy or make.

It’s my firm belief that, as a hacker, you should be able to buy any USB-C contraption that you could ever need. Hackers don’t need restrictions driven by marketing – they need understanding of how a piece of tech can or cannot be used, based on how it operates internally. I would like you to provide with such understanding, so that you can make informed decisions.

On the other hand, USB-C is designed to be used by less-than-skilled people, even if it often fails at that. (Cable labelling, anyone?) Clear definitions of what complies to a standard can help enforce it. Here’s the notorious story of a USB-C cable that killed a Chromebook, and launched a career of explaining USB-C specifics online for [Benson Leung]. There’s many such failure stories, in fact. Today, we’ll go through USB-C contraptions which might or might not fail you, depending on how you use them. Continue reading “All About USB-C: Illegal Adapters” →