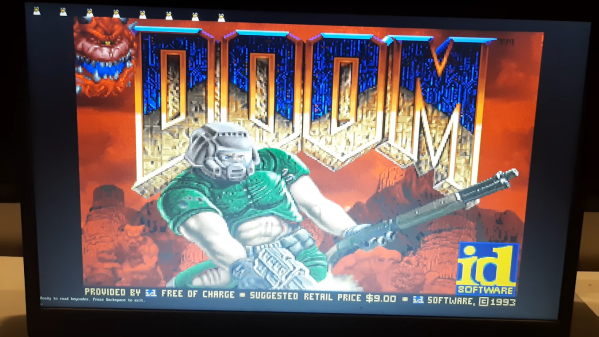
Tiny RISC Virtual Machine Is Built For Speed

Most of us are familiar with virtual machines (VMs) as a way to test out various operating systems, reliably deploy servers and other software, or protect against potentially malicious software. But virtual machines aren’t limited to running full server or desktop operating systems. This tiny VM is capable of deploying software on less powerful systems like the Raspberry Pi or AVR microcontrollers, and it is exceptionally fast as well.

The virtual machine is built from scratch, including the RISC processor with only 61 opcodes, a 64 bit core, and runs code written in his own programming language called “Brackets” or in assembly. It’s designed to be modular, so only those things needed for a given application are loaded into the VM. With these design criteria it turns out to be up to seven times as fast as comparably small VMs like NanoVM. The project’s creator, [koder77], has even used its direct mouse readout and joystick functionality to control a Raspberry Pi 3D camera robot.

For anyone looking to add an efficient VM to a small computing environment, [koder77] has made the project open-source on his GitHub page. This also includes all of the modules he has created so far which greatly expand the project’s capabilities. For some further reading on exceedingly tiny virtual machines, we featured this project way back in 2012 which allows users to run Java on similar hardware.

90s Apple Computer Finally Runs Unsigned Code

Back in the 90s, the console wars were in full swing. Nintendo vs Sega was an epic showdown at first, but when Nintendo seemed sure to clench the victory Sony came out of nowhere with the PlayStation. While these were the most popular consoles at the time, there were a few others around that are largely forgotten by history even if they were revolutionary in some ways. An example is the Pippin, a console made by Apple, which until now has been unable to run any software not signed by Apple.

The Pippin was Apple’s only foray into gaming consoles, but it did much more than that and included a primitive social networking system as well as the ability to run Apple’s Macintosh operating system. The idea was to be a full media center of sorts, and the software that it would run would be loaded from the CD-ROM at each boot. [Blitter] has finally cracked this computer, allowing it to run custom software, by creating an authentication file which is placed on the CD to tell the Pippin that it is “approved” by Apple.

The build log goes into incredible detail on the way these machines operated, and if you have a Pippin still sitting around it might be time to grab it out of the box and start customizing it in the way you probably always wanted to. For those interested in other obscure Apple products, take a look at this build which brings modern WiFi to the Apple Newton, their early PDA.

Continue reading “90s Apple Computer Finally Runs Unsigned Code”

Digital To Analog In The Darkroom

As the world becomes more and more digital, there are still a few holdouts from the analog world we’ve left behind. Vinyl records are making quite the comeback, and film photography is still hanging on as well. While records and a turntable have a low barrier for entry, photography is a little more involved, especially when developing the film. But with the right kind of equipment you can bridge the gap from digital to analog with a darkroom setup that takes digital photographs and converts them to analog prints.

The project’s creator, [Muth], has been working on this project since he found a 4K monochrome display. These displays are often used in resin 3D printers, but he thought he could put them to use developing photographs. This is much different from traditional darkroom methods, though. The monochrome display is put into contact with photo-sensitive paper, and then exposed to light. Black pixels will block the light while white pixels allow it through, creating a digital-to-analog negative of sorts. With some calibration done to know exactly how long to expose each “pixel” of the paper, the device can create black-and-white analog images from a digital photograph.

[Muth] notes that this method isn’t quite as good as professional print, but we wouldn’t expect it to be. It creates excellent black-and-white prints with a unique method that we think generates striking results. The 4K displays needed to reproduce this method aren’t too hard to find, either, so it’s fairly accessible to those willing to build a small darkroom to experiment. For those willing to go further, take a look at some other darkroom builds we’ve seen in the past.

Continue reading “Digital To Analog In The Darkroom”

Hoverbike Turns Hoverboard Into Ebike

Hoverboards were a popular trend with the youths and in-crowd a few years ago, and now that the fad has largely died out there are plenty of them sitting unused in closets and basements around the world. That only means opportunities to put the parts from these unique transportation devices into other builds. A more practical method of transportation is a bicycle, and this build scavenges most of the parts from a hoverboard to turn a regular bicycle into a zippy ebike.

This bike build starts with a mountain bike frame and the parts from the hoverboard are added to it piece by piece. The two motors are mounted to the frame and drive the front chain ring of the bike, allowing it to still take advantage of the bike’s geared drivetrain. Battery packs from two hoverboards were combined into a single battery which give the bike a modest 6-10 km of range depending on use. But the real gem of this build is taking the gyroscopic controller board from the hoverboards and converting it, with the help of an Arduino Due, to an ebike controller.

Eventually a battery pack will be added to give the bike a more comfortable range, but for now we appreciate the ingenuity that it took to adapt the controller from the hoverboard into an ebike controller complete with throttle and pedal assist. For other household objects turned into ebikes, be sure to check out one of our favorites based on a washing machine motor: the Spin Cycle.

Processing Audio With The RP2040

The Raspberry Pi, although first intended as an inexpensive single-board computer for use in education, is now ubiquitous in electronics communities. Its low price as well as Linux platform and accessible GPIO make it useful in many places outside the classroom. But, if you want to abandon the ease-of-use in favor of an even lower price, the Raspberry Pi foundation makes that possible as well with the RP2040 chip, commonly found on the Pico. [Jason] shows us one way to make use of this powerful chip by putting one in an audio digital signal processing board.

While development boards are available for this chip, [Jason] has opted instead for a custom PCB which he designed himself and includes an integrated headphone amplifier and 3.5 mm audio jacks. To do the actual DSP work, the RP2040 chip uses three 12-bit ADC channels and 16 controllable PWM channels. The platform is also equipped with the TLV320AIC3254 codec from Texas Instruments. With all of this put together, he has a functioning open-source platform he calls the DS-Pi.

[Jason] has built this as a platform for guitar effects and as a customizable guitar amp modeler, but with a platform that is Arduino-compatible and fairly easy to program it could be put to use for anything involving other types of music or audio processing, like this specialized MIDI-compatible guitar effects platform which is built around the same processor.

Astrophotography On The Game Boy Camera

The Game Boy Camera was the first digital camera that many of us ever interacted with. At the time it was fairly groundbreaking to take pictures without film, even though the resolution was extremely low by modern standards, and it could only shoot two-bit color. It’s been long enough since its release that it’s starting to become a popular classic with all kinds of hacks and modifications, like this one which adds modern SLR camera lenses which lets it take pictures of the Moon.

The limitations of the camera make for a fairly challenging build. Settings like exposure are automatic on the Game Boy Camera and can’t be changed, and the system only allows the user to change contrast and brightness. But the small sensor size means that astrophotography can be done with a lens that is also much smaller than a photographer would need with a modern DSLR. Once a mount was 3D printed to allow the lenses to be changed and a tripod mount was built, it was time to take some pictures of the moon.

Thanks to the interchangeability of the lenses with this build, the camera can also capture macro images as well. The build went into great detail on how to set all of this up, even going as far as giving tips for how to better 3D print interlocking threads, so it’s well worth a view. And, for other Game Boy Camera builds, take a look at this one which allows the platform to send its pictures over WiFi.

Continue reading “Astrophotography On The Game Boy Camera”

Stress-Testing An Arduino’s EEPROM

Every time one of us flashes an Arduino’s internal memory, a nagging thought in the backs of our minds reminds us that, although everything in life is impermanent, nonvolatile re-writable memory is even more temporary. With a fixed number of writes until any EEPROM module fails, are we wasting writes every time we upload code with a mistake? The short answer is that most of us shouldn’t really be concerned with this unless we do what [AnotherMaker] has done and continually write data until the memory in an Arduino finally fails.

The software for this is fairly simple. He simply writes the first 256 ints with all zeros, reads them to make sure they are all there, and then repeats the process with ones. After iterating this for literally millions of times continuously over the course of about a month he was finally able to get his first read failure. Further writes past this point only accelerated the demise of the memory module. With this method he was able to get nearly three million writes before the device failed, which is far beyond the tens or hundreds of thousands typically estimated for a device of this type.

To prove this wasn’t an outlier, [AnotherMaker] repeated the test, and did a few others while writing to a much smaller amount of memory. With this he was able to push the number of cycles to over five million. Assuming the Arduino Nano clone isn’t using an amazingly high-quality EEPROM we can safely assume that most of us have nothing to worry about and our Arduinos will be functional for decades to come. Unless a bad Windows driver accidentally bricks your device.

Continue reading “Stress-Testing An Arduino’s EEPROM”