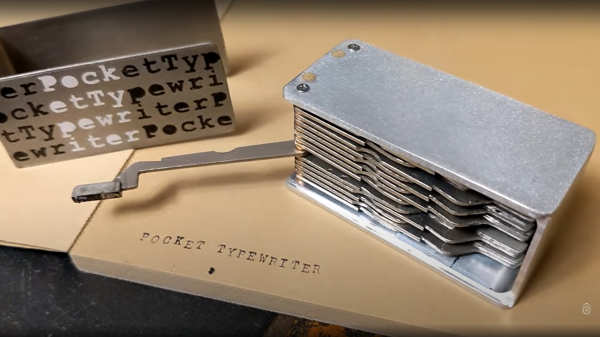
TEGA: Typescript Embedded Game Boy (Macro) Assembler

[Francis Stokes] has a real love for the original Game Boy, suggesting that owning this machine pushed him along a certain path that many of us would recognize. Developing Game Boy games isn’t particularly difficult from a hardware point of view, as you can easily buy special cartridges that have an SD card slot, allowing custom code. [Francis] had the idea of easy software development by producing a typescript hardware abstraction library, TEGA (or TypeScript Embedded Game Boy Macro Assembler). This provides a safe environment in which to play with the code, which can then be run inside an emulator such as BGB, before being deployed onto actual hardware.

The video embedded below — which we warn you now is a long one — goes into extensive justification and technical explanation of how [Francis] leverages typescript to create lots of nice features to produce safe code, whilst handling many of the Game Boy’s architectural restrictions, as well as the weirdness of the Sharp SM83 processor that powers it. We particularly liked the built-in support for on-the-fly asset compression, since every byte matters in the meager 32 Kb system, it’s nice not to have to think about it all the time! After discussing TEGA, the Game Boy hardware, the ins and outs of a demo game Block Jump, and then how to debug with BGB, we’re pretty confident many of you will be in a strong position to bust out a Game Boy application in the future!

As an aside, we did also stumble upon a new hardware guide provided by Finnish programmer and Game Boy superfan [Joonas Javanainen] which will help frame some of the topics [Francis] was talking about.

You may recall a little while back, the same author targeted the RISC-V using code written in typescript. After all, when you’re comfortable with a tool, you can shape it to do practically anything.

Continue reading “TEGA: Typescript Embedded Game Boy (Macro) Assembler”

The Game Boy Color Accessory You’ve Been Waiting For

Sometimes silly projects catch our eye, and we just can’t resist covering them. Over on Hackaday.io, [solderking] realized that there was a glaring omission in the multi-game management hardware for the Game Boy Color. Obviously, it’s too mundane to carry the handheld around with a bunch of games in one’s pocket, and a hardware multi-changer would definitely improve the usability. This convenient, pocket-friendly solution allows you to dock up four cartridges at a time, and with only a little mild inconvenience, spin the whole assembly, lock in a game and load it up. What could be easier?

Constructed from a ridiculous three-tier PCB stack, with a rotating center joint, the assembly is completely passive, with the connections from the selected game cartridge passed down a series of connectors before finally entering the Game Boy via the usual edge connector. The mere fact that this works at all just shows how tolerant (and we guess, slow) older gaming platforms used to be, and just what you can get away with! Still, it’s a fun build, and it does work, which just goes to show that just because you can, then you should.

We’re no strangers to Game Boy hacks. Here’s a useful cartridge to help with developing your first program. If the old platform is just a bit too limited for you, then we’ve got you covered with a hack that wedges an iCE40 FPGA and a Pi Zero inside the case, to give a bit more oomph.

Continue reading “The Game Boy Color Accessory You’ve Been Waiting For”

Interfacing An Old Engine Cowl Flaps Indicator To USB

[Glen Akins] had a WW2-era aircraft engine cowl flap indicator lying around (as you do) and thought it would make a jolly fine USB-attached indicator. The model in question is a General Electric model 8DJ4PBV DC Selsyn, which was intended for four-engined aircraft. For those not familiar with the purpose [Glen] explains in his detailed writeup, that piston-engine aircraft of that era were air-cooled, and during conditions of maximum engine power — such as during take-off — flaps on the side of the engine cowling could be opened to admit additional cooling airflow. These indicator dials were connected to a sender unit on each of the flap actuators, providing the pilots an indication of the flaps’ positions. Continue reading “Interfacing An Old Engine Cowl Flaps Indicator To USB”

Aesthetic PCB Design Tips For Improved Functionality

Those of us hardware types that spend a lot of time designing PCBs will often look at other peoples’ designs with interest, and in some cases, considerable admiration. Some of their boards just look so good. But are aesthetics important? After all, for most products, the delicate electronic components on that PCB are tucked safely inside a protective enclosure. But, as [Phil’s Lab] explains, aesthetic PCB designs can lead to functional improvements, such that better-looking designs are also better performing, in terms of manufacturability (and therefore yield), electromagnetic compatibility (EMC), and several other factors that can be important.

First off, making a PCB easy to read and using sane placement of components and connections will speed up debugging by reducing errors. Keeping a consistent and not too-tight placement grid can give the pick and place machine an easier task, and reduce solder issues during reflow. But there are also more serious concerns, such as the enforcement of design partitionings — such as keeping analog circuits together and away from noisy power and digital areas — which can make the difference between functioning within specification, and failure.

The video goes into a few other interesting tips, one highlight is using a ground-tied PCB perimeter zone, with wavelength-of-interest via stitching. This will reduce EMC side emissions from the power plane, but also if you select an appropriate surface finish, and keep the solder mask open, you’ve got a free, full perimeter contact to ground your scope probe. Oh, and it looks good too.

Hackaday is no stranger to beautiful artistic PCBs, like the work of [Saar Drimer] and many others. But if one PCB doesn’t cut it for your needs, there’s always the ‘Oreo’ construction to consider.

Continue reading “Aesthetic PCB Design Tips For Improved Functionality”

MikroLeo, A 4-Bit Retro Learning Platform

MikroLeo is a discrete TTL logic-based microcomputer intended for educational purposes created by [Edson Junior Acordi], an Electronics Professor at the Brazilian Federal Institute of Paraná, Brazil. The 4-bit CPU has a 
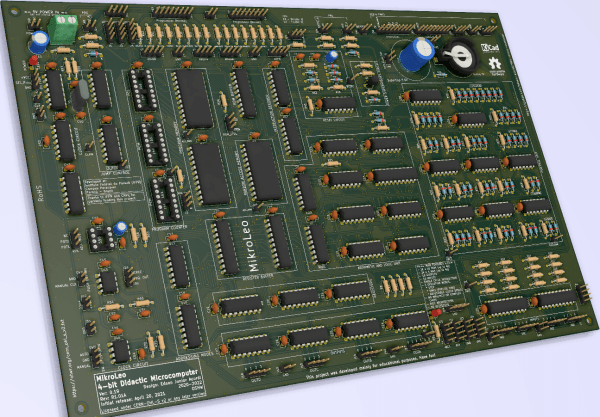
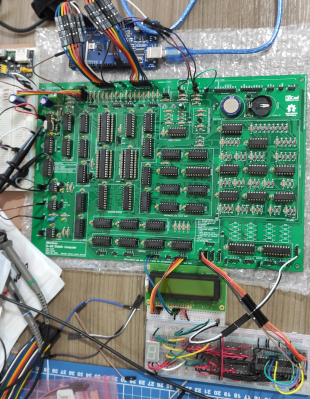
Harvard RISC architecture built entirely from 74HCT series logic mounted on a two-sided PCB using only through-hole parts. With 2K words of instruction RAM and 2K words of addressable RAM, the CPU has a similar resource level to comparable machines of old, giving students a feel for how to work within tight constraints.

Simulation of the circuit is possible with digital, with the dedicated PCB designed with KiCAD, so there should be enough there to get cracking with it. Four 4-bit IO ports make interfacing easy, with dedicated INput and OUTput instructions for the purpose. An assembler, compiler, and emulator are all being worked on (as far as we can tell) so keep an eye out for that, if this project is of interest to you.

We like computers a bit around these parts, the “hackier” and weirder the better. Even just in the 4-bit retro space, we’ve seen so many, from those built around ancient ALU chips to those built from discrete transistors and diodes, but you don’t need to go down that road, an emulation platform can scratch that retro itch, without the same level of pain.

Squish That Stack With Rampart

[P B Richards] and [Aaron Flin] were bemoaning the resource hunger of modern JavaScript environments and planned to produce a system that was much stingier with memory and CPU, that would fit better on lower-end platforms. Think Nginx, NodeJS, and your flavour of database and how much resource that all needs to run properly. Now try wedge that lot onto a Raspberry Pi Zero. Well, they did, creating Rampart: a JavaScript-based complete stack development environment.

The usual web applications have lots of tricks to optimise for speed, but according to the developers, Rampart is still pretty fast. Its reason for existence is purely about resource usage, and looking at a screen grab, the Rampart HTTP server weighs in at less than 10 MB of RAM. It appears to support a decent slew of technologies, such as HTTPS, WebSockets, SQL search, REDIS, as well as various utility and OS functions, so shouldn’t be so lightweight as to make developing non-trivial applications too much work. One interesting point they make is that in making Rampart so frugal when deployed onto modern server farms it could be rather efficient. Anyway, it may be worth a look if you have a reasonable application to wedge onto a small platform.

We’ve seen many JavaScript runtimes over the years, like this recent effort, but there’s always room for one more.

Tidy POV Display Using The ESP32

Chinese Youtuber [corebb] presents the second version of his POV display. The earlier version used 5050-sized SMT addressable LEDs, which didn’t give great resolution, so he rev’d the design to use a much higher number (160 to be exact) of APA102 LEDs. These are 2mm on the side, making them a little more difficult to handle, so after some initial solder paste wobbles, he decided to use a contract assembly house to do the tricky bit for him. This failed as they didn’t ‘understand’ the part and placed them the wrong way around! Not to be deterred, he had another go with a modified solder stencil, and eventually got the full strip to light up correctly.

Based on an ESP32 (using the Arduino stack) and SDCard for control, and a LiPo cell charged wirelessly, the build is rather tidy. A couple of hall effect switches are mounted at the start of each of the two arms, presumably lining

Real-time video streaming? Check!

up with a magnet on the case somewhere, although this isn’t clear. The schematic and PCB appear to have been designed with JLCEDA, which is a repackaging of EasyEDA. We can see the attraction with the heavy integration of this with the JLC and LCSC services. It appears that he even managed to get streamed video working — showing a live video from a webcam — which is quite an undertaking to pull off when you think how much processing needs to happen in real-time. As he alludes to in the video, trying to increase the resolution beyond this point is not viable with the processing capability of the ESP32.

A resin-printed case finishes off the build, with a screw-thread mount added to the rear, to allow typical camera mounts to be used to hold the thing down. A smart move we think.

We love POV displays around here, this spherical POV display is especially fabulous, but you don’t need fancy hardware if you have a handy ceiling fan and a bit of protoboard spare.

Continue reading “Tidy POV Display Using The ESP32”