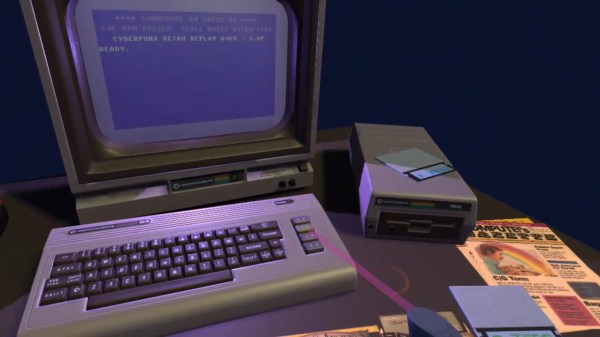
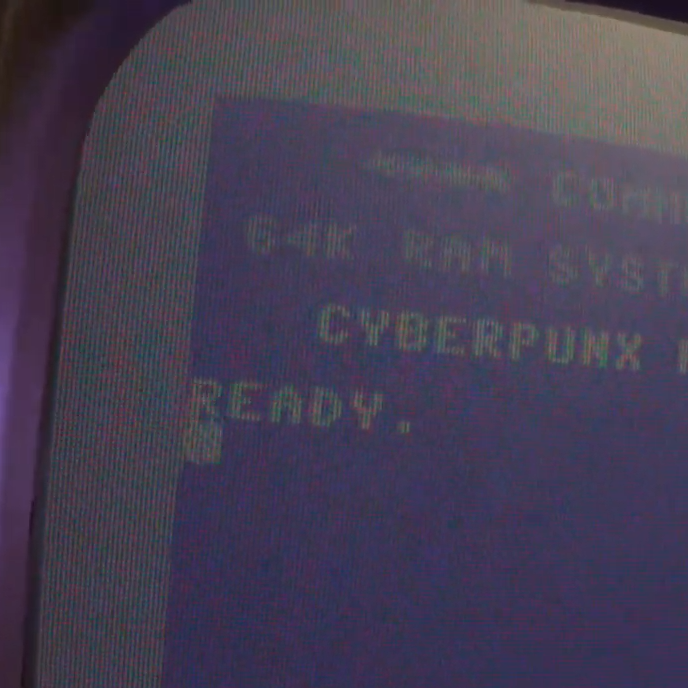
Legacy Digital Photos, With A Side Of Murphy’s Law

[Dave Madison] came across some old digital photos, and in his quest to access them, he ran into quite a few challenges. The saga brings to mind both Murphy’s Law, and while [Dave] prevailed in the end, it required quite a few more steps than one might expect.

The one smooth part of the process was that Konica’s proprietary software had a handy JPEG export feature.

Here’s the scene: in the late 90s, Konica partnered with photo shops to provide a photo scanning service, delivering digital scans of film photos on 3.5″ floppy disks, and that’s exactly what [Dave] had to work with. The disks were in good condition, and since modern desktop computers still support floppy drives and the FAT filesystem, in theory all one needs to do is stick disks into the reader one at a time in order to access the photos.

Sadly, problems started early. A floppy drive is revoltingly slow compared to any modern storage device, so [Dave]’s first step was to copy all of the files to his machine’s local storage before working on them. This took a bit of wrangling to deal with 8.3 format file names and avoid naming collisions across disks while still preserving some metadata such as original creation date. It was nothing a quick python script couldn’t handle, but that soon led to the next hurdle.

The photos in question were in an obsolete and proprietary Konica .KQP format. [Dave] went through a number of photo viewing programs that claimed to support .KQP, but none of them actually recognized the images.

Fortunately, each disk contained a copy of Konica’s proprietary “PC PictureShow” viewer, but despite having a variety of versions dated between 1997 and 2001 (making them from the Windows 98 and Windows ME eras) [Dave] could not get any version of the program to run in Windows 10, even with compatibility mode for legacy programs enabled. The solution was to set up a Windows XP virtual machine using Oracle’s Virtualbox, and use that to ultimately run PC PictureShow and finally access the photos. After all that work, [Dave] finally had a stroke of luck: Konica’s software had a handy feature to export images in JPEG format, and it worked like a charm.

In the end, [Dave] was able to save 479 out of the 483 images on the old floppy disks, with a reminder that proprietary formats are a pain. The disks and images may have been over twenty years old, but the roots of digital imaging go considerably further back than that. Take a few minutes out your day to read a bit about Russell Kirsch and the first digitized image, that of his three-month old son in 1957.

Some Tips For Monetizing Work In Open Source

Free and open-source software (FOSS) doesn’t have to be entirely separate from the concept of bringing in money, but the path to monetizing is maybe less clear than it could be. To help address this, [Drew DeVault] has shared some concise thoughts on different ways to monetize FOSS work and projects. [Drew] observes that monetizing one’s own projects is one approach, but that it is entirely possible, and less difficult, to make money by participating in open source work in a more general sense.

There are companies and organizations out there who may make their money otherwise, but are nevertheless involved in or reliant upon open source software for running their business. Such companies are a good starting point for anyone looking to work in FOSS, and [Drew] shares a clever tip for finding them: use git to clone the software repositories of large projects that are of interest to you, then run this command:

git log -n100000 --format="%ae" | cut -d@ -f2 | sort | uniq -c | sort -nr | less

This will extract the domain names from the last 100,000 commits to the repository in question; a good set of leads to companies and organizations that are invested enough in FOSS to contribute, and who may be willing to pay for such work.

There is also the option of monetizing one’s own projects, which [Drew] says is the more difficult approach. He shares tips on monetization options, but cautions that fundamentally one is building a business when going this route. One should therefore be prepared to face the attendant non-software-related problems in the process.

[Drew] runs SourceHut and works entirely in FOSS, but still makes time for fun hacks like using this old line printer to emulate the experience of working on a teletype, which is how it was done when terminal output went to paper, instead of a CRT monitor.

Art of 3D printer in the middle of printing a Hackaday Jolly Wrencher logo

3D Printering: Why Aren’t Enclosures Easier?

For 3D printers that aren’t already enclosed, why is easily adding a cheap and effective enclosure still not a completely solved problem? The reason is simple: unless one’s needs are very basic, enclosures are more than just boxes.

Different people need different features, printers come in different shapes and sizes, and creating something that can be both manufactured and shipped cheaply is a challenge in itself. In this article I’ll explain how those things make boxing up your printer a tougher nut to crack then may seem at first glance.

Enclosures Have Different Jobs

People have different expectations of what an enclosure’s job should be, and that determines which features are important to them and which are not. Here is a list of meaningful features for 3D printer enclosures; not everything on this list is important to everyone, but everything on this list is important to someone. Continue reading “3D Printering: Why Aren’t Enclosures Easier?”

OpenCV And Depth Camera Spots Weeds

Using vision technology to identify weeds in agriculture is an area of active development, and a team of researchers recently shared their method of using a combination of machine vision plus depth information to identify and map weeds with the help of OpenCV, the open-source computer vision library. Agriculture is how people get fed, and improving weed management is one of its most important challenges.

Many current efforts at weed detection and classification use fancy (and expensive) multispectral cameras, but PhenoCV-WeedCam relies primarily on an OAK-D stereo depth camera. The system is still being developed, but is somewhat further along than a proof of concept. The portable setups use a Raspberry Pi, stereo camera unit, power banks, an Android tablet for interfacing, and currently require an obedient human to move and point them.

It’s an interesting peek at the kind of hands-on work that goes into data gathering for development. Armed with loads of field data from many different environments, the system can use the data to identify grasses, broad leaf plants, and soil in every image. This alone is useful, but depth information also allows the system to estimate overall plant density as well as try to determine the growth center of any particular plant. Knowing that a weed is present is one thing, but to eliminate it with precision — for example with a laser or mini weed whacker on a robot arm — knowing where the weed is actually growing from is an important detail.

PhenoCV-WeedCam (GitHub repository) is not yet capable of real-time analysis, but the results are promising and that’s the next step. The system currently must be carried by people, but could ultimately be attached to a robotic platform made specifically to traverse fields.

Two-Key Keyboard Build Log Starts Small, But Thinks Big

Interested in making a custom keyboard, but unsure where to start? Good news, because [Jared]’s build log for an adorable “2% Milk” two-key mini-keyboard covers everything you need to know about making a custom keyboard, including how to add optional RGB lighting. The only difference is that it gets done in a smaller and cheaper package than jumping directly in with a full-size DIY keyboard.

[Jared] is definitely no stranger to custom keyboard work, but when he saw parts for a two-key “2% Milk” keyboard for sale online, he simply couldn’t resist. Luckily for us, he took plenty of photos and his build log makes an excellent tutorial for anyone who wants to get into custom keyboards by starting small.

The hardware elements are clear by looking at photos, but what about the software? For that, [Jared] uses a Teensy  Pro Micro clone running QMK, an open source project for driving and configuring custom input devices. QMK drives tiny devices like the 2% Milk just as easily as it does larger ones, so following [Jared]’s build log therefore conveys exactly the same familiarity that would be needed to work on a bigger keyboard, which is part of what makes it such a great project to document.

Interested in going a little deeper down the custom keyboard rabbit hole? You can go entirely DIY, but there’s also no need to roll everything from scratch. It’s possible to buy most of the parts and treat the project like a kit, and Hackaday’s own [Kristina Panos] is here to tell you all about what that was like.

Fixing NRF24L01+ Modules Without Going (Too) Insane

Good old nRF24L01+ wireless modules are inexpensive and effective. Well, they are as long as they work correctly, anyway. The devices themselves are mature and well-understood, but that doesn’t mean bad batches from suppliers can’t cause hair-pulling problems straight from the factory.

[nekromant] recently got a whole batch of units that simply refused to perform as they should, but not because they were counterfeits. The problem was that the antenna and PCB design had been “optimized” by the supplier to the point where the devices simply couldn’t work properly. Fortunately, [nekromant] leveraged an understanding of the problem into a way to fix them without going insane in the process. The test setup is shown in the image above, and the process is explained below. Continue reading “Fixing NRF24L01+ Modules Without Going (Too) Insane”

3D Printed Gesture-Controlled Robot Arm Is A Ton Of Tutorials

Ever wanted your own gesture-controlled robot arm? [EbenKouao]’s DIY Arduino Robot Arm project covers all the bases involved, but even if a robot arm isn’t your jam, his project has plenty to learn from. Every part is carefully explained, complete with source code and a list of required hardware. This approach to documenting a project is great because it not only makes it easy to replicate the results, but it makes it simple to remix, modify, and reuse separate pieces as a reference for other work.

[EbenKouao] uses a 3D-printable robotic gripper, base, and arm design as the foundation of his build. Hobby servos and a single NEMA 17 stepper take care of the moving, and the wiring and motor driving is all carefully explained. Gesture control is done by wearing an articulated glove upon which is mounted flex sensors and MPU6050 accelerometers. These sensors detect the wearer’s movements and turn them into motion commands, which in turn get sent wirelessly from the glove to the robotic arm with HC-05 Bluetooth modules. We really dig [EbenKouao]’s idea of mounting the glove sensors to this slick 3D-printed articulated gauntlet frame, but using a regular glove would work, too. The latest version of the Arduino code can be found on the project’s GitHub repository.

Most of the parts can be 3D printed, how every part works together is carefully explained, and all of the hardware is easily sourced online, making this a very accessible project. Check out the full tutorial video and demonstration, embedded below.

Continue reading “3D Printed Gesture-Controlled Robot Arm Is A Ton Of Tutorials”