Calculating Like It’s 1962

We sometimes forget that the things we think of as trivial today were yesterday’s feats of extreme engineering. Consider the humble pocket calculator, these days so cheap and easy to construct that they’re essentially disposable. But building a simple “four-banger” calculator in 1962 was anything but a simple task, and it’s worth looking at what one of the giants upon whose shoulders we stand today accomplished with practically nothing.

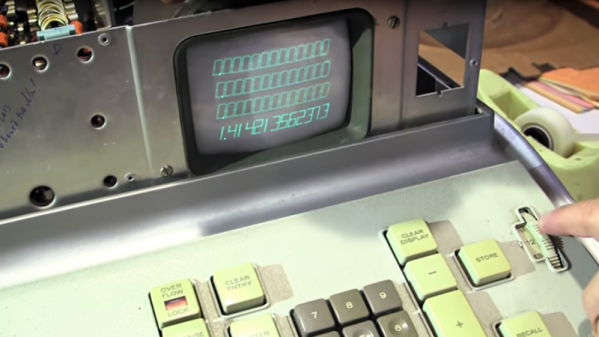
If there’s anything that [Cliff Stoll]’s enthusiasm can’t make interesting, we don’t know what it would be, and he certainly does the job with this teardown and analysis of a vintage electronic calculator. You’ll remember [Cliff] from his book The Cuckoo’s Egg, documenting his mid-80s computer sleuthing that exposed a gang of black-hat hackers working for the KGB. [Cliff] came upon a pair of Friden EC-132 electronic calculators, and with the help of [Bob Ragen], the engineer who designed them in 1962, got one working. With a rack of PC boards, cleverly hinged to save space and stuffed with germanium transistors, a CRT display, and an acoustic delay-line memory, the calculators look ridiculous by today’s standards. But when you take a moment to ponder just how much work went into such a thing, it really makes you wonder how the old timers ever brought a product to market.

As a side note, it’s great to see the [Cliff] is still so energetic after all these years. Watching him jump about with such excitement and passion really gets us charged up.

Continue reading “Calculating Like It’s 1962”

High-Speed Drones Use AI To Spoil The Fun

Some people look forward to the day when robots have taken over all our jobs and given us an economy where we can while our days away on leisure activities. But if your idea of play is drone racing, you may be out of luck if this AI pilot for high-speed racing drones has anything to say about it.

NASA’s Jet Propulsion Lab has been working for the past two years to develop the algorithms needed to let high-performance UAVs navigate typical drone racing obstacles, and from the look of the tests in the video below, they’ve made a lot of progress. The system is vision based, with the AI drones equipped with wide-field cameras looking both forward and down. The indoor test course has seemingly random floor tiles scattered around, which we guess provide some kind of waypoints for the drones. A previous video details a little about the architecture, and it seems the drones are doing the computer vision on-board, which we find pretty impressive.

Despite the program being bankrolled by Google, we’re sure no evil will come of this, and that we’ll be in no danger of being chased down by swarms of high-speed flying killbots anytime soon. For now we can take solace in the fact that JPL’s algorithms still can’t beat an elite human pilot like [Ken Loo], who bested the bots overall. But alarmingly, the human did no better than the bots on his first lap, which suggests that once the AI gets a little creativity and intuition like that needed to best a Go champion, [Ken] might need to find another line of work.

Continue reading “High-Speed Drones Use AI To Spoil The Fun”

Gamify Your Workout With This Wearable Console Controller

‘Tis soon to be the season when resolutions falter and exercise equipment purchased with the best of intentions is cast aside in frustration. But with a little motivation, like making your exercise machine a game console controller, you can maximize your exercise gear investment and get in some guilt-free gaming to boot.

Honestly, there is no better motivation for keeping up with exercise than taking classes, but not many people have the discipline — or the pocketbook — to keep going to the gym for the long haul. With this in mind, [Jason] looked for a way to control PS4  games like Mario Karts or TrackMania with his recumbent bike. In an attempt to avoid modifying the bike, [Jason] decided on a wearable motion sensor for his ankle. Consisting of an Uno, an MPU9250 accelerometer, and a transmitter for the 433-MHz ISM band, the wearable sends signals to a receiver whenever the feet are moving. This simulates pressing the up arrow controller key to set the game into action. Steering and other game actions are handled by a regular controller; we’d love to see this expanded to include strain gauges on the recumbent bike’s handles to allow left-right control by shifting weight in the seat. Talk about immersive gameplay!

While we like the simplicity of [Jason]’s build and the positive reinforcement it provides, it’s far from the first exercise machine hack we’ve seen. From making Google Street View bike-controlled to automatically logging workouts, exercise machines are ripe for the hacking.

Continue reading “Gamify Your Workout With This Wearable Console Controller”

The Chemistry And Engineering Of DIY Photochromic Glass

[Ben Krasnow] is no stranger to exploring the more arcane corners of hackerdom, and the latest video on his “Applied Science” channel goes into a field few DIYers have touched: homemade glass, including the photochromic variety.

That DIY glassmaking remains a largely untapped vein is not surprising given what [Ben] learned over the last months of experimenting. With searing temperatures bordering on the unobtainable, volatile ingredients that evaporate before they can be incorporated, and a final product so reactive that a platinum crucible is the best vessel for the job, glassmaking is not easy, to say the least. Glassmaking doesn’t scale down from an industrial process very well, it seems. Nonetheless, [Ben] came up with a process that could be replicated using common enough ingredients and a simple electric kiln modded with a PID controller for pinpoint temperature setting. And while Luxottica has nothing to worry about yet, he did manage to get some clearly if subtly photochromic samples, despite the challenges.

Without a doubt, [Ben] crossed over into “mad scientist” territory a while back, and we think it’s great. What other way is there to describe a guy who has an electron microscope, a high-power ruby laser, a CT scanner, and a cookie making robot in his basement? Whatever you call it, we like the results.

Continue reading “The Chemistry And Engineering Of DIY Photochromic Glass”

Tricked-Out Tablet Becomes Workbench Tool

The workbench of the typical electronics hobbyist today would probably be largely recognizable by Heathkit builders back in the 60s and 70s. But where the techs and tinkerers of yesteryear would have had a real dead-tree SAMS Photofact schematic spread out on the bench, today you’ll get more use out of a flat-screen display for data sheets and schematics, and this handy shop Frankentablet might be just the thing to build.

Tablets like the older Nexus 9 that [enginoor] used as the basis for this build have a little bit of a form-factor problem because unlike a laptop, a tablet isn’t very good at standing up on its own. To fix that, they found a suitable silicone skin for the Nexus, and with some silicone adhesive began bedazzling the back of the tablet. A bendy tripod intended for phones was added, and with the tablet able to stand on its own they maximized the USB port with a right angle adapter and a hub. Now the tablet has a USB drive, a mouse, and a keyboard, ready for perusing data sheets online. And hackers of a certain age will appreciate the eyeball-enhancing potential of the attached USB microscope.

[enginoor]’s bench tablet is great, but we’ve seen full-fledged bench PCs before too. Take your pick — wall mounted and floating, or built right into the workbench.

Thanks to [ccvi] for the tip.

A Minimalist Weather Clock With A Unique Display

If you’re looking for a home hub to display weather, time, and important family information, the formula is pretty simple: build yet another “magic mirror” project. We’re not complaining — magic mirrors look great. But if all you need is time and weather, this elegant pixel display is something just a little bit different.

Among his many criteria for the perfect hack, [Dominic] lists usefulness, visual appeal, and low cost. We’ll agree that his minimalist weather clock hits all those marks, and with the careful selection of a 16 x 32-pixel RGB display module, [Dominic] ended up giving back to the community by developing an Arduino driver for it. He points out that strips of Neopixels could have been used for the display, but they’d have ended up costing more, so the LED matrix was a sensible choice. A 3D-printed separator grid and a paper diffuser provide the proper pixelated look, and some simple animated icons display the two-day weather forecast. We find the time and temperature numerals a little hard to read, but it’s not bad considering the limited resolution of the display. And the case is a nice bit of woodworking too. Not a bad result for only €43.

We’re intrigued by the P10 LED matrix module [Dominic] used for this one. It might be a good choice for a word clock and weather station, or with his driver, a display for just about anything.

Entry-Level 3D Printer Becomes Budget PCB Machine

A funny thing happened on [Marco Rep]’s way to upgrading his 3D printer. Instead of ending up with a heated bed, his $300 3D printer can now etch 0.2-mm PCB traces. And the results are pretty impressive, all the more so since so little effort and expense were involved.

The printer in question is a Cetus3D, one of the newer generation of affordable machines. The printer has nice linear bearings but not a lot of other amenities, hence [Marco]’s desire to add a heated bed. But hiding beneath the covers was a suspicious transistor wired to a spare connector on the print head; a little sleuthing and a call to the factory revealed that the pin is intended for accessory use and can be controlled from G-code. With a few mods to the cheap UV laser module [Marco] had on hand, a printed holder for the laser, and a somewhat manual software toolchain, PCBs with 0.2-mm traces were soon being etched. The video below shows that the printer isn’t perfect for the job; despite the smooth linear bearings, the low mass of the printer results in vibration that shows up as wavy traces. But the results are more than acceptable, especially for $330.

This isn’t [Marco]’s first budget laser-etching rodeo. He recently tried the same thing using a cheap CNC laser engraver with similar results. That was a $200 dedicated engraver, this is a $300 3D printer with a $30 laser. It seems hard to lose at prices like these.

Continue reading “Entry-Level 3D Printer Becomes Budget PCB Machine”