Lightsaber Uses Pogo Pins To Make Assembly A Breeze

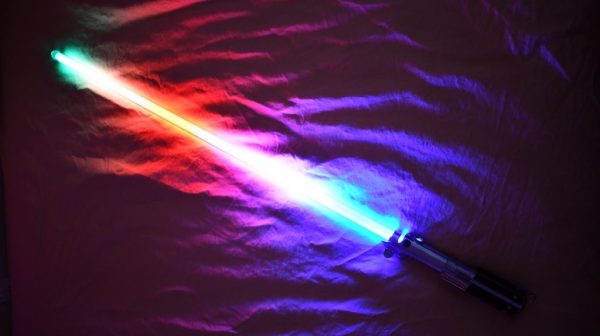
There was an endless supply of fantastic projects at Supercon this year, but one whose fit and finish really stood out was [Scott]’s lightsaber. If you were walking around and saw someone with a very bright RGB device with a chromed-out handle hanging off their belt it was probably this, though it may have been hard to look at directly. On the outside, the saber looks like a well-polished cosplay prop, and it is! But when Scott quickly broke down the device into component pieces it was apparent that extra care had been put into the assembly of the electronics.

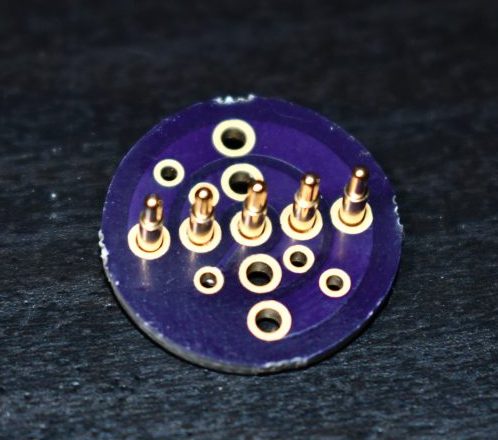
Like any good lightsaber replica the blade is lit, and wow is it bright. The construction is fairly simple, it’s a triplet of WS2812B LED strips back to back on a triangular core, mounted inside a translucent polycarbonate tube with a diffuser. Not especially unusual. But the blade can be popped off the hilt at a moments notice for easy transport and storage, so the strips can’t be soldered in. Connectors would have worked, but who wants flying wires when they’re disconnecting their lightsaber blade. The answer? Pogo pins! Scott runs the power, ground, and data lines out of the strips and into a small board with slip ring-style plated rings. On the hilt, there is a matching array of pogo pins to pass along power and data. The data lines from all the strips are tied together minimizing the number of connections to make, and the outer two power rings have more than one pin for better current-carrying capacity. A handy side effect is that there is nowhere on the blade where there aren’t LEDs; the strips go down to the very end of the blade where it meets the main board inside the hilt.

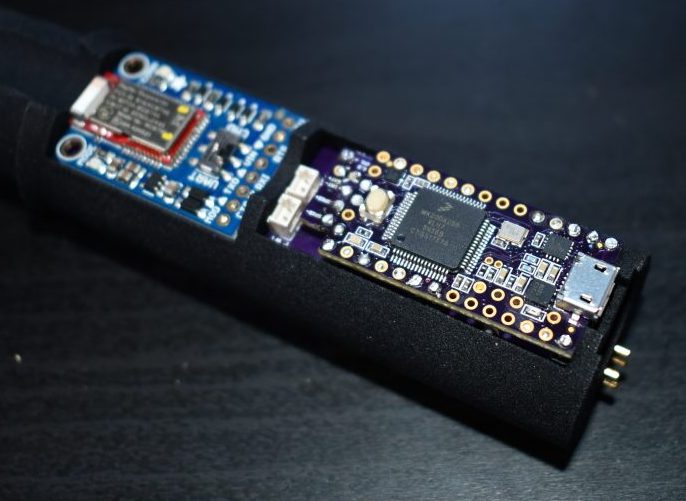
The hilt is filled with an assembly of 18650’s and a Teensy mounted with a custom shield, all fit inside a printed midframe. The whole build is all about robust design that’s easy to assemble. The main board is book-ended by perpendicular PCBs mounted to the ends, one at the top to connect to the blade and one at the bottom to connect to a speaker. Towards the bottom there is space for an optional Bluetooth radio to allow remote RGB control.

Scott is selling this as a product but also provides detailed instructions and parts lists for each component. Assembly instructions for the blade are here. The hilt is here. And pogo adapters are on OSH Park here. An overview of the firmware with links to GitHub is here. Check out a walkthrough of the handle assembly and blade attachment after the break!

Continue reading “Lightsaber Uses Pogo Pins To Make Assembly A Breeze”

A Tour Through The Archetypical Asian Factory

Overseas factories can be sort of a mythical topic. News articles remind us that Flex (née Flextronics) employs nearly 200 thousand employees worldwide or that Foxconn is up to nearly a million. It must take an Apple-level of insider knowledge and capital to organize such a behemoth workforce, certainly something well past the level of cottage hardware manufacturing. And the manufacturing floor itself must be a temple to bead blasted aluminum and 20 axis robotic arms gleefully tossing products together. Right?

Well… the reality is a little different. The special sauce turns out to be people who are well trained for the task at hand and it doesn’t require a $1,000,000,000,000 market cap to get there.

[Adam leeb] was recently overseas to help out with the production ramp for one of his products and took a set of fantastic videos that walk us through an archetypical asian factory.

The Room

I’ve been to several factories and for me the weirdest part of the archetype is the soul crushing windowless conference room which is where every tour begins. Check out this one on the left. If you ever find yourself in a factory you will also find a room like this. It will have weird snacks and bottles of water and a shiny wood-esque table. It will be your home for many, many more hours than you ever dreamed. It’s actually possible there’s just one conference room in the universe and in the slice of spacetime where you visit it happens to be in your factory.

Ok, less metaphysics. It’s amazing to watch the myriad steps and people involved in taking one product from zero to retail-ready. [adam] gives us a well narrated overview of the steps to go from a single bare board to the fully assembled product. From The Conference Room he travels to The Floor and walks us through rows of operators performing their various tasks. If you’ve been reading for a while you will recognize the pick and place machines, the ovens, and the pogo pin test fixtures. But it’s a treat to go beyond that to see the physical product that houses the boards come together as well.

Check out [adam]’s videos after the break. The first deals with the assembly and test of his product, and the second covers the assembly of the circuit boards inside which is broadly referred to as SMT. Watching the second video you may notice the funny (and typical) contrast between the extremely automated SMT process and everything else.

Continue reading “A Tour Through The Archetypical Asian Factory”

Which Wireless Is Right Wireless?

Back in the early days of Arduino proliferation (and before you ask, yes we realize there was a time before that too), wireless was a strange and foreign beast. IR communication was definitely a thing. And if you had the funds there was this cool technology called ZigBee that was available, often in funny blue house-shaped XBee boards. With even more funds and a stomach for AT commands you could even bolt on a 2G cell radio for unlimited range. WiFi existed too, but connecting it to a hobbyist ecosystem of boards was a little hairier (though maybe not for our readership).

But as cell phones pushed demand for low power wireless forward and the progression of what would become the Internet of marking Terms (the IoT, of course) began, a proliferation of options appeared for wireless communication. Earlier this week we came across a great primer on some of the major wireless technologies which was put together by Digikey earlier in the year. Let’s not bury the lede. This table is the crux of the piece:

There are some neat entries here that are a little less common (and our old friend, the oft-maligned and never market-penetrating ZigBee). It’s actually even missing some entries. Let’s break it down:

  • Extremely short range: Just NFC. Very useful for transferring small amount of sensitive information slowly, or things with high location-relevance (like between phones that are touching).
  • Short range: BLE, Zigbee, Z-Wave, etc. Handy for so-called Personal Area Networks and home-scale systems.
  • Medium/long range: Wifi, Bluetooth, Zigbee, Z-Wave, LoRaWAN: Sometimes stretching for a kilometer or more in open spaces. Useful for everything from emitting tweets to stitching together a mesh network across a forrest, as long as there are enough nodes. Some of these are also useful at shorter range.
  • Very Long range/rangeless: Sigfox, NB-IoT, LTE Category-0. Connect anywhere, usually with some sort of subscription for network access. Rangeless in the sense that range is so long you use infrastructure instead of hooking a radio up to a Raspberry Pi under your desk. Though LoRa can be a fun exception to that.

You’re unlikely to go from zero to custom wireless solution without getting down into the mud with the available dev boards for a few different common protocols, but which ones? The landscape has changed so rapidly over the years, it’s easy to get stuck in one comfortable technology and miss the appearance of the next big thing (like how LoRaWAN is becoming new cool kid these days). This guide is a good overview to help catch you up and help decide which dev kits are worth a further look. But of course we still want to hear from you below about your favorite wireless gems — past, present, and future — that didn’t make it into the list (we’re looking at you 433 MHz).

Cool Tools: Deus Ex Autorouter

The first thing you probably asked yourself when learning how to lay out PCBs was “can’t the computer do this?” which inevitably led to the phrase “never trust the autorouter!”. Even if it hooks up a few traces the result will probably be strange to human eyes; not a design you’d want to use.

But what if the autorouter was better? What if it was so far removed from the autorouter you know that it was something else? That’s the technology that JITX provides. JITX is a company that has developed new tools that can translate a coarse textual specification of a board to KiCAD outputs autonomously.

Continue reading “Cool Tools: Deus Ex Autorouter”

Cool Tools: The Pantorouter Turns Tracing On Its Side

Not too long ago we wrote about a small CNC tool for automating certain parts of the woodworking process. At the time it seemed unusual in its intentionally limited scope but a few commenters mentioned it reminded them of another device, [Matthias]’s Pantorouter. It didn’t take much investigation to see that the commenters were right! The MatchSticks device does feel a bit like a CNC version of the Pantorouter, and it seemed like it was more than worth of a post by itself. The Pantorouter is a fascinating example of another small manual-but-automated tool for optimized for accelerating and improving certain woodworking operations.

Continue reading “Cool Tools: The Pantorouter Turns Tracing On Its Side”

A Better Battery Arduino

We’ve seen [Johan]’s AA-battery-sized Arduino/battery crossover before, but soon (we hope!) there will be a new version with more MIPS in the same unique form factor! The original Aarduino adhered to classic Arduino part choices and was designed to run as the third “cell” in a 3 cell battery holder to relay temperature readings via a HopeRF RFM69CW. But as [Johan] noticed, it turns out that ARM development tools are cheap now. In some cases very cheap and very open source. So why not update an outstanding design to something with a little more horsepower?

The Aarduino Zero uses the same big PTH battery terminals and follows the same pattern as the original design; the user sticks it in a battery holder for power and it uses an RFM69CW for wireless communication. But now the core is an STM32L052, a neat low power Cortex-M0+ with a little EEPROM onboard. [Johan] has also added a medium size serial flash to facilitate offline data logging or OTA firmware update. Plus there’s a slick new test fixture to go along with it all.

So how do you get one? Well… that’s the rub. It looks like when this was originally posted at the end of 2017 [Johan] was planning to launch a Crowd Supply campaign that hasn’t quite materialized yet. Until that launches the software sources for the Zero are available, and there are always the sources from the original Aarduino to check out.

What’s The Cheapest Way To Scan Lots Of Buttons?

So you’re building a new mechanical keyboard. Or attaching a few buttons to a Raspberry Pi. Or making the biggest MIDI grid controller the world has ever know. Great! The first and most important engineering question is; how do you read all those buttons? A few buttons on a ‘Pi can probably be directly connected, one for one, to GPIO pins. A mechanical keyboard is going to require a few more pins and probably some sort of matrix scanner. But the grid controller is less clear. Maybe external I/O expanders or a even bigger matrix? Does it still need diodes at each button? To help answer these questions the folks at [openmusiclabs] generated a frankly astounding map which shows, given the number of inputs to scan and pins available, which topology makes sense and roughly how much might it cost. And to top it off they link into very readable descriptions of how each might be accomplished. The data may have been gathered in 2011 but none of the fundamentals here have changed.

How do you read this chart? The X axis is the number of free pins on your controller and the Y is the number of I/Os to scan. So looking at the yellow band across the top, if you need to scan one input it always makes the most sense to directly use a single pin (pretty intuitive, right?). Scrolling down, if you need to read 110 inputs but the micro only has eight pins free there are a couple choices, keys E and F. Checking the legend at the top E is “Parallel out shift register muxed with uC” and F is “Parallel in shift register muxed with uC“. What do those mean? Checking the table in the original post or following the link takes us to a handy descriptive page. It looks like a “parallel out shift register” refers to using a shift register to drive one side of the scan matrix, and “parallel in shift register” refers to the opposite.

Continue reading “What’s The Cheapest Way To Scan Lots Of Buttons?”