Blinkenlights For Your Parallel Port

Most modern equipment is connected over USB, and generally speaking we’re all the better for it. But that’s not to say there aren’t some advantages to using serial and parallel ports. For example, the slower and less complex protocols can be a bit easier to debug when devices aren’t communicating, which [Jeremy Cook] demonstrates in his latest project.

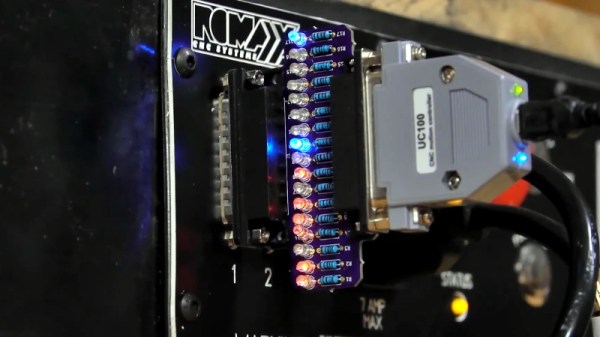
Looking to troubleshoot some communications problems he was having between his computer and CNC router, [Jeremy] came up with a handy little gadget that will allow him to visualize data passing through each pin of the parallel port in real-time. Even from across the room he can tell at a glance if communication is active, and with a keen eye, determine if he’s getting bi-directional traffic or not.

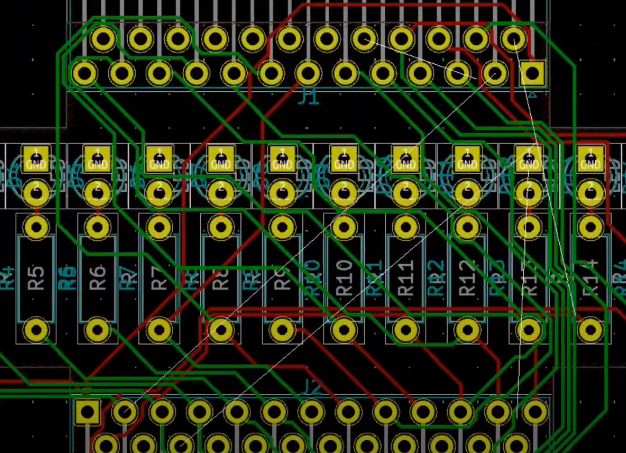
From a technical standpoint, this is a pretty simple project. The custom PCB is essentially just a pass-through, with an array of 3 mm LEDs and matching 10K resistors hanging off the data lines. But [Jeremy] found it to be an excellent excuse to brush up his KiCad skills. As he explains in the video after the break, this project certainly won’t impress the folks that do PCB design on a daily basis; but if you’re still learning the ropes, these are precisely the kind of projects you should be looking for.

Before any of you say it in the comments, we already know devices like this are available commercially for a few bucks. But that’s hardly the point. Things would be awfully slow around these parts if we disregarded any project that had a commercial alternative.

Continue reading “Blinkenlights For Your Parallel Port”

A Twisted Tale Of Woven Wires

A little over a year ago, we ran a contest that challenged readers to leave the comfort of their PCBs and breadboards. We wanted to see circuits built in three dimensions, with extra points awarded for creativity and artistic flair. Truth be told there was initially some concern that the “Circuit Sculpture” contest was a bit too abstract for the Hackaday community, but the overwhelming number of absolutely gorgeous entries certainly put those doubts to rest.

In a recent video, [Michael Aichlmayr] walks viewers through the creation of his mesmerizing entry Wonderlandscape, which ended up taking honorable mention in the Circuit Sculpture contest for Best Metalworks. Though this is much more than just a simple walk-through of a project. Sure you’ll see how brass bar stock was artfully twisted and wrapped to create a metallic winterscape that looks like it could have come from Bob Ross’s hitherto unknown cyberpunk period, but that’s only half the story.

The brass bar was twisted by hand with pliers.

In the video, [Michael] recalls how he discovered the burgeoning electronic sculpture community, and points to a few exceptional examples that got him hooked on finding the beauty that’s usually hidden inside of a plastic enclosure. Eventually he heard about the Circuit Sculpture contest, and decided it was the perfect opportunity to build something of his own. That’s right, Wonderlandscape is his very first attempt at turning electronics into art.

But the best may be yet to come. [Michael] explains that, due to the time constraints of the contest, he had to use metal stock purchased from the crafts store. But his ultimate goal is actually to melt down salvaged brass and bronze components and make his own wire and rods. We can’t wait to see what he’ll be able to accomplish when he starts working with his own custom made metal, and are eagerly awaiting the future video that he says will go over the techniques he’s been working on.

This story is a great reminder of how stepping out of your comfort zone once and awhile can be a good thing. Entering the contest with no previous experience was a risk to be sure, but [Michael] came out the other side more experienced and with a few new friends in the community. So why not enter our latest contest and see where it takes you?

Continue reading “A Twisted Tale Of Woven Wires”

Free Cloud Data Logging Courtesy Of Google

Pushing all of your data into “The Cloud” sounds great, until you remember that what you’re really talking about is somebody else’s computer. That means all your hard-crunched data could potentially become inaccessible should the company running the service go under or change the rules on you; a situation we’ve unfortunately already seen play out.

Which makes this project from [Zoltan Doczi] and [Róbert Szalóki] so appealing. Not only does it show how easy it can be to shuffle your data through the tubes and off to that big data center in the sky, but they send it to one of the few companies that seem incapable of losing market share: Google. But fear not, this isn’t some experimental sensor API that the Big G will decide it’s shutting down next Tuesday in favor of a nearly identical service with a different name. All your precious bits and bytes will be stored in one of Google’s flagship products: Sheets.

It turns out that Sheets has a “Deploy as Web App” function that will spit out a custom URL that clients can use to access the spreadsheet data. This project shows how that feature can be exploited with the help of a little Python code to push data directly into Google’s servers from the Raspberry Pi or other suitably diminutive computer.

Here they’re using a temperature and humidity sensor, but the only limitation is your imagination. As an added bonus, the chart and graph functions in Sheets can be used to make high-quality visualizations of your recorded data at no extra charge.

You might be wondering what would happen if a bunch of hackers all over the world started pushing data into Sheets every few seconds. Honestly, we don’t know. The last time we showed how you could interact with one of their services in unexpected ways, Google announced they were retiring it on the very same day. It was probably just a coincidence, but to be on the safe side, we’d recommend keeping the update frequency fairly low.

Back in 2012, before the service was even known as Google Sheets, we covered how you could do something very similar by manually assembling HTTP packets containing your data. We’d say this validates the concept for long-term data storage, but clearly the methodology has changed considerably in the intervening years. Somebody else’s computer, indeed.

Teardown: Generation NEX

Today if you wanted a little gadget to sit on your shelf and let you play classic games from the early console era, you’d likely reach for the Raspberry Pi. With slick emulator front-ends like RetroPie and DIY kits available on Amazon, you don’t even need to be a technical wizard or veteran penguin wrangler to set it up. If you can follow an online tutorial, you can easily cram the last few decades of gaming into a cheap and convenient package.

But things were a bit different back in 2005. There weren’t a lot of options for playing old games on the big screen, and what was out there tended to be less than ideal. You could hack an original Xbox or gut an old laptop to make an emulation box that could comfortably blend in with your DVD player, but that wasn’t exactly in everyone’s wheelhouse. Besides, what if you had the original cartridges and just wanted to play them on a slightly more modern system?

I’m willing to bet whoever wrote this owns a katana.

Enter Messiah, and their Generation NEX console. As you might have gathered from their ever-so-humble name, Messiah claimed their re-imagined version of the Nintendo Entertainment System would “Bring Gaming Back to Life” by playing the original cartridges with enhanced audio and visual clarity. It also featured integrated support for wireless controllers, which at the time was only just becoming the standard on contemporary consoles. According to the manufacturer, the Generation NEX used custom hardware based on the “NES algorithm” that offered nearly 100% game compatibility.

Unfortunately, the system was a complete bomb. Despite Messiah’s claims, the Generation NEX ended up being yet another “NES-on-a-chip” (NOAC) clone, and a pretty poor one at that. Reviewers at the time reported compatibility issues with many popular titles, despite the fact that they were listed as working on Messiah’s website. The touted audio and video improvements were nowhere to be found, and in fact many users claimed the original NES looked and sounded better in side-by-side comparisons.

It didn’t matter how slick the console looked or how convenient the wireless controllers were; if the games themselves didn’t play well, the system was doomed. Predictably the company folded not long after, leaving owners stuck with the over-priced and under-performing consoles. Realistically, most of them ended up in landfills. Today we’ll take a look inside a relatively rare survivor and see just what nostalgic gamers got for their money in 2005.

Continue reading “Teardown: Generation NEX”

Turn An Unused Pi Zero Into A Parts Bin WiFi Extender

We know a lot of you are sitting on an unused Raspberry Pi Zero W, maybe even several of them. The things are just too small and cheap not to buy in bulk when the opportunity presents itself. Unfortunately, the Zero isn’t exactly a powerhouse, and it can sometimes be tricky to find an application that really fits the hardware.

Which is why this tip from [Tejas Lotlikar] is worth taking a look at. Using the Pi Zero W, a cheap USB WiFi adapter, and some software trickery, you can put together a cheap extender for your wireless network. The Pi should even have a few cycles left over to run ad-blocking software like Pi-hole while it shuffles your packets around the tubes.

[Tejas] explains every step of the process, from putting the Raspbian image onto an SD card to convincing wpa_supplicant to put the Pi’s WiFi radio into Access Point mode. Incidentally, this means that you don’t need to be very selective about the make and model of the USB wireless adapter. Something with an external antenna is preferable since it will be able to pull in the weak source signal, but you don’t have to worry about it supporting Soft AP.

With the software configured, all you need to finish this project off is an enclosure. A custom 3D printed case large enough to hold both the Pi and the external WiFi adapter would be a nice touch.

Reverse Engineering Saves Trashed LED Panels

While out riding his bike, [Hammond Pearce] came across a dumpster overflowing with large LED panels. Despite the fact that the model numbers didn’t reveal anything helpful after some online searching, he decided to pedal off with as many as he could safely carry. The COVID-19 lockdown left him with only a limited set of tools, be he still managed to crack the protocol used to control his e-waste score and document it for our reading pleasure.

Between the helpful labels on the PCB silkscreen and the advice of a friend that used to work on digital road signs, it didn’t take [Hammond] long to get a general idea of what the panels were looking for in terms of power and control. Especially once he noticed the MBI5024 shift registers dotting the board.

The next step was to take an ATmega328PB based development board and start throwing data at the panel’s input lines to see if he could elicit a response. With careful attention and some custom code, he eventually figured out that each byte of data sent down the line would control a 4 x 2 section of LEDs.

Once he had the basics down, the next step was to start expanding his code to handle things like shapes, text, and daisy-chained panels. After posting some of his work to Reddit, cyber-sleuths determined that the protocol appeared to be some variation of HUB75, which gave [Hammond] hints on what some of the other pins in the connector might be used for. He’s released all of his code online for anyone who might find it useful, but since he still doesn’t know who made these panels and why there’s really no telling how many of them are actually floating around out there.

Figuring out how to talk to an unknown or undocumented piece of hardware can be intimidating, but success stories like these are reminders of why it’s worth putting the effort in. As we’ve seen, the difference between trash and treasure is often a keen eye and a few lines of code.

Halloween Costume Turned Positive Pressure Suit

As a general rule, you probably shouldn’t be getting your Personal Protective Equipment (PPE) from the party store. But these are exceptional times, and rather than potentially depriving medical professionals the equipment they so desperately need on the front lines, the team at [Robots Everywhere] has been looking into improvised PPE. We’re not sure things are at the point where you would need to don this DIY Positive Pressure Suit (PAPR), but it’s certainly an interesting look at what’s possible when you think outside the box.

At the most basic level, a PAPR is a mostly air-tight garment that is continuously pumped full of filtered air. As long as the pressure inside the suit is higher than outside, there’s no way airborne bacteria and viruses can get in without traveling through the filter first.

For this project, the folks at [Robots Everywhere] took an inflatable astronaut costume and replaced the dinky original air pump with a much larger 12 V unit designed for inflating air beds. Upgrading the pump not only increased the internal air pressure of the suit, but also made it easier to add a HEPA filter to the inlet. As long as the suit is inflated and there are no leaks in the hose, the wearer will be surrounded by a bubble of filtered air.

Presumably, you don’t want to be tethered to the wall though, so the write-up briefly touches on how the pump system can be made more mobile with the addition of an RC-style battery pack. With the pump and batteries secured in a pouch attached to the suit, the wearer is free to venture outside the confines of their self-isolation bunker and go about their dystopian daily business.

A getup like this might seem a bit excessive, but with so many folks desperate for information on homemade protective gear, we aren’t passing any judgment. The team says you can modify a cheap painter’s suit in much the same way, but frankly, that doesn’t sound nearly as fun to us.

[Thanks to Aron for the tip.]