Mobile Power From Cordless Tool Batteries

For years, [Michael Davis] has been using a large lead-acid battery to power the electronic components of his custom Dobsonian telescope; but that doesn’t mean he particularly enjoyed it. The battery was heavy, and you always had to be mindful of the wires connecting it to the scope. Looking to improve on the situation somewhat, he decided to build an adapter for Ryobi cordless tool batteries.

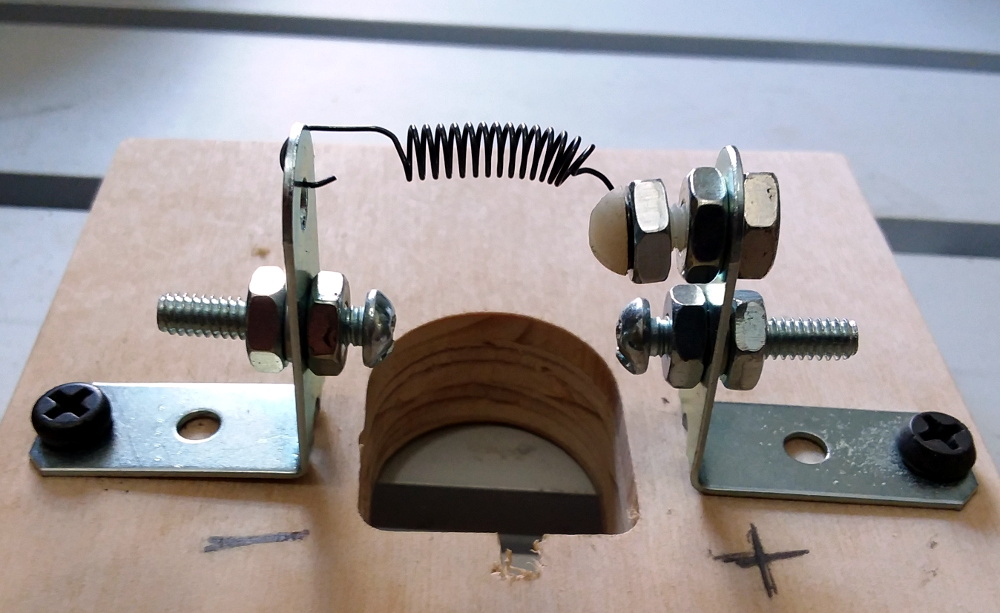
[Michael] had already seen similar 3D printed adapters, but decided to make his the traditional way. Well, sort of. He used a CNC router to cut out the distinctive shape required to accept the 18 V lithium-ion battery pack, but the rest was assembled from hardware store parts.

Bent mending plates with nuts and bolts were used to create adjustable contacts, and a spring added to the top ensures that there’s always a bit of tension in the system so it makes a good electrical contact. This setup makes for a very robust connector, and as [Michael] points out, the bolts make a convenient place to attach your wires.

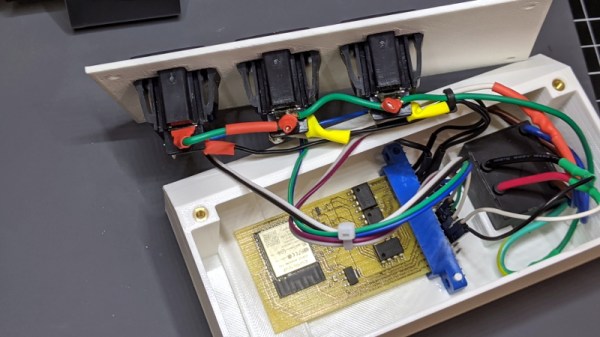
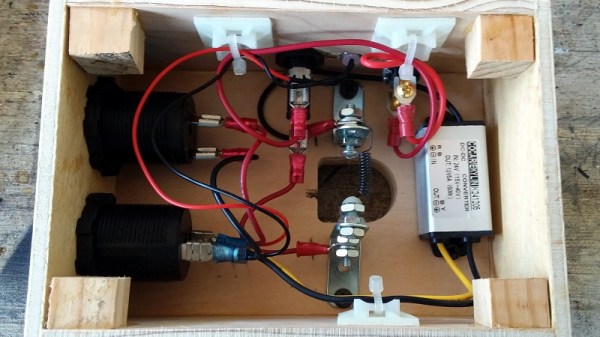
With the logistics of physically connecting to the Ryobi batteries sorted out, the next step was turning that into useful power for the telescope. A stable 12 V is produced by way of a compact DC-DC converter, and a toggle switch and fuse connect it to a pair of automotive-style power sockets. Everything is held inside of a wooden box that’s far smaller and lighter than the lead-acid monster it replaced, meaning it can get mounted directly to the telescope rather than laying on the ground.

If you want to build a similar adapter, the 3D printing route will potentially save you some time and effort. But we have to admit that the heavy-duty connection [Michael] has rigged up here looks quite stout. If you’ve got an application where the battery could be knocked around or vibrated lose, this may be the way to go.

Building An ESP32 Smart Power Strip From Scratch

Surely the most straightforward way of creating a smart power strip would be to take an existing model and hack in some relays that you could fire with a WiFi-enabled microcontroller. But where’s the fun in that? Instead of repurposing a commercial power strip for his recent project, [Md Raz] decided to just build the whole thing himself.

The project started with a 3D printed enclosure that could hold the electronics and three panel mount sockets. The use of heat-set inserts makes it a bit more robust for future upgrade work, but otherwise it’s a fairly simple rectangular design. Nobody ever said a power strip had to be pretty, right? In addition to the panel mount sockets, there’s also a AC-DC converter to step mains voltage down to 5 VDC for the ESP32.

In addition to the microcontroller, the custom PCB in the power strip holds a trio of MOSFETs connected to AQH2223 solid state relay (SSR) chips. Once the ESP32 toggles the line attached to each MOSFET, the indicator LED above the outlet goes on and the appropriate SSR is thrown to turn on the power. With a simple web interface running on the microcontroller, all three outlets can be independently controlled from any device with a web browser.

If you’d like to limit your interaction with mains voltages, then we’ve seen some projects that commandeer the low-voltage side of a commercial smart power strip. But remember, putting a Raspberry Pi inside of a power strip might seem suspicious to some folks.

STM32 Blue Pill Turned GPG Security Token

Feeling the cost of commercial options like the YubiKey and Nitrokey were too high, [TheStaticTurtle] started researching DIY alternatives. He found an open source project allows the STM32F103 to act as a USB cryptographic token for GNU Privacy Guard, which was a start. All he had to do was build a suitable device to install it on.

Blue Pill proof of concept

The first step was to test the software out on the popular “Blue Pill” development board, which [TheStaticTurtle] documents in the write-up should anyone want to give it a try themselves. The ST-Link V2 was already a supported target, so it only took some relatively minor tweaks to get running and add support for a simple push button. The output of gpg --card-status showed the device was working as expected, so with the software sorted, it was time to take a closer look at the hardware.

To create his “TurtleAuth” dongle, [TheStaticTurtle] started with the basic layout of the Blue Pill and added in a TTP223E touch control IC. The original Micro USB port was also swapped for a male USB-A connector so the device could be plugged directly into a computer. An upper PCB, containing the status LEDs and touch pad, was then designed so it would fit over the main board as an enclosure of sorts. While the sides are still open, the device looks robust enough to handle life in a laptop bag at least.

While it’s not exactly a common project, this isn’t the first time we’ve seen somebody spin up their own hardware token. More evidence of what the dedicated individual can accomplish these days on a relatively limited budget.

An Open Hardware Modem For The Modern Era

Readers of a certain age will no doubt remember the external modems that used to sit next to their computers, with the madly flashing LEDs and cacophony of familiar squeals announcing your impending connection to a realm of infinite possibilities. By comparison, connecting to the Internet these days is about as exciting as flicking on the kitchen light. Perhaps even less so.

But while we don’t use them to connect our devices to the Internet anymore, that doesn’t mean the analog modem is completely without its use. The OpenModem by [Mark Qvist] is an open hardware and software audio frequency-shift keying (AFSK) modem that recalls some of the charm (and connection speeds) of those early devices.

It’s intended primarily for packet radio communications, and as such is designed to tie into a radio’s Push-to-Talk functionality with a standard 3.5 mm jack connector. Support for AES-128 encryption means it will take a bit more than an RTL-SDR to eavesdrop on your communications. Though if you’re really worried about others listening in, the project page says you could even use the OpenModem over a wired connection as you would have in the old days.

If you just want a simple and reliable way to get a secure AFSK communication link going, the OpenModem looks like it would be a great choice. But more than that, it offers a compelling platform for learning and experimentation. The hardware is compatible with the Arduino IDE, so you can even write your own firmware should you want to spin up your own take on this classic communications device.

The OpenModem is the evolution of the MicroModem that [Mark] developed years ago, and it’s clear that the project has come a long way since then. Of course, if you’re more about the look than the underlying technology, you could always just put a WiFi access point into the case of an old analog modem.

[Thanks to Boofdas for the tip.]

Teardown: The Writer Word Processor

For modern students, the spiral notebook has given way to the laptop and the pocket calculator has been supplanted by the smart phone. We’re not just talking about high school and college, either. Today, the education of even grade school children is intrinsically linked with technology. While some might question the wisdom of moving away from the pencil and pad at such a young age, there’s little question that all the kids stuck at home right now due to COVID-19 would have had a much harder time transitioning to remote learning otherwise.

But that certainly wasn’t the case when Advanced Keyboard Technologies released the Writer in 2003. Back then, five years before the first netbooks hit the market, you’d be hard pressed to find a laptop cheap enough to give to a grade school student. In comparison, these small electronic word processors could be purchased for as little as $150. Not only was the initial price low, but the maintenance costs were almost negligible. They ran for hundreds of hours on a standard AA batteries, and didn’t require schools to have any IT staff to manage them. Sure they couldn’t get on the Internet or even run any software, but they would give students a chance to hone their keyboarding skills. Continue reading “Teardown: The Writer Word Processor”

Unique Strandbeest Stands Tall With Line Of Legs

Multiple rows of intricately articulated legs are the defining characteristic of the Strandbeest, but [James Bruton] wondered if he could reduce that down to a single row using the same principles at work in a self-balancing two wheeled robot. While it’s perhaps a bit early to call his experiments a complete success, the first tentative steps taken by his (relatively) svelte Strandbeest certainly look promising.

Initially the robot only had two pairs of legs, but in testing [James] found this arrangement to be a bit unstable. By bringing the total count to four legs per side and improving the counterweight arrangement, the bot has been able to walk the length of the workshop. Unfortunately, an issue with the leg design seems to be preventing the Strandbeest from taking any backward steps.

Normally this wouldn’t be that big of a problem, but in this case it’s keeping the Strandbeest from being able to self-balance while standing still. In other words, the robot needs to keep moving forward or it will fall over. Still, [James] thinks the idea has promise and wants to continue experimenting with the bot in a larger area.

Specifically, he wants to see if the dual-motor robot can turn by varying the speed the two sets of legs are running at. If it can walk in a tight enough circle, it could keep right on marching until the power runs down. Sounds more than a little nightmarish to us, but we’d still like to see it.

Reader’s may recall [James] from this other another robotic projects, such as the phenomenal OpenDog. We don’t know where his obsession of legged robots comes from, but we certainly aren’t complaining.

Continue reading “Unique Strandbeest Stands Tall With Line Of Legs”

UV Phone Sanitizer Shows The Power Of Modern DIY

Editor’s Update: According to the schematic for this project, SST-10-UV-A130-F405-00 (PDF) LEDs are used which produce 405nm UV-A light. The manufacturer, Luminus, does not recommend that part for disinfection or sterilization. Luminus sells UV-C LEDs for that purpose, generating 275-285nm. After publication the part number used was changed to and American Opto L933-UV265-2-20 which is a UV-C LED producing 265-278nm.

The global COVID-19 pandemic has had a serious impact on the hacking and making scene, though it hasn’t been all bad. Sure, shipping on average is taking a lot longer than we’d like when ordering parts, but otherwise being stuck at home has given many people far more time to work on their projects than they would have had otherwise. In some cases, it’s also been a reminder of just how far we’ve come in terms of what the dedicated individual is capable of producing within the confines of their own home.

As a perfect example, take a look at this UV sanitizer box built by [Md Raz]. Looking for a way to quickly and easily kill germs on smartphones and other small devices, he used the considerable capabilities afforded to the modern hacker to produce a professional-looking device in far less time than it would have if he had to outsource things like PCB manufacturing or injection molding.

Inside the 3D printed enclosure is an array of SMD UV-C LEDs that, according to the manufacturer’s specs, will destroy viruses and bacteria in 5 minutes. To make sure the LEDs are given enough time to do their job, [Md] is using an ATtiny85 to control the countdown and a seven segment display to let the user know how much longer they have to wait. All the electronics are held on PCBs produced with a BotFactory SV2 desktop PCB printer, but for those of us with somewhat more limited budgets, a mill or even a modified laser engraver could be used to produce similar boards.

With everything going on, there’s understandably been increased demand for germicidal lights. But unfortunately, some unscrupulous manufacturers are trying to take advantage of the situation. Being able to select the LEDs for this device based on their specifications is arguably just as important as how quickly it was produced. Though we’d still advise a position of “trust, but verify” when it comes to UV-C.