Unique 3D Printer Turned CNC Engraver

As we’ve said in the past, one of the most exciting things about the proliferation of low-cost desktop 3D printers (beyond all the little boats we get to see on Reddit), is the fact that their motion control systems are ripe for repurposing. Outfitting a cheap 3D printer with a drag knife, pen holder, or even a solid-state laser module, are all very common ways of squeezing even more functionality out of these machines.

But thanks to the somewhat unusual nature of his printer, [Hammad Nasir] was able to take this concept a bit farther. Being considerably more rigid than the $99 acrylic-framed box of bolts we’ve become accustomed to, he was able to fit it with a basic spindle and use it for CNC engraving. He won’t be milling any steel on this rig, but judging by the pictures on the Hackaday.io page for the project, it does a respectable job cutting designs into plastic at least.

The IdeaWerk 3D printer that [Hammad] used for this project is phenomenally overbuilt. We don’t know whether the designers simply wanted to make it look futuristic and high-tech (admittedly, it does look like it could double as a movie prop) or they thought there was a chance it might get thrown down the stairs occasionally. In either event, it’s built like an absolute tank.

While the frame on lesser printers would likely flex as soon as the bit started moving across the workpiece, this thing isn’t going anywhere. Of course this machine is presumably still running on the standard GT2 belt and NEMA 17 arrangement that has been used in desktop 3D printers since the first wooden machines clattered to life. So while the frame might be ready to take some punishment, the drive system could respectfully disagree once the pressure is on.

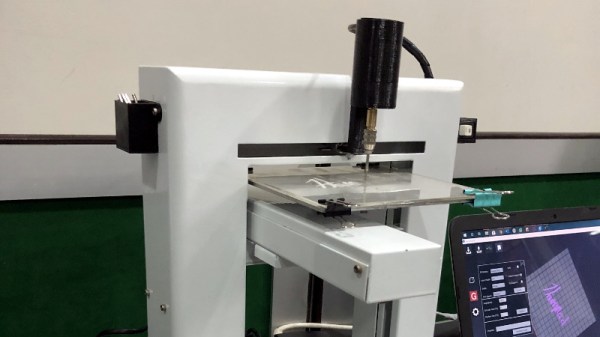
Modification was simplified by the fact that the hotend and extruder assembly on the IdeaWerk is mounted to the X axis with just a single bolt. This makes it exceptionally easy to design alternate tool mounts, though arguably the 3D printed motor holder [Hammad] is using here is the weak link in the entire system; if it’s going to flex anywhere, it’s going to be there.

If you’re more photonically inclined, you might be interested in this similarly straightforward project that sees a 2.5 W laser module get bolted onto an entry level 3D printer.

HoloLens Brings Video Game Kart Racing To Life

There aren’t a lot of video game experiences we can easily recreate in the physical realm. You’ll quickly find that jumping on mushrooms in the real world doesn’t have nearly the same appeal as it does in Super Mario, and we won’t even get into the dangers of trying to recreate Frogger on your local multi-lane. But video game style go-kart racing? We have all the technology to pull that off, somebody just has to put all the pieces together.

Which is precisely what [Ian Charnas] is trying to do with his latest project. Using Microsoft’s HoloLens augmented reality headset, electric go-karts, 433 MHz wireless transceivers, and some Arduinos sprinkled in, he’s created the closest thing to Mario Kart that us flesh and blood mortals are likely to experience anytime soon.

The HoloLens headset worn by each driver overlays the necessary graphical elements like pickups and weapon effects, as well as puts over-the-top cartoon heads on the other racers. But of course, that’s only half of the story. Seeing the pickups and gadgets doesn’t do you any good if they don’t have any effect on the actual race.

To that end, [Ian] has come up with a way to control the performance of the go-karts using an electronic “backpack” that mounts to each kart. So speed boosting pickups actually make the kart go faster, and if a driver gets hit with a weapon fired at them, they get slowed down.

That’s the high-level version, anyway. There’s obviously a lot going on behind the scenes, some of which are detailed on the Hackaday.io page. One of the interesting notes is that the HoloLens needs visual markers to orient itself, which in the video after the break can be seen as black and white posters dotting the walls alongside the track. As the project progresses, [Ian] is hoping that these can be camouflaged in creative ways (such as being made to look like audience members or checkered flags) to make the overall experience more immersive.

According to [Ian], the next step is to find partners who want to help elevate this from a one-off project to something that you might actually see at an amusement park. We wish him luck, if for no other reason than we really want to play the thing ourselves. In the meantime, we’ll have to settle for racing hacked Power Wheels.

Continue reading “HoloLens Brings Video Game Kart Racing To Life”

Unlocking SIM Cards With A Logic Analyzer

[Jason Gin] wanted to reuse the SIM card that came with a ZTE WF721 wireless terminal he got from AT&T, but as he expected, it was locked to the device. Unfortunately, the terminal has no function to change the PIN and none of the defaults he tried seemed to work. The only thing left to do was crack it open and sniff the PIN with a logic analyzer.

This project is a fantastic example of the kind of reverse engineering you can pull off with even a cheap logic analyzer and a keen eye, but also perfectly illustrates the fact that having physical access to a device largely negates any security measures the manufacturer tries to implement. [Jason] already knew what the SIM unlock command would look like; he just needed to capture the exchange between the WF721 and SIM card, find the correct byte sequence, and look at the bytes directly after it.

Finding the test pads on the rear of the SIM slot, he wired his DSLogic Plus logic analyzer up to the VCC, CLK, RST, and I/O pins, then found a convenient place to attach his ground wire. After a bit of fiddling, he determined the SIM card was being run at 4 MHz, so he needed to configure a baud rate of 250 kbit/s to read the UART messages passing between the devices.

Once he found the bytes that signified successful unlocking, he was able to work his way backwards and determine the unlock command and its PIN code. It turns out the PIN was even being sent over the wire in plain text, though with the way security is often handled these days, we can’t say it surprises us. All [Jason] had to do then was put the SIM in his phone and punch in the sniffed PIN when prompted.

Could [Jason] have just run out to the store and picked up a prepaid SIM instead of cracking open this wireless terminal and sniffing its communications with a logic analyzer? Of course. But where’s the fun in that?

Jeremy Cook Is Living His Strandbeest Dream

The first thing Jeremy Cook thought when he saw a video of Theo Jansen’s Strandbeest walking across the beach was how incredible the machine looked. His second thought was that there was no way he’d ever be able to build something like that himself. It’s a feeling that most of us have had at one time or another, especially when starting down a path we’ve never been on before.

But those doubts didn’t keep him from researching how the Strandbeest worked, or stop him from taking the first tentative steps towards building his own version. It certainly didn’t happen overnight. It didn’t happen over a month or even a year, either.

ClearCrawler at the 2019 Hackaday Superconference

For those keeping score, his talk at the 2019 Hackaday Superconference, “Strandbeests: From Impossible Build to Dominating My Garage” is the culmination of over six years of experimentation and iteration.

His first builds could barely move, and when they did, it wasn’t for long. But the latest version, which he demonstrated live in front of a packed audience at the LA College of Music, trotted across the stage with an almost otherworldly smoothness. To say that he’s gotten good at building these machines would be something of an understatement.

Jeremy’s talk is primarily focused on his Strandbeest creations, but it’s also a fascinating look at how a person can gradually move from inspiration to mastery through incremental improvements. He could have stopped after the first, second, or even third failure. But instead he persisted to the point he’s an expert at something he once believed was out of his reach.

Continue reading “Jeremy Cook Is Living His Strandbeest Dream”

A Pocket-Sized Terminal For Mobile Python Hacking

Inspired by the good old days when your computer would boot directly into BASIC, [Le Roux Bodenstein] has created a handheld device he calls “DumbDumb” that can drop you into a MicroPython environment at a moment’s notice. If that doesn’t interest you, think of it this way: it’s a (relatively) VT100 compatible serial terminal with a physical keyboard that can fit in your pocket.

Being essentially just a dumb terminal (hence the name), there’s actually not a lot of hardware on the board. Beyond the 320×240 NewHaven 2.4 inch LCD, there’s just an STM32G071R8 microcontroller and a handful of passives. Plus the 57 tactile buttons that make up the keyboard, of course.

The MicroPython part comes in thanks to the spot on the back of the board that accepts an Adafruit Feather Wing. In this case, it’s the HUZZAH32 with an ESP32 on board, but it could work with other variants as well. With the wide array of Feather boards available, this terminal could actually be used for an array of applications.

So even if fiddling around with MicroPython isn’t your idea of a good time, there’s almost certainly some interesting software you could come up with for a tiny network-attached terminal like this. For example, it might be just what you need to start working on that LoRa pager system.

A VFD Wall Thermometer

Want to build something using VFD tubes, but don’t need yet another clock project? In that case, this wall mounted temperature and humidity display created by [commanderkull] might be exactly what you’re looking for. With six IV-11 tubes, this display is a practical way to add some of that gorgeous blue-green glow to your home or office.

The USB powered display uses a XL6009 and an XL7015 to provide the 24 V and 1.8 V needed by the IV-11 tubes, respectively. Both of which can be disconnected with jumpers to shut down the tubes without powering off the entire device, a useful feature when programming and debugging the display’s ATmega328P microcontroller. Each tube is connected to the ATmega with an 74HC595 shift register and a UDN2981 driver. Temperature and humidity data is provided, perhaps unsurprisingly, by the exceptionally common DHT22 sensor.

If you are looking to build another clock with these style tubes, there’s certainly enough prior art out there to get you started. We’ve also seen faux VFDs that you could use for either project, just in case you aren’t looking to deal with the voltage requirements and relative rarity of the real thing.

Breathe Easy With This Online Dust Sensor Box

It’s an unfortunate reality that for many of us, our air isn’t nearly as clean as we’d like. From smog to wildfires, there’s a whole lot of stuff in the air that we’d just as soon like to keep out of our lungs. But in order to combat this enemy, you first need to understand it. That means figuring out just what’s in the air you breathe, and how much of it. That’s where devices like the Dust Box from [The IoT GURU] can come in handy.

Inside the 3D printed enclosure is a Wemos D1 Mini ESP8266 development board, sitting on a custom breakout PCB. This board gives you some easy expandability to add your own sensors and hardware, though in this particular configuration, the Dust Box is using the BME280 sensor for general environmental monitoring and the SDS011 laser particle sensor to determine what’s in the air. Just plug it into a convenient USB power source, make sure it’s connected to the WiFi, and off it goes.

But where does all that lovely data end up? That’s up to you, but in this case, the [The IoT GURU] is pushing everything out to a web interface that allows the user to view yearly, monthly, and weekly historical data for each of the parameters the Dust Box can check. This is probably a bit more granular than most of us need, but it’s a good example of what’s possible should you need that much information.

For a similar project that allows you to take your sensors a bit farther off the beaten path, checkout FieldKit, which was recently crowned winner of the 2019 Hackaday Prize.