The GENIAC Lives Again

[Mike Gardi] credits his professional successes in the world of software development on the fact that he had access to logic-based educational games of a sort that simply don’t exist anymore. Back in the 1960s, kids who were interested in electronics or the burgeoning world of computers couldn’t just pick up a microcontroller or Raspberry Pi. They had to build their “computers” themselves from a kit.

One of those kits was the GENIus Almost-automatic Computer (GENIAC), a product which today is rare enough to essentially be unobtainable. Using images and documentation he was able to collect online, [Mike] not only managed to create a functioning replica of the GENIAC, but he even took the liberty of fixing some of the issues with the original 60-odd year old design.

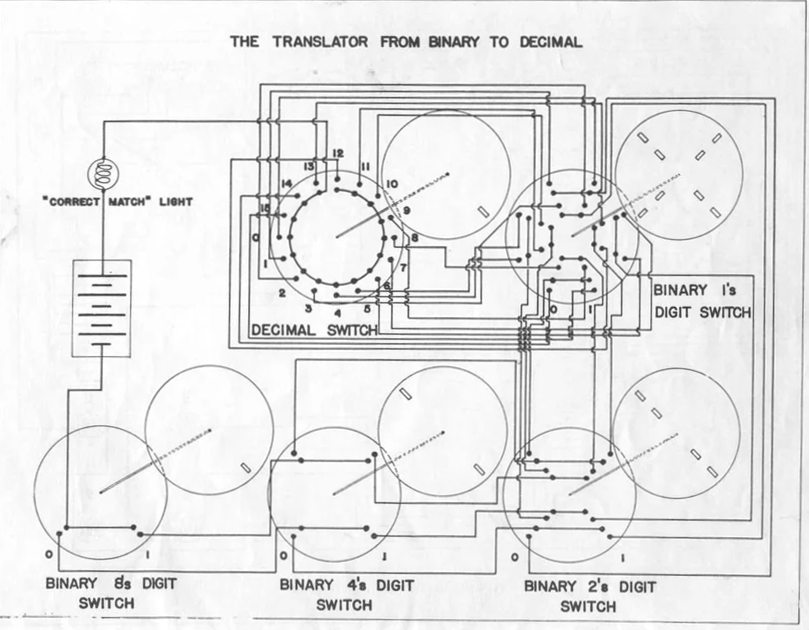
Fundamentally, the GENIAC is composed of rotary switches which feed into each other to perform rudimentary logical functions. With banks of incandescent bulbs serving as the output, users could watch how placing the switches in different positions would influence the result.

This might seem a little silly to modern audiences, but thanks to a well written manual that featured a collection of compelling projects, the GENIAC managed to get a lot of mileage out of a couple light bulbs and some wire. In fact, [Mike] says that the GENIAC is often considered one of the first examples of an interactive electronic narrative, as the carefully crafted stories from the manual allowed players to go on virtual adventures long before the average kid had ever heard of a “video game”. A video about how one of these stories, “The Uranium Shipment and the Space Pirates“, can be seen after the break. Even today it would be an interesting enough toy, but back in 1955 it would have been mind-blowing.

Construction of this replica will require access to a laser cutter so you can approximate the original’s drilled Masonite backing and rotors. From there, [Mike] has produced an array of 3D printable components which are attached to the board to serve as contacts, spacers, and various other pieces of bric-a-brac. Some of the parts he couldn’t find pictures of, so he was forced to come up with his own designs. But considering the finicky nature of the original, he thinks his printed parts may actually be better than what the toy shipped with.

If you like his work with GENIAC, be sure to check out the 3D printed replica of “The Amazing Dr. Nim” that [Mike] made last year, or his breathtaking recreation of the Minivac 601.

Continue reading “The GENIAC Lives Again”

This WiFi Spoofing Syringe Is For External Use Only

A browse through his collected works will tell you that [El Kentaro] loves to build electronics into interesting enclosures, so when he realized there’s enough room inside a 150 ml plastic syringe to mount an ESP8266, a battery, and a copious amount of RGB LEDs, the “Packet Injector” was the inescapable result.

Granted, the current incarnation of this device doesn’t literally inject packets. But [El Kentaro] wasn’t actually looking to do anything malicious, either. The Injector is intended to be a fun gag for him to bring along to the various hacker cons he finds himself at, like his DEAUTH “bling” necklace we saw at DEF CON 26, so having any practical function is really more icing on the cake than a strict requirement.

In the end, the code he came up with for the Adafruit Feather HUZZAH that uses the FakeBeaconESP8266 library to push out fictitious networks on demand. This is a trick we’ve seen used in the past, and makes for a relatively harmless prank as long as you’re not pumping out any particularly unpleasant SSIDs. In this case, [El Kentaro] punctuates his technicolor resplendency with beacons pronouncing “The WiFi Doctor is Here.”

But the real hack here is how [El Kentaro] controls the device. Everything is contained within the syringe chamber, and he uses a MPL3115A2 I2C barometric pressure sensor to detect when it’s being compressed. If the sensor reads a pressure high enough over the established baseline, the NeoPixel Ring fires up and the fake beacon frames start going out. Ease up on the plunger, and the code detects the drop in pressure and turns everything back off.

If this build has piqued your interest, [El Kentaro] gave a fascinating talk about his hardware design philosophy during the WOPR Summit that included how he designed and built some of his “greatest hits”; including a Raspberry Pi Zero enclosure that was, regrettably, not limited to external use.

A Post-Mortem For An Electric Car Charger

[Mastro Gippo] recently purchased a wall mounted charger for his electric car that looked great and had all the bells and whistles he wanted. There was only one problem: the thing burned up on him. Looking to find out how this seemingly high-end piece of hardware gave up the ghost so easily, he took it apart and tried to figure out where things went wrong. While he’s not looking to sling any mud and actually name the company who produced the charger, he certainly has some choice words for whoever green-lit this particular design.

With the charger open, there’s little doubt that something became very toasty inside. A large swath of the PCB has a black char mark on it, and in some places it looks like the board burned right through. After a close examination, [Mastro] is of the opinion that the board heated up to the point that the solder actually liquified on some connections. This conductive flow then shorted out components below it, and things went from bad to worse.

But where did all the heat come from? [Mastro] was stunned to see that a number of the components inside the charger were only rated for 30 amps, despite the label for the product clearly stating it’s good for up to 32A. With components pushed past their limits, something had to give. He wonders how such a device could have made it through the certification process; an excellent question we’d love to know the answer to.

The worst part is, it looks like the designers might have even known there was an overheating issue. [Mastro] notes that there are heatsinks bolted not to a component as you might assume, but directly to the PCB itself. We’ve seen what happens when designers take a cavalier attitude towards overheating components, and the fact that something like an electric vehicle charger was designed so poorly is quite concerning.

Arduino Traffic Light Sings The Song Of Its People

Getting an old traffic light and wiring it up to do its thing inside your house isn’t exactly a new trick; it’s so common that it wouldn’t normally pass muster for these hallowed pages. Even using one up to show the real-time status of your build or system resource utilization would be pushing it at this point. To get our attention, your traffic light is going to need to have a unique hook.

So how did [Ronald Diaz] manage to get his project to stand out from the rest? Interestingly enough, it’s nothing you can see. His traffic light doesn’t just look the part, it also sounds like the real thing. With far more effort and attention to detail than you’d probably expect, he’s made it so his Australian pedestrian traffic light correctly mimics the complex chirping of the original.

Working from a video of the traffic light on YouTube, [Ronald] was able to extract and isolate the tones he was after. Performing spectral analysis on the audio sample, he was able to figure out the frequency and durations of the eleven individual tones which make up the complete pattern. From the 973 Hz tone that only lasts 25 ms to the continuous 500 Hz “woodpecker”, every element of the sound was meticulously recreated in his Arduino code.

The Arduino Pro Mini used to control the traffic light is not only responsible for playing the tones through a piezo speaker, but as you might expect, for firing off the relays which ultimately control the red and green lamps. With everything carefully orchestrated, [Ronald] can now get that authentic Australian side-of-the-road experience without having to leave the comfort of his own home.

If you’d rather your in-home traffic light be more useful than realistic, we’ve got plenty of prior art for you to check out. This traffic light that tells you how the value of Bitcoin is trending is a great example. Or maybe this one that can tell you if the Internet is down.

Continue reading “Arduino Traffic Light Sings The Song Of Its People”

Fail Of The Week: Spinning The Pripyat Ferris Wheel

This multifaceted fail comes to us straight from the Chernobyl Exclusion Zone, where a group of friends apparently decided that a fun weekend project would be trying to turn over the iconic ferris wheel in the Pripyat Amusement Park. The [Kreosan] crew documented their admittedly very creative attempt at suicide in the video after the break, but we can save you some time by telling you right up front that the decades-old ferris wheel never actually rotates more than a few degrees. Though that’s hardly the key failure of this endeavour.

Even if you don’t understand anything they’re saying (we certainly don’t), it’s not too hard to follow along with this harebrained scheme.

Under cover of darkness, the troupe gains access to the mechanisms below the towering Soviet-era ride, and removes the brake unit mounted next to the motor. With the wheel now free spinning, the team is elated to see the mechanical advantage is such that spinning the shaft by hand is enough to cause a very slight rotation of the pulley and cables attached to the wheel.

Realizing they need more speed, the group then spends the rest of the night and apparently a good deal of the following day attempting to spin the mechanism using the rear wheel of one of their electric bicycles. But a rubber wheel held by hand against a rusty shaft, rather unsurprisingly, turns out to be a fairly poor mechanical linkage. They get a couple partial rotations on the pulleys, but still no serious movement.

One of the guys was working on the next phase of the inexplicably misguided plan, removing some heavy counterweights hanging under the ferris wheel, when a young woman shows up with a dosimeter and starts taking some measurements. Eventually, one of these moonlighting ferris wheel engineers uses the meter to observe the elevated radiation levels of the dirt and rust accumulated on his bare hands. This swiftly brings the operation to a close, and they all ride off on their bikes.

This was, without question, a monumentally stupid thing to do. Even if this was just a run-of-the-mill ferris wheel that had been abandoned and exposed to the elements for over thirty years, climbing on the thing and trying to get it to spin would be dangerous. But when you combine that with the fact it’s common knowledge to those who explore the Exclusion Zone that there are parts of the ferris wheel still emitting radiation at hundreds of times the normal background dose, this misadventure is a strong contender for the 2019 Darwin Award.

We’re lucky the remnants of Chernobyl’s number four reactor are locked away inside the Chernobyl New Safe Confinement, or else some up-and-coming Internet celebrity might try to get in there and spin up the turbines for a laugh. We’ve seen some pretty crazy stunts from [Kreosan], and we’d like to see more. So please, stay safe(r) guys!

Continue reading “Fail Of The Week: Spinning The Pripyat Ferris Wheel”

Why Spacecraft Of The Future Will Be Extruded

It’s been fifty years since man first landed on the Moon, but despite all the incredible advancements in technology since Armstrong made that iconic first small step, we’ve yet to reach any farther into deep space than we did during the Apollo program. The giant leap that many assumed would naturally follow the Moon landing, such as a manned flyby of Venus, never came. We’ve been stuck in low Earth orbit (LEO) ever since, with a return to deep space perpetually promised to be just a few years away.

Falcon Heavy Payload Fairing

But why? The short answer is, of course, that space travel is monstrously expensive. It’s also dangerous and complex, but those issues pale in comparison to the mind-boggling bill that would be incurred by any nation that dares to send humans more than a few hundred kilometers above the surface of the Earth. If we’re going to have any chance of getting off this rock, the cost of putting a kilogram into orbit needs to get dramatically cheaper.

Luckily, we’re finally starting to see some positive development on that front. Commercial launch providers are currently slashing the cost of putting a payload into space. In its heyday, the Space Shuttle could carry 27,500 kg (60,600 lb) to LEO, at a cost of approximately $500 million per launch. Today, SpaceX’s Falcon Heavy can put 63,800 kg (140,700 lb) into the same orbit for less than $100 million. It’s still not pocket change, but you wouldn’t be completely out of line to call it revolutionary, either.

Unfortunately there’s a catch. The rockets being produced by SpaceX and other commercial companies are relatively small. The Falcon Heavy might be able to lift more than twice the mass as the Space Shuttle, but it has considerably less internal volume. That wouldn’t be a problem if we were trying to hurl lead blocks into space, but any spacecraft designed for human occupants will by necessity be fairly large and contain a considerable amount of empty space. As an example, the largest module of the International Space Station would be too long to physically fit inside the Falcon Heavy fairing, and yet it had a mass of only 15,900 kg (35,100 lb) at liftoff.

To maximize the capabilities of volume constrained boosters, there needs to be a paradigm shift in how we approach the design and construction of crewed spacecraft. Especially ones intended for long-duration missions. As it so happens, exciting research is being conducted to do exactly that. Rather than sending an assembled spacecraft into orbit, the hope is that we can eventually just send the raw materials and print it in space.

Continue reading “Why Spacecraft Of The Future Will Be Extruded”

Sniffed Transformer Puts Wired Doorbell Online

There’s certainly no shortage of “smart” gadgets out there that will provide you with a notification, or even a live audiovisual stream, whenever somebody is at your door. But as we’ve seen countless times before, not everyone is thrilled with the terms that most of these products operate under. Getting a notification on your phone when the pizza guy shows up shouldn’t require an email address, credit card number, or DNA sample.

For [Nick Touran], half the work was already done. There was already a traditional wired doorbell in his home, he just had to come up with a minimally invasive way to link it with Home Assistant. He reasoned that he could tap into the low-voltage side of the doorbell transformer and watch for the telltale fluctuations that would indicate the bell was doing its thing. The ESP8266 has an ADC to measure voltage and WiFi to connect to Home Assistant, so it seemed like the perfect bridge between old and new.

Transformer voltage before and after

Of course, as with any worthwhile project, it ended up being a bit more complicated. Wired doorbells generally operate on 16-24 VAC, and [Nick] knew if he tried to put his Wemos D1 across the line he’d release the critical Magic Smoke. What he needed was a voltage divider circuit that would take low-voltage AC and drop it to an even lower DC voltage that the microcontroller could cope with.

The simple circuit [Nick] comes up with cuts the voltage way down and removes the negative component completely. So what was originally 18.75 VAC turned into a series of 60 Hz blips at 2.4 VDC; perfect for feeding into a microcontroller ADC. With a baseline to work from, he could then write some code that would watch for variations in this signal to determine when the bell was ringing.

Or at least, that was the idea. While the setup worked well enough on the bench, its performance in the real-world left something to be desired. If his house guest had a heavy hand, it worked great. But a quick tap of the doorbell button would tend to go undetected. After investigating the issue, [Nick] found that he needed to use some software trickery to ensure the ESP8266 was able to keep up with the speedy signal. Once he was able to reliably detect short and long button presses, the rest was just a simple matter of sending an MQTT message to his automation system.

Compared to the hoops we’ve seen other hackers have to jump through to smarten up their doorbells, we think [Nick] got off fairly easy. This project is also an excellent example of how learning about circuit design and passive components can still come in handy in the Arduino Era.

Continue reading “Sniffed Transformer Puts Wired Doorbell Online”