Global Radio Direction Finding In Your Browser

Radio direction finding is one of those things that most Hackaday readers are likely to be familiar with at least on a conceptual level, but probably without much first-hand experience. After all it’s not everyday that you need to track down a rogue signal, let alone have access to the infrastructure necessary to triangulate its position. But thanks to the wonders of the Internet, at least the latter excuse is now a bit less valid.

Triangulated location of “The Buzzer”

The RTL-SDR Blog has run a very interesting article wherein they describe how the global network of Internet-connected KiwiSDR radios can be used for worldwide radio direction finding. If you’ve got a target in mind, and the time to fiddle around with the web-based SDR user interface, you now have access to the kind of technology that’s usually reserved for world superpowers. Indeed, the blog post claims this is the first time such capability has been put in the hands of the unwashed masses. Let’s try not to mess this up.

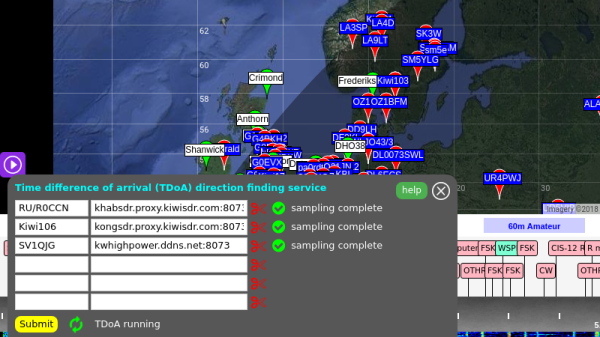
To start with, you should have a rough idea of where the signal is originating from. It doesn’t have to be exact, but you want to at least know which country to look in. Then you pick one of the nearby public KiwiSDR stations and tune the frequency you’re after. Repeat the process for a few more stations. In theory the more stations you have the better, but technically three should be enough to get you pretty close.

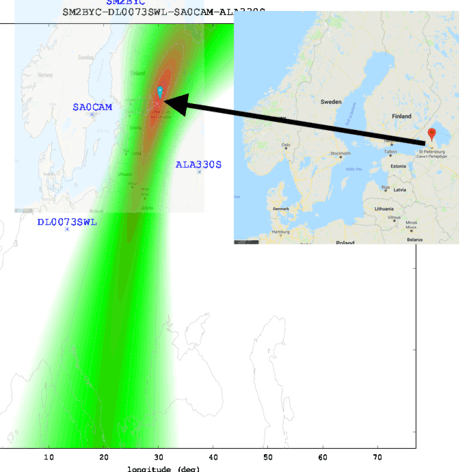
With your receiving stations selected, the system will then start Time Difference of Arrival (TDoA) sampling. This technique compares the time the signal arrives at each station in relation to the KiwiSDR’s GPS synchronized clock. With enough of this data from multiple stations, it can estimate the origin of the signal based on how long it takes to reach different parts of the globe.

It’s not perfect, but it’s pretty impressive for a community run project. The blog post goes on to give examples of both known and unknown signals they were able to triangulate with surprising accuracy: from the US Navy’s VLF submarine transmitter in Seattle, Washington to the mysterious “Buzzer” number station hidden somewhere in Russia.

We’ve covered small-scale triangulation using Wi-Fi, and even a project that aimed to use drones to home in on rescue beacons, but the scale of the KiwiSDR TDoA system is really on a whole new level. Use it wisely.

Incredible Atari 800XL Case Restoration

If you’ve been hanging around Hackaday for a while, you know that a large portion of the stuff we publish goes above and beyond what most people would consider a reasonable level of time and effort. One could argue that’s sort of the point: the easy way out is rarely the most exciting and interesting route you can take. We, and by extension our readers, are drawn to the projects that someone has really put their heart and soul into. If the person who created the thing wasn’t passionate about it, why should we be?

That being said, on occasion, even we are left in awe about the lengths some people will go to. A perfect example of this is the absolutely insane amount of time and effort [Drygol] has put into restoring an Atari 800XL that looked like it was run over by a truck. Through trial, error, and a bunch of polyester resin, he’s recreated whole sections of the Atari’s case that were missing.

To start the process, [Drygol] used metal rods to bridge the areas where the plastic was completely gone. By heating the rods with a torch and pushing them into the Atari’s case, he was able to create a firm base to work from. Additional rods were then soldered to these and bent, recreating the shape of the original case. With the “skeleton” of the repair in palce, the next step was filling it in.

[Drygol] borrowed an intact Atari 800XL case from a friend, and used that to create a mold of the missing sections from his own case. Most of his rear panel was missing, so it took some experimentation to create such a large mold. In the end he used silicone and a custom built tray that the case could sit in vertically, but he does mention that he never quite solved the problem of degassing the silicone. The mold still worked, but bubbles caused imperfections which needed to be filled in manually during the finishing process.

Using his silicone mold and the same tray, he was then able to pour polyester resin over the wire frame. This got him most of the way to rebuilding the case, but there was still plenty of filler and sanding required before the surface finish started to look half-way decent. When he got towards the very end of the finishing process, he used a mold he created of the case surface texture to roughen up the smooth areas left over from the filling process. Add a bit of custom spray paint, and the end result looks absolutely phenomenal considering the condition it was in originally.

We were already impressed by the work he put in during the first stages of the restoration, but this case repair is really on a whole new level. Between this and the incredible instructional videos [Eric Strebel] has been putting out, we’re really gaining a whole new respect for the power of polyester.

Continue reading “Incredible Atari 800XL Case Restoration”

Watney: A Fully 3D Printed Rover Platform

We’re getting to the point that seeing 3D printed parts in a project or hack isn’t as exciting as it was just a few years ago. The proliferation of low-cost desktop 3D printers means that finding a printer to squirt out a few parts for your build isn’t the adventure it once was. Gone are the days of heading to a local hackerspace or college hoping their janky Mendel felt like working that day. But all that really means is that hackers and makers now have the ability to utilize 3D printing even more. Forget printing one or two parts of your design, just print the whole thing.

That’s exactly what [Nik Ivanov] did with Watney, his fully 3D printed rover project. After lamenting that many so-called 3D printed rovers were anything but, he set out to design one that was not only made primarily of printed parts, but was robust enough to put some real work in. Over the course of several design iterations, he built a very capable all-wheel drive platform that needs only some electronics and a handful of M3 screws to leap into action.

As long as you’ve got a 3D printer big enough to handle the roughly 120mm x 190mm dimensions of this bot’s body, you’re well on the way to owning your very own video rover. [Nik] recommends printing everything in PETG, no doubt for its increased strength when it comes to things like the drive gears. Plus it’s low warp, which is really going to help when printing the top and bottom sections of the body. TPU is advised for the tires, but if you don’t have any (or your printer chokes on flexible filaments) you can just wrap the wheels with wide rubber bands.

[Nik] is using a Raspberry Pi Zero W as the brains of the operation, but the beauty of an open platform like this is that you could easily swap out the controls for something else to meet your needs. In addition to the Pi, there’s a L298N H-bridge motor controller to interface with the dual geared motors, as well as a servo to provide tilt for the SainSmart camera module.

We’ve often been surprised at just how expensive commercial robotics platforms can be, so we’re keenly interested in seeing if the availability of designs like this spur on DIY rover development. Though if you’re looking for something a little more rough and tumble, we’ve seen a 3D printed rover that looks combat-ready.

Continue reading “Watney: A Fully 3D Printed Rover Platform”

3D Printed Variable Area Jet Nozzle

If you’ve ever seen the back end of a military jet, you’ve likely seen variable area nozzles. They’re used to adjust the exhaust flow out of the rear of a jet engine during supersonic flight and while the afterburner is engaged. Commercial aircraft, with the exception of the Concorde, don’t need such fancy hardware since a static exhaust nozzle works well enough for the types of flying they’ll be doing. For much the same reasons, RC aircraft don’t need variable area nozzles either, but it doesn’t keep builders from wanting them.

Which brings us to this utterly gorgeous design by [Marco Colucci]. Made up of 23 individual PETG parts, this variable area nozzle is able to reduce its diameter by 50% with just a twist of the rotating collar. When paired with a hobby servo, this mechanism will allow the operator to adjust the nozzle aperture with an extra channel on their RC transmitter. The nozzle hasn’t flown yet, but a test run is being planned with a 40mm Electric Ducted Fan (EDF) motor. But thanks to the parametric design, it shouldn’t be a problem to scale it up to larger motors.

But the big question: does it have an effect on the EDF’s performance? The answer is, of course, no. This doesn’t actually do anything. An EDF motor has no need for this sort of nozzle, and even if you tried to fit this on a scale jet engine, it would melt in seconds from the exhaust temperature. This is purely a decorative item, to give the plane a more accurate scale look. To that end, it looks fantastic and would definitely be impressive on the back of a large scale RC military fighter.

If anything, [Marco] says he expects performance to be worse with the nozzle fitted. Not only is it adding dead weight to the plane, but restricting the air coming out of the back of the fan isn’t going to do anything but reduce thrust. But on the bright side: if it’s flying slower, it will be easier to see how awesome your adjustable nozzles look.

This isn’t the first time somebody’s tried to make an electric RC plane look like it’s packing a proper turbine, but it certainly might be one of the slickest. Only way to top this is to build an actual jet engine for the thing.

Continue reading “3D Printed Variable Area Jet Nozzle”

ERRF 18: New Products Make Their Debut

While ostensibly the purpose of the recent East Coast RepRap Festival (ERRF) was to celebrate the 3D printing community and culture, it should come as no surprise that more than a few companies decided to use the event as an opportunity to publicly launch new products. Who can blame them? It’s not as if every day you have a captive audience of 3D printing aficionados; you might as well make the best of it.

Many creations were being shown off for the first time at ERRF, and we surely didn’t get a chance to see them all. There was simply too much going on at any given time to be sure no printed stone was left unturned. But the following printers, filaments, and accessories caught our attention long enough to warrant sharing with the good readers of Hackaday.

Keep in mind that much of this information is tentative at best, and things could easily change between now and when the products actually go on sale. These events serve as much as a sounding board for new products as they do a venue for advertising and selling them, so feedback received from show attendees may very well alter some of these products from what we saw at ERRF.

Continue reading “ERRF 18: New Products Make Their Debut”

Fail Of The Week: Careful Case Mod Is All For Naught

Today’s entry comes to us from [Robert Tomsons], who was kind enough to document this crushing tale of woe so that we might all learn what true heartbreak is. If you’ve ever toiled away at getting that perfect surface finish with body filler, this one is going to hurt. In fact, you might just want to hit that “Back” button and head to safety now. There’s probably a pleasant story about some 3D printed thing being used with a Raspberry Pi of some sort that you can read instead.

For those of you brave enough to continue on, today we’ll be looking at what [Robert] thought would be a simple enough project. Seeing the board from a USB 3.0 external hard drive kicking around his parts bin, he had a rather unusual idea. Wanting to add an extra drive to his computer, but liking the idea of being able to independently control its power, he decided to integrate the external drive into machine’s front panel. This would not only allow him to power off the secondary drive when not in use, but it meant he could just plug his laptop into the front panel if he wanted to pull files off of it.

All [Robert] needed to do was make it look nice. He carefully squared off the edges of the external drive’s back panel to roughly the size of the computer’s 3.5 inch drive bay opening. He then glued the piece in place, and began the arduous task of using body filler to smooth everything out. It’s a dance that many a Hackaday reader will know all too well: filler, sand, primer, sand, filler, sand, primer, sand, so on and so on. In the end, the final result looked perfect; you’d never have thought the front panel wasn’t stock.

It should have been so easy. Just snap the case back together and be done with it. But when [Robert] finally got the machine buttoned back up and looked at the front, well, it’s safe to say his day couldn’t get much worse. Maybe the glue was not up to the task. Perhaps it was how excited he was to get the case put back together; a momentary loss of muscular coordination. A few extra foot-pounds of energy per second, per second. Who can say?

[Robert] says he’ll return to the project, but for now he needs a break. We agree. Interestingly, he mentions in his post that his body filler work was inspired by [Eric Strebel], a name that is well known around these parts. Considering how good it looked before it exploded, we’ll consider that high praise.

Hacked LCD Shutter Glasses See The Light

It’s always a little sad to see a big consumer technology fail. But of course, the upside for us hacker types is that the resulting fire sale is often an excellent source for hardware that might otherwise be difficult to come by. The most recent arrival to the Island of Unwanted Consumer Tech is 3D TV. There was a brief period of time when the TV manufacturers had nearly convinced people that sitting in their living room wearing big dorky electronic glasses was a workable solution, but in the end we know how it really turned out.

Those same dorky glasses are now available for a fraction of their original price, and are ripe for hacking. [Kevin Koster] has been playing around with them, and he’s recently came up with a circuit that offers the wearer a unique view of the world. Any reflective surface will look as though it is radiating rainbows, which he admits doesn’t show up as well in still images, but looks cool enough that he thought it was worth putting the board into production in case anyone else wants in on the refraction action.

To explain how it works, we need to take a couple of steps back and look at the mechanics of the LCD panels used in these type of glasses. At the risk of oversimplification, one could say that LCDs are sort of like capacitors: when charged the crystals align themselves in such a way that the polarization of the light passing through is changed. Combined with an external polarization filter, this has the end result of turning the panel opaque. To put the crystals back in their original arrangement, and let the light pass through again, the LCD panel is shorted out in the same way you might discharge a capacitor.

What [Kevin] found was that if he slowly discharged the LCD panel rather than shorting it out completely, it would gradually fade out instead of immediately becoming transparent. His theory is that this partial polarization is what causes the rainbow effect, as the light that’s passing through to the wearers eyes is in a “twisted” state.

[Kevin] has provided all of the information necessary to build your own “Rainbow Adapter”, but you can also purchase a kit or assembled board from Tindie. If you’re looking for other projects to make use of those 3D glasses collecting dust, how about turning them into automatic sunglasses or having a go at curing your lazy eye.