A Fully Open Source Raspberry Pi Synthesizer

Have you ever seen something and instantly knew it was something you wanted, even though you weren’t aware it existed a few seconds ago? That’s how we felt when we received a tip about Zynthian, a fully open source (hardware and software) synthesizer. You can buy the kit online directly from the developers, or build your own from scratch using their documentation and source code. With a multitude of filters, effects, engines, and essentially unlimited upgrade potential, they’re calling it a “Swiss Army Knife of Synthesis”. We’re inclined to agree.

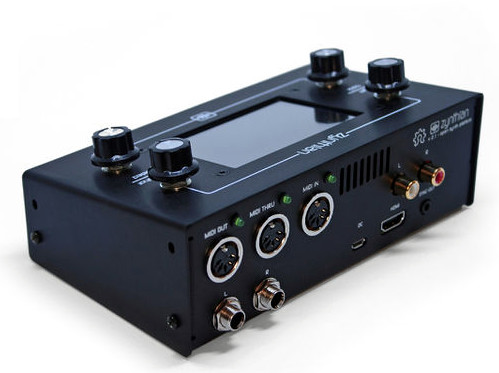
At the most basic level, the Zynthian is a Raspberry Pi 3 with a touch screen, a few rotary encoders, a dedicated sound card, and MIDI support. Software wise the biggest feature is arguably the real-time Linux kernel for the lowest latency possible. There’s also a custom web interface so you can control the Zynthian from another machine on the network if you want. As a matter of course, it also includes a wide array of pre-installed audio packages to experiment and create with.

Kits are offered at various prices from $420 USD for the top of the line model down to unpopulated PCBs for a few bucks. We like that they broke things down this way; allowing users of various skill (and or patience) to pay what they want. If you just want to buy the custom boards and roll your own case and Pi solution, you can do that.

If you want to go all in, you can build one entirely from scratch as well. Everything from the CAD files for the case to their custom rotary encoder library is completely open (most licensed under GPL v3) for anyone to use however they see fit. There’s even a page in the wiki for listing hardware which isn’t officially supported by the project, but remain as options for those looking to cut their own path.

Synthesizers are a fairly popular hacker project, from Google’s AI-powered version to single chip exercises in frugality. If you want to learn even more about the fine line between digital noise and music, check out this fantastic series by our very own [Elliot Williams].

[Thanks to Mynasru for the tip.]

Continue reading “A Fully Open Source Raspberry Pi Synthesizer”

VCF East 2018: SDR On The Altair 8800

You’d be forgiven if you thought software defined radio (SDR) was a relatively recent discovery. After all, few outside of the hardcore amateur radio circles were even familiar with the concept until it was discovered that cheap USB TV tuners could be used as fairly decent receivers from a few hundred MHz all the way up into the GHz range. The advent of the RTL-SDR project in 2012 brought the cost of entry level SDR hardware from hundreds of dollars to tens of dollars effectively overnight. Today there’s more hackers cruising the airwaves via software trickery than there’s ever been before.

Continue reading “VCF East 2018: SDR On The Altair 8800”

Ambient Lighting For Baby With The ESP8266

There are plenty of great reasons to have a child. Perhaps you find the idea of being harshly criticized by a tiny person very appealing, or maybe you enjoy somebody screaming nonsense at you while you’re trying to work on something. But for us, we think the best reason for procreation is getting another excuse to build stuff. It’ll be what, at least two years before a baby can solder or program a microcontroller? Somebody’s going to have to do it for them until then.

To try to help his baby daughter get on a better sleep schedule, [Amir Avni] decided to outfit her room with some “smart” lighting to establish when it’s time for her to wake up. Not only can he and his wife control the time the lights come on to “day” mode, but they can also change the colors. For example, they can switch over to a red glow at night. Despite some learning experience setbacks, the both the parents and the baby are very happy with the final product.

An ESP8266 controls a WS2812 LED strip to provide the adjustable lighting, and a DHT22 sensor was added to the mix to detect the temperature and humidity in the baby’s room. [Amir] used Blynk to quickly throw together a slick mobile application that allows for complete control of the brightness and color of light in the room, as well as provides a readout of the environmental data pulled from the DHT22.

But not everything went according to plan. [Amir] thought he could power the LED strip from the ESP8266 development board by soldering to the 5 V side of its AMS1117 voltage regulator. Which worked fine, until he turned on too many LEDs. Then it pulled too much current through a resistor connected to the regulator, and let all the magic smoke out. An important reminder of what can happen when we ask more of a circuit than what it was designed for.

We’ve covered many awesome projects that were born of a parental need, from feature packed baby monitors to devices seemingly designed to program nostalgia in the little one’s subconscious.

Building A Knife By Hand Is Just As Hard As You Think

Carl Sagan once said: “If you wish to make an apple pie from scratch, you must first invent the universe.” In other words, the term “scratch” is really a relative sort of thing. Did you grow the apples? Did you plant the wheat to make the flour? Where do you keep your windmill, incidentally? With Carl’s words in mind, we suppose we can’t say that [Flannagill] truly built this incredible knife from scratch, after all, he ordered the sheet steel on Amazon. But we think it’s close enough.

He was kind enough to document the epic build in fantastic detail, including (crucially), the missteps he made along the way. While none of the mistakes were big enough to derail the project, he mentions a few instances where he wasted time and money trying to take shortcuts. Even if making your own knives at home isn’t on your short list of summer projects, we’d wager there’s something in this build log you can learn from regardless.

So how does one build a knife? Slowly and methodically, if what [Flannagill] has written up is any indication. It started with a sketch of the knife on a piece of paper, the outline of which was then transferred to a piece of tool steel with nothing more exotic than a permanent marker. An angle grinder was then used to follow the outline and create the rough shape of the final knife.

From there, the process is done almost entirely with hand files. Here [Flannagill] gives one of his most important pieces of advice: don’t cheap out on the tools. He bought the cheapest set of files he could, and paid the price: he says it took up to 14 hours to complete just one side of the knife. Once he switched over to higher quality files, the rest of the work went much faster.

After filing and sanding the knife blank, it went into a charcoal fire to be hardened, followed by a total of 4 hours in a 200 C (~400 F) oven to heat temper it. Finally the handle pieces (which are officially known as “scales”) were attached, and finished with considerably less labor intensive woodworking methods. The final result is a gorgeous one of a kind specimen that [Flannagill] is rightly very proud of.

If you’re worried this process looks a bit too quick and easy for you, don’t worry. You can always go the [Bil Herd] route and make a forge out of your old sink if you’d rather start your apple pie a bit closer to the tree.

Stars Looking A Bit Dim? Throw Some Math At Them.

As the cost of high-resolution images sensors gets lower, and the availability of small and cheap single board computers skyrockets, we are starting to see more astrophotography projects than ever before. When you can put a $5 Raspberry Pi Zero and a decent webcam outside in a box to take autonomous pictures of the sky all night, why not give it a shot? But in doing so, many hackers are recognizing a fact well-known to traditional telescope jockeys: seeing a few stars is easy, seeing a lot of stars is another story entirely.

The problem is that stars are fairly dim; a problem compounded by the light pollution you get unless you’re out in a rural area. You can’t just brighten up the images either, as that only increases the noise in the image. A programmer always in search of a challenge, [Benedikt Bitterli] decided to take a shot at using software to improve astrophotography images. He documented the entire process, failures and all, on his blog for anyone else who might be curious about what it really takes to create the incredible images of the night sky we see in textbooks.

In principle it’s simple: just take a lot of pictures of the sky, stack them on top of each other, and identify which points of light are stars and which ones are noise artifacts. But of course the execution is considerably more difficult. For one thing, unless the camera was on a mount that was automatically tracking the sky, the stars will have slightly moved in each image. To help with this process, [Benedikt] used a navigational trick that humanity has relied on for millennia: mapping constellations. By comparing groupings of stars in each image, his software is able to accurately overlay each image.

But that’s only one part of the equation. In his post, [Benedikt] goes over the incredible amount of math that goes into identifying individual stars in the sea of noise you get when a digital image sensor looks into the black. You certainly don’t need to understand all the math to appreciate the final results, but it’s a fascinating read for those with an interest in computer vision concepts.

This kind of software is precisely what you want to pair with your 3D printed star tracker, or even better a Raspberry Pi sky monitoring station.

[Thanks to Helio Machado for the tip.]

Illuminated Bread For A Cookie Cutter World

Just in case you thought your eyes were playing tricks on you, we’d like to confirm right from the start that what you are looking at is a loaf of bread with internal LED lighting. Why has this bread been internally lit? We can’t really say. But what we can do is pass on the fascinating process that took an unremarkable piece of stale bread and turned it into an exceptional piece of stale bread.

As demonstrated by [The Maker Monster], working with stale bread is basically like working with wood. Wood that you can dip in soup, granted, but wood nonetheless. The process of electrifying the loaf starts with cutting it down the length on a bandsaw, and then hollowing it out with a rotary tool. This creates a fairly translucent shell that’s basically just crust.

You’re probably wondering how you keep a bread-light from getting moldy, and thankfully [The Maker Monster] does address that issue. The bread shell is completely coated with shellac, which creates a hard protective layer that will not only prevent decay but should give it some added strength. In the video it looks like only one coat is applied, but if we had to guess, a few coats would be necessary to really seal it up. Coating it with epoxy wouldn’t be a terrible idea either.

While the shellac dries on the bread, he gets to work on the lighted base (bet you never imagined you’d read a sentence like that), which is really just a sanded piece of wood with a standard LED strip stuck too it. It’s very understated, but of course the glowing loaf really draws the eye anyway. All that’s left is to glue the bread down to the base, and proudly display your creation at your next dinner party.

We can’t say that an electric ciabatta is in the cards for Hackaday HQ; but we know that baking good bread is a science in itself, and turning the failed attempts into works of art does have a certain appeal to it.

Continue reading “Illuminated Bread For A Cookie Cutter World”

Cracking The Case Of Capcom’s CPS2 Security

We love a good deep-dive on a specialized piece of technology, the more obscure the better. You’re getting a sneak peek into a world that, by rights, you were never meant to know even existed. A handful of people developed the system, and as far as they knew, nobody would ever come through to analyze and investigate it to find out how it all went together. But they didn’t anticipate the tenacity of a curious hacker with time on their hands.

[Eduardo Cruz] has done a phenomenal job of documenting one such system, the anti-piracy mechanisms present in the Capcom CPS2 arcade board. He recently wrote in to tell us he’s posted his third and final entry on the system, this time focusing on figuring out what a mysterious six pin header on the CPS2 board did. Hearing from others that fiddling with this header occasionally caused the CPS2 board to automatically delete the game, he knew it must be something important. Hackaday Protip: If there’s a self-destruct mechanism attached to it, that’s probably the cool part.

He followed the traces from the header connector, identified on the silkscreen as C9, back to a custom Capcom IC labeled DL-1827. After decapping the DL-1827 and putting it under the microscope, [Eduardo] made a pretty surprising discovery: it wasn’t actually doing anything with the signals from the header at all. Once the chip is powered up, it simply acts as a pass-through for those signals, which are redirected to another chip: the DL-1525.

[Eduardo] notes that this deliberate attempt at obfuscating which chips are actually connected to different headers on the board is a classic trick that companies like Capcom would use to try to make it harder to hack into their boards. Once he figured out DL-1525 was what he was really after, he was able to use the information he gleaned from his earlier work to piece together the puzzle.

This particular CPS2 hacking journey only started last March, but [Eduardo] has been investigating the copy protection systems on arcade boards since 2014.

[Thanks to Arduino Enigma for the tip.]