Printed It: Rubber Band PCB Vise

If you’ve ever worked on a small PCB, you know how much of a hassle it can be to hold on to the thing. It’s almost as if they weren’t designed to be held in the grubby mitts of a human. As designs have become miniaturized over time, PCBs are often so fragile and festooned with components that tossing them into the alligator clips of the classic soldering “third hand” can damage them. The proper tool for this job is a dedicated PCB vise, which is like a normal bench vise except it doesn’t crank down very hard and usually has plastic pads on the jaws to protect the board.

Only problem with a PCB vise is, like many cool tools and gadgets out there, not everybody owns one. Unless you’re doing regular PCB fabrication, you might not take the plunge and buy one either. So what’s a hacker on a budget to do when they’ve got fiddly little PCBs that need attention?

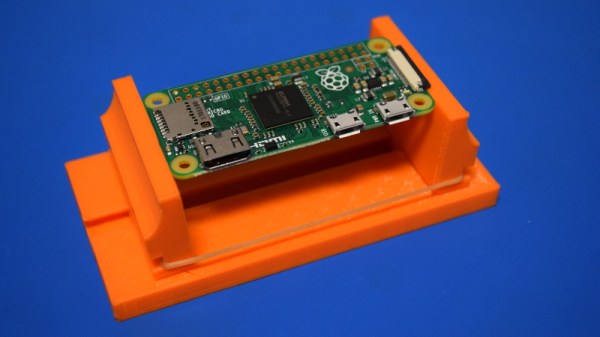
Luckily for us, we live in a world where you can press a button and have a magical robot on your desktop build things for you. Online model repositories like Thingiverse and YouMagine are full of designs for printable PCB vises, all you have to do is pick one. After looking through a number of them I eventually decided on a model designed by [Delph27] on Thingiverse, which I think has a couple of compelling features and more than deserves the few meters of filament it will take to add to your bench.

Of course the best part of all of this is that you can customize and improve the designs you download, which is what I’m about to do with this PCB vise!

Continue reading “Printed It: Rubber Band PCB Vise”

An ADS-B Antenna Built From Actual Garbage

With the advent of low-cost software defined radio (SDR), anyone who’s interested can surf the airwaves from the FM band all the way up to the gigahertz frequencies used by geosynchronous satellites for about $20 USD. It’s difficult to overstate the impact this has had on the world of radio hacking. It used to be only the Wizened Ham Graybeards could command the airwaves from the front panels of their $1K+ radios, but now even those who identify as software hackers can get their foot in the door for a little more than the cost of a pizza.

But as many new SDR explorers find out, having a receiver is only half the battle: you need an antenna as well. A length of wire stuck in the antenna jack of your SDR will let you pick up some low hanging fruit, but if you’re looking to extend your range or get into the higher frequencies, your antenna needs to be carefully designed and constructed. But as [Akos Czermann] shows on his blog, that doesn’t mean it has to be expensive. He shows how you can construct a very capable ADS-B antenna out of little more than an empty soda can and a bit of wire.

He makes it clear that the idea of using an old soda can as an antenna is not new, another radio hacker who goes by the handle [abcd567] popularized their own version of the “cantenna” some time ago. But [Akos] has made some tweaks to the design to drive the bar even lower, which he has dubbed the “coketenna”.

The primary advantages of his design is that you no longer need to solder anything or even use any special connectors. In fact, you can assemble this antenna with nothing more than a pocket knife.

You start by cutting the can down to around 68 mm in length, and cutting an “X” into the bottom. Then strip a piece of coax, and push it through the X. The plastic-coated center conductor of the coax should emerge through the bottom of the can, while the braided copper insulation will bunch up on the other side. If you want to make it really fancy, [Akos] suggests cutting a plastic drink bottle in half and using that as a cover to keep water out of the “coketenna”.

How well does it work? He reports performance being very similar to his commercial ADS-B antenna which set him back $45 USD. Not bad for some parts of out the trash.

We’ve covered the math of creating an ADS-B antenna in the past if you’d like to know more about the science of how it all works. But if you just want an easy way of picking up some signals, this “coketenna” and an RTL-SDR dongle will get you started in no time.

Building A Better Kerbal Space Program Controller

If you have even the most passing interest in space and what it takes to get there, you’ve probably already played Kerbal Space Program (KSP). If you haven’t, then you should set aside about ten hours today to go check that out real quick. Don’t worry, Hackaday will still be here when you get back. Right now you need to focus on getting those rockets built and establishing a network of communication satellites so you can get out of low orbit.

For those of you who’ve played the game (or are joining us again after playing KSP for the prescribed 10, 12, 16 hours), you’ll know that the humble computer keyboard is not very well suited to jaunts through space. You really want a joystick and throttle at the absolute minimum for accurate maneuvers, but even you’ll be spending plenty of time back on the keyboard to operate the craft’s various systems. If you want the ultimate KSP control setup, you’ll need to follow in the footsteps of [Hugo Peeters] and build your own. Luckily for us, he’s written up an exceptionally well detailed guide on building KSP controllers that should prove useful even if you don’t want to clone his.

Wiring switches and buttons to the Arduino.

At the most basic level, building a KSP controller consists of hooking a bunch of switches and buttons to a microcontroller such as the Arduino or Teensy, and converting those to USB HID key presses that the game understands. This works fine up to a point, but is limited because it’s only a one-way method of communication. For his controller, [Hugo] forked KSPSerialIO, a plugin for KSP that allows bidirectional communication between the game and your controller, enabling things like digital readouts of speed and fuel levels on the controller’s panel.

Once the logistics of how you’ll talk to the game are settled, the rest is really up to the individual. The first step in building your own KSP controller is deciding what you want it to do. Are you looking to fly planes? Control a rover? Maybe you just want a master control panel for your space station. There’s a whole lot of things you can build in KSP, and the layout, inputs, and displays on your controller should ideally reflect your play style.

[Hugo] went with a fairly general purpose panel, but did spend quite a bit of extra time to get some slick LED bar graphs hooked up to display resource levels of different systems on his craft. That’s an extra step that isn’t strictly required for a build like this, but once you see it, you’re going to have a hard time not wanting to include it on your own panel. He also went through the expense of having the panel and case professionally laser cut and etched, which definitely gives it a polished feel.

We’ve covered quite a number of custom KSP controllers here at Hackaday. The overlap between KSP players and hackers seems unusually high, but of course a game that lets you build and fly contraptions of your own design does sound like something that would be right up our alley.

Easier End-User Setup For ESP32 Projects

As hackers, we occasionally forget that not everyone is enamored with the same nerdy minutia that we are. Configuring hardware by changing some lines in the code and compiling a new firmware doesn’t sound like that big of a deal to those of us who’ve been around the block a few times, but might as well be ancient Sanskrit to the average person. As long as your projects are for personal use this isn’t really a concern, but what if you plan on distributing the code for a project or perhaps even selling finished products? Shipping it out with hard-coded variables simply isn’t an option.

Code for loading configuration file from SPIFFS

In a recent video, [Proto G] shows a clever way to use WiFiManager to make configuring your ESP32 project easier for end-users. Not only can you use the captive portal system to configure the ESP32’s WiFi against a nearby access point, but it can allow users to enter in configuration data which can be picked up in your code by using SPI Flash File System (SPIFSS).

With the setup demonstrated in the video below by [Proto G], you don’t need anything more exotic than a web browser to configure the device. The end user simply searches for the device’s WiFi network, connects to it, and is presented with an easy to understand dialog which has them select a WiFi network to configure against along with some fields to enter in custom variables. All this information is then stored to a file on the SPI flash. When the ESP32 reboots, it reads the configuration from the saved file and applies the requested settings.

This is very similar to how many consumer devices are now configured, and even the less technically-inclined recipients of such a device should be able to work through the setup with a bit of hand-holding. If you plan on handing one of your ESP32 projects to John Q. Public, this is the kind of configuration you should be aiming for.

We’ve covered using WiFiManager to make ESP32 projects easier to manage, but the addition of arbitrary variables to the captive portal opens up a lot of possibilities. Just the kind of thing you need when you start considering the leap to commercial product.

Continue reading “Easier End-User Setup For ESP32 Projects”

Teardown: What’s Inside A Christmas Laser Projector?

In the world of big-box retail, December 26th is a very special day. The Christmas music playing on the overhead speakers switches back to the family friendly Top 40, the store’s decorations get tossed in the compactor, and everything that’s even remotely related to the holiday is put on steep clearance. No more money to be made on the most commercialized of all holidays, so back to business as usual.

It’s in this narrow corridor of time, between the Great Holiday Unloading and the new spring products coming in, that you can find some fantastic deals on Christmas decorations. Not that long ago, this would hardly be exciting news for the readers of Hackaday. But Christmas lights and decorations have really started pushing the envelope in terms of technology: addressable RGB LED strands, Bluetooth controlled effects, and as of the last couple years, friggin’ lasers.

That’s right, you’ve seen them all over the neighborhood, probably took a few stray beams to the eye, you might even own your own. Laser projectors have been one of the most popular Christmas decorations for the last couple of years, and it’s not hard to see why. Just set the projector up in front of your house, and you’re done. No need to get on a ladder and string lights on the roof when you can just blast some directed energy up there instead.

Given how popular they are, I was surprised to see a lone Home Accents Holiday Multi-Color Light Projector on the clearance rack at Home Depot for around $14 a few days after Christmas. This was a 75% price reduction from normal MSRP, and right in that sweet impulse-buy price range. Let’s see what’s hiding inside!

Continue reading “Teardown: What’s Inside A Christmas Laser Projector?”

ESP8266 Beacon Announces Your Arrival

It used to be people were happy enough to just have to push a button in their car and have the garage door open. But pushing a button means you have to use your hands, like it’s a baby toy or something. We’re living in the 21st century, surely there must be a better way! Well, if you’ve got a home automation system setup and a spare ESP8266 laying around, [aderusha] may have your solution with MQTTCarPresence.

The theory of operation here is very clever. The ESP8266 is powered via the in-dash USB port, which turns on and off with the engine. When the engine is started, the ESP8266 is powered up and immediately connects to the WiFi network and pushes an MQTT message to Home Assistant. When Home Assistant gets the notification that the ESP8266 has connected, it opens the garage door.

When [aderusha] drives out of the garage and away from the house, the ESP8266 loses connection to the network, and Home Assistant closes the door. The same principle works when he comes home: as the car approaches the house it connects to the network and the garage door opens, and when the engine is shut off in the garage, the door closes again.

The hardware side of the setup is really just a WeMos D1 mini Pro board, though he’s added an external antenna to make sure the signal gets picked up when the vehicle is rolling up. He’s also designed a very slick 3D printed case to keep it all together in a neat little package.

We’ve covered automated entry systems based on the ESP8266 before, though usually the ESP stays at home. Be sure to check out the awesome series [Elliot Williams] has on the wonders of MQTT if you’re looking to setup your own automation system.

The (Unnecessary?) Art Of Connector Crimping

The “Completion Backwards Principle” is a method of reasoning through a problem by visualizing the end result and then working your way backwards from that point. The blog post that [Alan Hawse] has recently written about the intricacies of crimping wires for plug connectors is a perfect example of this principle. The end result of his work is the realization that you probably shouldn’t bother crimping your own connectors, but watching him work backwards from that point is still fascinating. It’s also the name of a rock album from the 80’s by The Tubes, but this is not a useful piece of information in regards to electrical wiring.

Of course, sometimes people do silly things. Even though there are pre-crimped wires available online for a pittance, you might still want to do your own. With this in mind, [Alan] has put together an exceptionally detailed and well-research post that gives you all the information you could possibly want to know about crimping what is often erroneously referred to as the “JST connector”.

He starts by showing off some common examples of this connector, which if you’ve ever opened a piece of consumer electronics will be like looking through a High School yearbook. You might not know their names without reading them, but you definitely remember what they look like.

We’re then treated to an array of macro shots showing the scale of the pieces involved. If getting up close and personal with metal bits that are only a few millimeters long is your kind of thing, then you’re really going to love this part.

Finally, the post is wrapped up with a few words about the kind of crimping tools that are available on the market, and then a demonstration of his personal crimping method. While some tools would have you crimp both sets of “wings” at the same time, [Alan] tells us he finds taking them on individually leads to better results in his experience.

If this this little taste has left you hungry for a true feast of hyper-specialized knowledge, be sure to check out the Superconference talk by [Bradley Gawthrop].

Continue reading “The (Unnecessary?) Art Of Connector Crimping”