Nintendo Switch Gets Making With Labo

Over the years, Nintendo has had little trouble printing money with their various gaming systems. While they’ve had the odd misstep here and there since the original Nintendo Entertainment System was released in 1983, overall business has been good. But even for the company that essentially brought home video games to the mainstream, this last year has been pretty huge. The release of the Nintendo Switch has rocketed the Japanese gaming giant back into the limelight in a way they haven’t enjoyed in a number of years, and now they’re looking to keep that momentum going into 2018 with a killer new gaming accessory: a cardboard box.

Some of the contraptions feature surprisingly complex internal mechanisms.

Well, it doesn’t have to be a box, necessarily. But no matter which way you fold it, it’s definitely a piece of cardboard. Maybe a few bits of string here and there. This is the world of “Nintendo Labo”, a recently announced program which promises to let Switch owners create physical objects which they can interact with via specially designed software for the console.

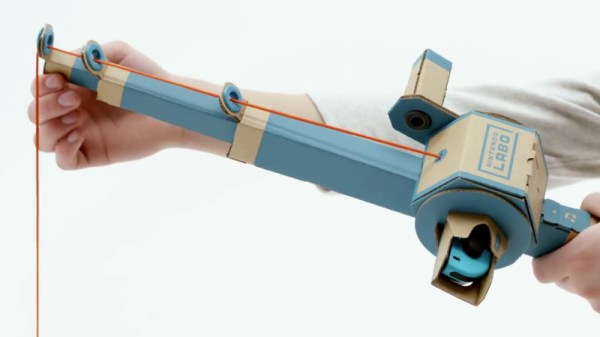
The Labo creations demonstrated in the bombastic announcement video make clever use of the very unique Switch hardware. The removable Joy-Con controllers are generally still used as input devices, albeit in less traditional ways. Twisting and tilting the cardboard creations, which take varied forms such as a fishing rod or motorcycle handlebars, relays input to the appropriate game thanks to the accelerometers and gyroscopes they contain.

Many of the more complex contraptions rely on a less-known feature of the controller: the IR depth camera. By pointing the controller’s camera inside of the devices, the motion of internal components, likely helped along by IR-reflective tape, can be tracked in three dimensions. In the video, the internal construction of some of the devices looks downright intimidating.

Which leads into the natural question: “Who exactly is this for?”

Clearly some of the gadgets, not to mention the folded cardboard construction, are aimed at children, an age group Nintendo has never been ashamed to appeal to. But some of the more advanced devices and overall concept seems like it would play better with creative teens and adults looking to push the Switch in new directions.

Will users be empowered to create their own hardware, and by extension, associated software? Will hackers and makers be able to 3D print new input devices for the Switch using this platform? This is definitely something we’ll be keeping a close eye on as it gets closer to release in April.

The popularity of the Switch has already given rise to a surprising amount of hacking given how new the console is. It will be interesting to see if the introduction of Labo has any effect on the impressive work already being done to bend the console to the owner’s will.

Continue reading “Nintendo Switch Gets Making With Labo”

Getting To Know An 18th Century Hacker

Here at Hackaday we tend to stay pretty close to the bleeding edge in tech, not by any conscious effort, but simply because that’s what most hackers are interested in. Sure we see the occasional vintage computer rebuild, or reverse engineering of some component that was put into service before most of us were born; but on the whole you’re way more likely to see projects involving the latest and greatest microcontroller to hit AliExpress than ones involving the once ubiquitous vacuum tube.

Bill Maddox

But occasionally it’s nice to take a step back from the latest and greatest, to really look at what makes the hacker spirit without the all modern trappings of blinking LEDs and Wi-Fi connectivity. We make and explore because it’s something we are passionate about, and while today most of us are doing that with a soldering iron or a compiler, that hasn’t always been the case. In the video below, historic interpreter and woodworker [Bill Maddox] talks about what draws him to 18th century technology. His tools may look foreign to us, but the passion he shows while talking about his creations will be familiar to anyone who’s ever set foot in a hackerspace.

Even with a vastly different set of interests than the modern hacker, [Bill] runs into some very familiar problems. When the highly specialized tools he needed to work like an 18th century craftsman weren’t available, he decided to make his own. But to make his own tools he needed to learn how to forge, and after he forged his hand tools he moved on to forging chisels for the lathe he decided to build.

Whether or not we ever take a knife to a piece of wood and try to carve out a spoon, it’s impossible to watch [Bill] speak about his creations and not see him as a kindred spirit. Like many of us, he’s honed skills in a niche that the everyday person takes for granted. Makes you wonder what people from 300 years in the future would think of us if they could peer back through the centuries.

Continue reading “Getting To Know An 18th Century Hacker”

Recreating The Radio From Portal

If you’ve played Valve’s masterpiece Portal, there’s probably plenty of details that stick in your mind even a decade after its release. The song at the end, GLaDOS, “The cake is a lie”, and so on. Part of the reason people are still talking about Portal after all these years is because of the imaginative world building that went into it. One of these little nuggets of creativity has stuck with [Alexander Isakov] long enough that it became his personal mission to bring it into the real world. No, it wasn’t the iconic “portal gun” or even one of the oft-quoted robotic turrets. It’s that little clock that plays a jingle when you first start the game.

Alright, so perhaps it isn’t the part of the game that we would be obsessed with turning into a real-life object. But for whatever reason, [Alexander] simply had to have that radio. Of course, being the 21st century and all his version isn’t actually a radio, it’s a Bluetooth speaker. Though he did go through the trouble of adding a fake display showing the same frequency as the one in-game was tuned to.

The model he created of the Portal radio in Fusion 360 is very well done, and available on MyMiniFactory for anyone who might wish to create their own Aperture Science-themed home decor. Though fair warning, due to its size it does consume around 1 kg of plastic for all of the printed parts.

For the internal Bluetooth speaker, [Alexander] used a model which he got for free after eating three packages of potato chips. That sounds about the best possible way to source your components, and if anyone knows other ways we can eat snack food and have electronics sent to our door, please let us know. Even if you don’t have the same eat-for-gear promotion running in your neck of the woods, it looks like adapting the model to a different speaker shouldn’t be too difficult. There’s certainly enough space inside, at least.

Over the years we’ve seen some very impressive Portal builds, going all the way back to the infamous levitating portal gun [Caleb Kraft] built in 2012. Yes, we’ve even seen somebody do the radio before. At this point it’s probably safe to say that Valve can add “Create cultural touchstone” to their one-sheet.

Continue reading “Recreating The Radio From Portal”

Smartphone Controlled Periodic Table Of Elements

It wouldn’t be much of a stretch to say that here at Hackaday, we’re about as geeky as they come. Having said that, even we were surprised to hear that there are people out there who collect elements. Far be it from us to knock how anyone else wishes to fill their days, but telling somebody at a party that you collect chemical elements is like one step up from saying you’ve got a mold and fungus collection at home. Even then, at least a completed mold and fungus collection won’t be radioactive.

But if you’re going to spend your spare time working on a nerdy and potentially deadly collection, you might as well put it into an appropriate display case. You can’t just leave your Polonium sitting around on the kitchen counter. That’s the idea behind the interactive periodic table built by [Maclsk], and we’ve got to admit, if we get to put it in a case this awesome we might have to start our own collection.

A large portion of this project is building the wooden display case itself as, strangely enough, IKEA doesn’t currently stock a shelving unit that’s in the shape of the periodic table. The individual cells and edge molding are made of pine, the back panel is MDF, and the front of the display is faced off with thin strips of balsa to cover up all the joints. Holes were then drilled into the back of each cell for the LED wiring, and finally the entire frame was painted white.

Each cell contains an WS2812B RGB LED, which at maximum brightness draws 60mA. Given the 90 cells of the display case, [Maclsk] calculated a 5.4A power supply would be needed to keep everything lit up. However, he found a 4A power supply that made his budget happier, which he reasons will be fine as long as he doesn’t try to crank every cell up to maximum at the same time. Control for the display is provided by an Arduino Nano and HC05 Bluetooth module.

The final piece of the project was the Android application that allows the user to control the lighting. But it doesn’t just change colors and brightness, it’s actually a way to visualize information about the elements themselves. The user can do things like highlight certain groups of elements (say, only the radioactive ones), or light up individual cells in order of the year each element was discovered. Some of the information visualizations are demonstrated in the video below, and honestly, we’ve seen museum displays that weren’t this well done.

We last caught up with [Maclsk] when he created a very slick robotic wire cutting machine, which we can only assume was put to work for this particular project. Too bad he didn’t have a robot to handle the nearly 540 soldering joints it took to wire up all these LEDs.

[via /r/DIY]

Continue reading “Smartphone Controlled Periodic Table Of Elements”

A Salty Solution For A Dead Nexus 5X

If you’re an Android fan, there’s a good chance you’ve heard of the Nexus 5X. The last entry in Google’s line of low-cost Nexus development phones should have closed the program on a high note, or at the very least maintained the same standards of quality and reliability as its predecessor. But unfortunately, a well known design flaw in the Nexus 5X means that the hardware is essentially a time-bomb. There are far too many reports of these phones entering into an endless bootloop right around the one year mark to say it’s just a coincidence.

The general consensus seems to be that faulty BGA chip soldering on the CPU works lose after about a year or so of thermal stress. Whatever the reason, [hillbillysam] recently found himself the proud owner of a dead Nexus 5X. Resigned to the fact that he would need to get a new phone, he at least wanted to get some of his data off the device before it went to that big landfill in the sky.

As it turns out these bootlooped phones can temporarily be revived by cooling them down, say by putting them in the freezer for a few hours. There’s plenty of debate as to why this works, but even our own [Lewin Day] can testify that it does seem to get the phone booting again; though only until it comes back up to operating temperature. With this in mind, [hillbillysam] reasoned that if he kept the phone as cold as possible while it was running, it may stay operational long enough for him to pull his files off of it over USB.

He couldn’t exactly freeze the phone in a block of ice, but remembering his high school chemistry, he came up with something pretty close. By adding salt to water, you can significantly lower temperature at which it freezes. Putting the phone into a watertight bag and submerging it in this supercooled solution is an easy and non-destructive way of keeping it very cold while still being accessible over USB.

His Nexus 5X was able to keep kicking the whole time it was luxuriating in its below-freezing saltwater bath, giving him plenty of time to copy everything he needed. It doesn’t sound like the kind of spa day we’d like to have personally, but to each their own.

If your Nexus 5X has met a similar fate, you may want to take a look at our previous coverage about the issue. While your mileage may vary, we’ve reported on a couple of success stories so it’s worth a shot.

[via /r/nexus5x]

Raspberry Pi Offers Soulless Work Oversight

If you’re like us, you spend more time than you care to admit staring at a computer screen. Whether it’s trying to find the right words for a blog post or troubleshooting some code, the end result is the same: an otherwise normally functioning human being is reduced to a slack-jawed zombie. Wouldn’t it be nice to be able to quantify just how much of your life is being wasted basking in the flickering glow of your monitor? Surely that wouldn’t be a crushingly depressing piece of information to have at the end of the week.

With the magic of modern technology, you need wonder no longer. Prolific hacker [dekuNukem] has created the aptly named “facepunch”, which allows you to “punch in” with nothing more than your face. Just sit down in front of your Raspberry Pi’s camera, and the numbers start ticking away. It’s like the little clock in the front of a taxi: except at the end you don’t have to pay anyone, you just have to come to terms with what your life has become. So that’s cool.

It doesn’t take much hardware to play along at home. All you need is a Raspberry Pi and the official camera accessory. Though for the full effect you should add one of the displays supported by the Luma.OLED driver so you can see the minutes and hours ticking away in real-time.

To get the facial recognition going, all you need to do is take a well-lit picture of your face and save it as a 400×400 JPEG. The Python 3 script will take care of the rest: checking the frames from the camera every few seconds to see if your beautiful mug is in the frame, and incrementing the counters accordingly.

Even if you’re not in the market for an Orwellian electronic supervisor, this project is a great example to get you started in the world of facial recognition. With a little luck, you’ll be weaponizing it in no time.

3D Printing A Better Quadcopter Frame

Before you smash the “Post Comment” button with the fury of Zeus himself, we’re going to go ahead and say it: if you want to build a decent quadcopter, buy a commercial frame. They are usually one of the cheaper parts of the build, they’re very light for how strong they are, and replacement parts are easily available. While you could argue the cost of PLA/ABS filament is low enough now that printing it would be cheaper than buying, you aren’t going to be able to make a better quadcopter frame on a 3D printer than what’s available on the commercial market.

The frame features a surprisingly low part count.

Having said that, [Paweł Spychalski] has recently shown off his 3D printed FPV racing quadcopter frame with some surprising results. The frame ended up being surprisingly stiff, and while the weight is a bit high, it’s actually lighter than he expected. If you’re looking to build a quad with the absolute minimum of expense his design might be something to look into.

Of course, [Paweł] is hardly the first person to think about printing a quad frame. But he did give his design some extra consideration to try and overcome some of the shortcomings he noticed in existing 3D printed designs. For one, rather than have four separate arms that mount to a central chassis, his design has arms that go all the way across with a thick support that goes between the motors. The central chassis is also reassuringly thick, adding to the overall stiffness of the frame.

The key here is that [Paweł] printed all the parts with 2 mm thick walls. While that naturally equates to longer print times and greater overall weight, it’s probably more than worth it to make sure the frame doesn’t snap in half the first time it touches the ground.

Beyond the printed parts, all you need to assemble this frame are about a dozen M3 nuts and bolts. Overall, between the hardware and the plastic you’re looking at a total cost of under $5 USD. In the video below [Paweł] puts the frame through its paces doing some acrobatic maneuvers, and it looks like 5 bucks well spent to us.

If you want to go all-in on 3D printed quadcopter parts, you can pair this frame with some printed propellers. Perhaps even a printed camera gimbal while you’re at it. Continue reading “3D Printing A Better Quadcopter Frame”