Squeezing A Wordle Clone Onto The Game Boy

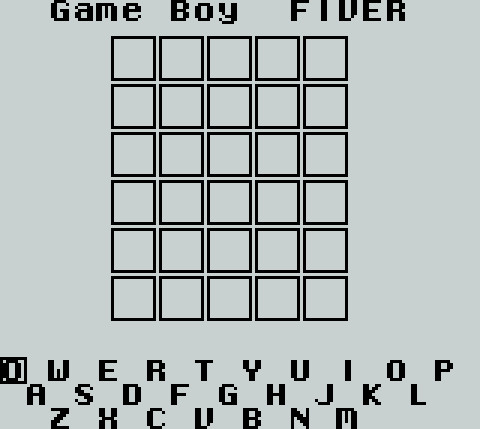
The popular word game Wordle is both an addictive brain teaser for some and a perpetual social media annoyance for others. Its runaway success has spawned a host of clones, among them one created for the Nintendo Game Boy with a reduced vocabulary. [Alexander Pruss] took on the challenge of improving it by fitting the entire 12972-strong 5-letter-word vocabulary as well as the 2315-word answer list into a 32K cartridge along with the code. The challenge in compression on a platform of such meager resources is to devise an algorithm which does not require more computing power or memory than the device has at its disposal. His solution is both elegant and easy to understand.

Starting by dividing the words into lists by first letter such that he can ignore the letter, he can reduce each word to 20 bits as four 5-bit letters. The clever part comes when he organises the words alphabetically, meaning that the 20-bit numbers representing each word are in numerical order.

Thus instead of storing the full number he could store the difference between it and its predecessor. With a few extra tweaks he was able to get the full list down to an impressive 20186 bytes, but was still faced with not enough space. Turning to the Wordle code he found that a library function call could be switched to an alternative with a much more efficient footprint, resulting in a new ROM with all words in place and ready to play.

Of course our community have applied their minds to Wordle and we’ve featured more than one hack based upon it. Mostly they have involved automated solving, so this retro gaming version breaks new ground.

Header image: Sammlung der Medien und Wissenschaft, CC BY 4.0.

The control panel of a glider winch

A Custom Radio And Telephone System For Glider Winch Operators

While gliding might be the most calm and peaceful way of moving through the air, launching a glider is a rather noisy and violent process. Although electric winches do exist, most airfields use big V8-powered machines to get their gliders airborne. [Peter Turczak] noticed that the winch operators at his airfield often had to juggle multiple communication channels while pressing buttons and moving levers, all with the deafening roar of a combustion engine right next to them. To make their life easier, he built a single communication device that combines multiple radio inputs and an analog telephone .

A stack of circuit boards next to an old phone ringer
The inside of the cabinet. Note the classic phone ringer

The main user interface is a sturdy headset that dampens engine noise significantly. This headset is connected to a cabinet that contains several modules connecting to different audio sources: an analog telephone line, an aircraft radio receiver, a PMR handheld radio, and even a music source in case the other lines are quiet. The system contains automatic switchover circuits based on a priority system, ensuring that important messages are never missed.

The electronic design is based on classic analog components like NE5532 and TL084 op amps, all mounted on small, custom-made PCBs. Audio transformers are used to avoid ground loops between the various signal sources while relays mute sources that are not prioritized. To ensure seamless compatibility with the telephone network, [Peter] used components from old desk phones, including line transformers, a DTMF keypad and even a mechanical ringer. His blog post is full of details that will be of interest to anyone working with op amps and audio, such as how to stabilize an amplifier that has significant wiring capacitance on its input.

At heart this whole project is “just” an audio mixer, although optimized for a very specific purpose. But designing even a simple mixer is by no means an easy task, as we reported a few years back. If you’re more into winches, you’ll be delighted to find that smaller ones can also be used for sledding and even wakeboarding.

From Hoverboard To Scooter

I’m sure anyone who had seen Back To The Future was more than a little disappointed when “hoverboards” started appearing on the scene. They didn’t float and they looked fairly ridiculous for anyone over 12. But they have the huge advantage of being cheap and easy to find. [Made By Madman] breaks down a hoverboard for parts to make an incredible custom electric scooter.

The first step after breaking things down for parts was to break the wheel hub motors. He pulled out the axle and started machining a new one using the lathe and a milling machine. A quick temper later, he had a sturdy steel axle. An adapter for a disc brake was milled that could attach to the wheel. The TIG welder came out to weld up a box out of some aluminum to hold the electronics. The wheel had a bracket welded on with a spring shock absorber to help smooth the ride. The fork was machined on the lathe and belt sander, but actual shocks came from an old bicycle. To attach the fork to the frame, [Madman] bends a piece of bar stock into shape; like a madman. The handlebars were taken from the bicycle and the fork was extended up to an adult height.

A quick test ride in the alley showed that the back shock wasn’t strong enough, so he swapped it with a strong one. All the parts got a powder coat. Electronics wise, it has a standard speed controller and a custom battery made from 18650 cells wired up in a 13s6p configuration and bundled together into a package. After a significant amount of wiring, he took it for a test drove and we love seeing him zip around the streets in the snow.

So many parts here are machined to press-fit tolerances and then welded on. The skill, videography, and effort that went into this were just incredible. If you’re feeling inspired and don’t have a lathe on hand, perhaps this 3d printed scooter might be a bit more your speed. Video after the break.

Continue reading “From Hoverboard To Scooter”

A HVTPI adapter plugged into a USBASP, with a an IDC10 cable plugged into it in turn

HVTPI Primer And Toolkit Equips You For BOM Substitutions

Novel programming interfaces for MCUs might catch us by surprise, but then we inevitably get up to speed with the changes required. Today’s bastion is HVTPI – a “12V reset” addition to the TPI we’ve just started getting used to, and [Sam Ettinger] has shared a simple circuit to teach us all about it, along with PCB files and detailed explanations of how it all works.

HVTPI is an add-on on top of TPI, for which, as Sam explains, you need to hold RST at 12V when TPI would have it be low logic level, and leave it at Vtarget otherwise. For that, he has designed a variety of interposer boards of various complexity and requirements; explaining the choices behind each one and clearing up any misunderstandings that might occur on your way. All of the board files (and the TPI write-up copy) are caringly shared with us in a git repository, too! As a result, if you have an USB-ASP or an Arduino available, now you also have everything to do HVTPI, thanks to Sam’s work and explanations.

We’ve been covering Sam’s exploits before, and can’t help but be grateful for the stop-and-explain detour along the way. HVTPI being used on very small ATTiny parts, we wonder if something new in the vein of his recent FPC board able to fit and function entirely within a Type-C cable end!

With chip shortages, investigating programming interfaces for small and obscure yet in-stock microcontrollers has been, quite literally, paying off, and if you got some projects that need a MCU but won’t consume a whole lot of resources, it could be time to give an ATTiny10 a go. What’s the worst that can happen – you make the smallest chiptunes ever?

Receiver board of the Ethernet tester, with only probing pins, and no resistors populated

Ethernet Tester Needs No LEDs, Only Your Multimeter

Ethernet cable testers are dime a dozen, but none of them are as elegant and multimeter-friendly as this tester from our Hackaday.io regular, [Bharbour]. An Ethernet cable has 8 wires, and the 9 volts of easily available batteries come awfully close to that – which is why the board has a voltage divider! On the ‘sender’ end, you just plug this board onto the connector, powered by a 9 volt battery. On the “receiver” end, you take your multimeter out and measure the testpoints – TP7 should be at seven volts, TP3 at three volts, and so on.

As a result, you can easily check any of the individual wires, as opposed to many testers which only test pair-by-pair. This also helps you detect crossover and miswired cables – while firmly keeping you in the realm of real-life pin numbers! This tester is well thought-out when it comes to being easily reproducible – the PCB files are available in the “Files” section, and since the “receiver” and “sender” PCBs are identical, you only need to do a single “three PCBs” order from OSHPark in order to build your own!

Bharbour has a rich library of projects, and we encourage you to check them out! If you ever want to get yourself up to speed on Ethernet basics, we’ve talked about its entire history – and we’ve even explained PoE! After some intensive learning time, perhaps you can try your hand at crimping the shortest Ethernet cable ever.

CRT cyberdeck

Old Portable TV Becomes Unique CRT Cyberdeck

Remember the “suitcase” form-factor for PCs? In the time before latops, these luggable machines were just the thing for the on-the-go executive. OK, maybe not really — but the ability to have PC, monitor, and peripherals in a single package had real appeal, and a lot of that rationale is behind the cyberdeck phenomenon. So when we saw this retro portable TV turned into a cyberdeck, it really caught our eye.

Ironically, the portable black-and-white TV that [Lucas Dul] chose as the basis for his cyberdeck hails from about the same period in time that luggable PCs were having their brief time in the sun. Scored from eBay, the Magnavox TV/radio combo had seen better days, and required a bit of surgery to repair what might have been drop damage. With the CRT restored and the video and audio paths located, the TV got a Raspberry Pi, a small touchpad, and a couple of concealed USB connectors. The Pi’s composite output drives the CRT, with about the results you’d expect. The keyboard appears to be just about the right size to serve as a cover, but [Lucas] said that’s a future project.

Still, with the TV’s original handle acting as a stand, this cyberdeck gives off a real Compaq or IBM portable PC vibe. We’ve seen a few luggable-lookalike cyberdecks before, but none that dared use a CRT monitor. It may be a far cry from HDMI, but we really appreciate that [Lucas] chose this way rather than slapping in an LCD.

Continue reading “Old Portable TV Becomes Unique CRT Cyberdeck”

A vortex puff hitting the craft

Swap The Laser For A Vortex Cannon And You Have… Lift?

When people are thinking of the future of space travel, an idea that floats around is a spaceship with a giant solar sail pushed along by a massive laser. Inspired by the concept but lacking a giant laser, [Tom Stanton] build a small craft powered by a vortex cannon.

Creating a vortex is hard enough, but creating a vortex with enough oomph to travel a longer distance and push something takes some doing. [Tom] started with some cheap solenoids, but had a few issues. Their interior nozzles were quite small, which restricted airflow. He used four valves all plumbed together to provide the volume of air needed. Additionally, he found that their response time was lacking. They couldn’t quite switch off quickly enough so instead of a puff of air, it pushed out something closer to a stream. To compensate, [Tom] 3d printed and tried a few different sizes of cone nozzles to see if that helped. Unfortunately, it did not. So he combined the nozzle with an expansion chamber that allowed the pressure wave to shorten, then it narrows to speed it up again. This provided a decent vortex.

Next [Tom] turned to his craft. After designing a 3d model, he had a template to cut out some shapes from paper and taped them together to form a light vehicle that can capture the vortex. The initial tests weren’t too promising as the craft twisted and the string that it traveled on had too much friction. Switching to a vertical test showed more promise but trying to generate multiple vortexes rapidly was unsuccessful as the turbulence from the previous rings broke up the newer rings.

So what’s to be learned from this? It seems like he doesn’t have much to show. [Tom] tweaked and iterated his way to a working vortex cannon and has continued to refine his craft. Hopefully, in the future, we’ll see a fully-functional version of this. The lesson is to keep enumerating the possibilities. Like this webcam based posture sensor iterating its way to success. Video after the break.

Continue reading “Swap The Laser For A Vortex Cannon And You Have… Lift?”