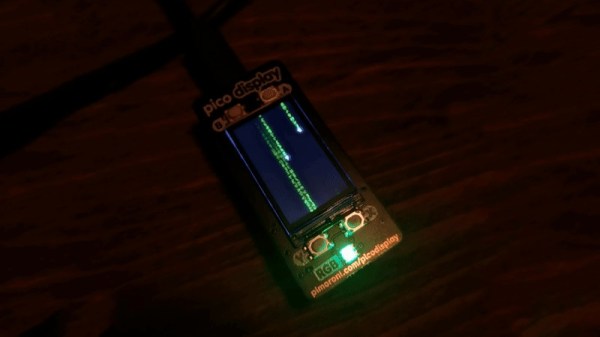
TypeMatrix EZ-Reach 2030 Is Better Than Your Laptop Keyboard

Maybe you’re not ready to take the leap into a full-on ergonomic split keyboard. That’s okay, that’s cool, that’s understandable. They’re weird! Especially ones like my Kinesis Advantage with the key bowls and such. But maybe your poor pinkies are starting to get tired and you’re ready to start using your thumbs for more than just the space bar. Or you want to be able to type ‘c’ properly, with your middle finger.

In that case, the TypeMatrix could be the keyboard for you. Or maybe for travel you, because it’s designed as a quasi-ergonomic, orthonormal layout travel keyboard to pair with your laptop, and as such it sits directly over a laptop keyboard without blocking the track pad. (How do people use those things, anyway?)

Of course, you could use this as a desktop keyboard as well, although it’s unfortunate that Control and Shift are stuck on the pinkies. More about that later.

First Impressions

When I saw this keyboard on eBay, I was attracted by two things: the layout, and the dedicated Dvorak light. (And, let’s be honest — the price was right.) I’ve always found myself generally turned off by chocolate bar-style ortholinear keebs because they’re so incredibly cramped, but this one seemed a more acceptable because of the slight split.

The first thing I noticed was the fantastic number pad integration. The different colored keycaps are a nice touch, because the gray makes the number pad stand out, and the red Delete is easy to find since Num Lock is squatting in the upper right corner. Why does Delete always feel like an afterthought on compact keebs? I also like the location of the arrows, and it makes me think of the AlphaSmart NEO layout. Unfortunately, it comes at the cost of burying the right hand Enter down in no-man’s land where you can’t exactly hit it blindly with great accuracy right away. If only you could swap Shift and Enter without messing up the number pad!

Continue reading “TypeMatrix EZ-Reach 2030 Is Better Than Your Laptop Keyboard”

Soviet Super 8 Camera Hides Raspberry Pi Zero

A few years ago [Xabier Zubizarreta] got it into his head that he wanted to put a modern digital image sensor into a classic Super 8 camera, but he didn’t want to ruin a gorgeous piece of vintage hardware in the process. After a bit of research, he discovered an export version of the Avrora camera made for the 1980 Summer Olympic Games in Moscow that could be had for cheap. Figuring nobody would miss a camera built with the utilitarian aesthetics you’d expect of a Soviet-era piece of consumer tech, he set off to cram a Raspberry Pi into its film compartment.

On the Hackaday.io page for this project, [Xabier] explains a bit about the optical properties that make this project challenging. Specifically, the miniature sensor used by the official Raspberry Pi camera module is far smaller than the 8 mm film the camera was designed for. So when the sensor placed at the appropriate focal length for the original film, the image will be cropped considerably. As you can see in the video below, this gives the impression of everything being filmed with a fairly tight zoom.

To perform this modification, [Xabier] first had to liberate the sensor of the Pi Camera from the original optics, and then carefully install it in proper position on the Avrora. To make sure he had it aligned, he watched a live feed from the camera while the epoxy holding the sensor down was curing. This allowed him to make slight adjustments before everything was solidified. With the sensor in place, he only had to stuff the Pi Zero and battery pack into the film compartment, and wire the original camera trigger to the GPIO pins so he could read it in software.

Considering the incredible amount of effort some photographers have put in to adapt their vintage cameras to digital, it’s refreshing to see such a straightforward approach. The resulting video might not be up to modern standards, but with projects like this, that’s sort of the point.

Continue reading “Soviet Super 8 Camera Hides Raspberry Pi Zero”

Enjoy An ASCII Version Of Star Wars In The Palm Of Your Hand For May The 4th

Everyone by now has probably seen the original — and best; fight us — installment of the Star Wars franchise, and likely the ASCII-art animation version of it that improves greatly on the film by eliminating all those distracting special effects, human actors, and the soundtrack. But what we haven’t had until now is a portable player for ASCIIWars, to enjoy the film in all its character-based glory while you’re on the go.

While this tribute to [Simon Jansen]’s amazing ASCII-art achievement might seem like a simple repackaging of the original, [Frank] actually had to go to some lengths to make this work. After getting [Simon]’s blessing, the build started with a WEMOS D1 Mini, a good platform for the project less for its wireless capabilities and more for its 4 MB of flash memory. A 240×360 TFT LCD display was selected to show the film; the scale of the display made most fonts hard to read, so [Frank] used Picopixel, a font designed for legibility on small screens. The animation file is stored on the SPIFFS file system on the D1’s flash memory, and a few lines of code parse it and send it to the display. The final touch is mounting the whole thing is an old slide viewer, which magnifies the display to make it a little easier to see.

As much as we applaud [Frank]’s tribute to [Simon]’s effort, there’s no reason to confine this to the Star Wars universe. If you read up on the history of ASCII art, which goes surprisingly far back, you might be inspired to render another classic film in ASCIImation and put it on a viewer like this. ASCII-Metropolis, anyone?

Continue reading “Enjoy An ASCII Version Of Star Wars In The Palm Of Your Hand For May The 4th”

Guitar Hero Robot Actually Shreds

Once a popular craze, most of the public has sold or stashed away their plastic video game instruments and forgotten the likes of Guitar Hero and Rockband. Having never been quite satisfied with his scores, [Nick O’Hara] set out to create a robot that could play a Guitar Hero controller. It would be easy enough to use transistors to actuate the buttons or even just a Teensy to emulate a controller and have it play the perfect game, but [Nick] wanted to replicate what it was really like to play. So after burning out a fair number of solenoids (driving them over spec) and learning on his feet, [Nick] slowly began to dial in his robot, Jon Bot Jovi.

The brains of the bot are a Raspberry Pi running some OpenCV-based code that identifies blobs of different colors. The video feed comes from a PS2 via an HDMI capture card. Solenoids are driven via an 8 channel driver board, controlled by the Pi. While it missed a few notes here and there, we loved seeing the strumming solenoid whammy rapidly on the strummer. All in all, it’s a great project, and we love the design of the robot. Whether played by a robot, turned into a synthesizer, or recreated from toy pianos and mechanical keyboards, Guitar Hero controllers offer many hacking opportunities.

Continue reading “Guitar Hero Robot Actually Shreds”

Silicon Carbide Chips Can Go To Hell

IEEE Spectrum had an interesting read about circuits using silicon carbide as a substrate. [Alan Mantooth] and colleagues say that circuits based on this or some other rugged technology will be necessary for missions to Venus, which they liken to hell. That might seem like hyperbole, but at about 460C with an atmosphere full of sulphuric acid, maybe it isn’t such a stretch. When the Soviets sent Venera 13 to Venus, it was able to send data for just over two hours before it was gone. You’d hope 40 years later we could do better.

Silicon carbide is a semiconductor made with an even mix of silicon and carbon. The resulting components can operate for at least a year at 500C. This high-temperature operation has earned them a place in solar energy and other demanding applications.  [Alan], with the University of Arkansas along with colleagues from the KTH Royal Insitute of Technology in Stockholm are building test circuits aimed at developing high-temperature radios for use in environments like the one found on Venus.

Continue reading “Silicon Carbide Chips Can Go To Hell”

ECG Project With All The Messy Safety Details

We’ve seen a number of heart rate monitoring projects on Hackaday, but [Peter’s] electrocardiography (ECG) Instructable really caught out attention.

If you’ve followed Hackaday for any period of time, you’re probably already somewhat familiar with the hardware needed to record the ECG. First, you need a high input impedance instrumentation amplifier to pick up the millivolt signal from electrical leads carefully placed on the willing subject’s body. To accomplish this, he used an AD8232 single-lead ECG module (we’ve actually seen this part used to make a soundcard-based ECG). This chip has a built-in instrumentation amplifier as well as an optional secondary amplifier for additional gain and low-pass filtering. The ECG signal is riddled with noise from mains that can be partially attenuated with a simple low-pass filter. Then, [Peter] uses an Arduino Nano to sample the output of the AD8232, implement a digital notch filter for added mains noise reduction, and display the output on a 2.8″ TFT display.

Other than the circuit itself, two things about his project really caught our attention. [Peter] walks the reader through all the different safety considerations for a commercial ECG device and applies these principles to his simple DIY setup to ensure his own safety. As [Peter] put it, professional medical electronics should follow IEC 60601. It’s a pretty bulky document, but the main tenets quoted from [Peter’s] write-up are:

  1. limiting how much current can pass through the patient
  2. how much current can I pass through the patient?
  3. what electrical isolation is required?
  4. what happens if a “component” fails?
  5. how much electromagnetic interference can I produce?
  6. what about a defibrillator?

[Peter] mentions that his circuit itself does not fully conform to the standard (though he makes some honest attempts), but lays out a crude plan for doing so. These include using high-valued input resistors for the connections to the electrodes and also adding a few protection diodes to the electrode inputs so that the device can withstand a defibrillator. And of course, two simple strategies you always want to follow are using battery power and placing the device in a properly shielded enclosure.

[Peter] also does a great job breaking down the electrophysiology of the heart and relates it to terms maybe a bit more familiar to non-medical professionals. Understanding the human heart might be a little less intimidating if we relate the heart to a simple voltage source like a battery or maybe even a function generator. You can imagine the ions in our cells as charger carriers that generate electrical potential energy and nerve fibers as electrical wires along which electrical pulses travel through the body.

Honestly, [Peter] has a wealth of information and tools presented in his project that are sure to help you in your next build. You might also find his ECG simulator code really handy and his low-memory display driver code helpful as well. Cool project, [Peter]!

Measuring ECG is something that is near and dear to my heart (sorry, couldn’t resist). Two of my own projects that were featured on Hackaday before I became a writer here include a biomedical sensor suite in Arduino shield form factor, and a simple ECG built around an AD623 instrumentation amplifier.

Hoverboard Turned Heavy Duty Remote Control Rover

They might not be the hoverboards we were promised in Back to the Future II, but the popular electric scooters that have commandeered the name are exciting pieces of tech in their own way. Not because we’re looking to make a fool of ourselves by actually riding one, but because they’re packed full of useful hardware that’s available for dirt cheap thanks to the economies of scale and the second-hand market.

In his latest video, the ever resourceful [MakerMan] turns a pair of hoverboards into a capable remote controlled mobile platform perfect for…well, whatever you want to move around. Its welded steel construction is certainly up for some heavy duty tasks, and while we can’t say we’d ever tow a SUV with it as shown in the video below, it’s nice to know we’d have the option.

The project starts by liberating the four wheel motors from the scooters and carefully cutting down the frame to preserve the mounting hardware. These mounts are ultimately welded to the frame of the rover, with a piece of diamond plate screwed down on top. On the bottom, [MakerMan] mounts the two control boards and a custom fabricated 36 V battery pack.

He doesn’t go into any detail on how he’s interfacing the RC hardware with the motor controllers, but as we’ve seen with past hacks, there’s open source firmware replacements for these boards that allow them to be controlled by external inputs. Presumably something similar is being used here, but we’d be interested to hear otherwise. Of course you could swap the RC hardware out for a microcontroller or Raspberry Pi if you were looking to make some kind of autonomous rover.

Don’t have a welder or convenient collection of scrap steel laying around? No worries. Prolific tinkerer [Aaron Christophel] put something very similar together using bolted aluminum extrusion.

Continue reading “Hoverboard Turned Heavy Duty Remote Control Rover”