New Part Day: Arduino Goes Pro With The Portenta H7

The Consumer Electronics Show in Las Vegas is traditionally where the big names in tech show off their upcoming products, and the 2020 show was no different. There were new smartphones, TVs, and home automation devices from all the usual suspects. Even a few electric vehicles snuck in there. But mixed in among flashy presentations from the electronics giants was a considerably more restrained announcement from a company near and dear to the readers of Hackaday: Arduino is going pro.

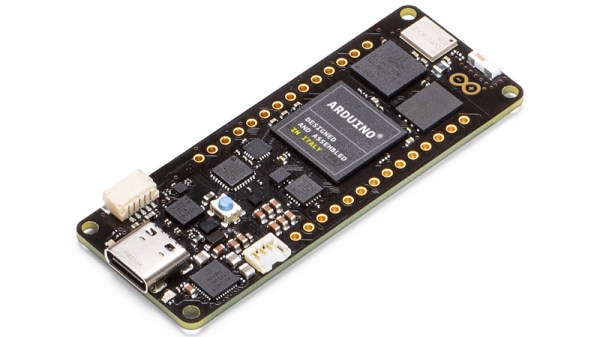
While Arduino has been focused on the DIY and educational market since their inception, the newly unveiled Portenta H7 is designed for professional users who want to rapidly develop robust hardware suitable for industrial applications. With built-in wireless hardware and the ability to run Python and JavaScript out of the box, the powerful dual-core board comes with a similarly professional price tag; currently for preorder at $99 USD a pop, the Portenta is priced well outside of the company’s traditional DIY and educational markets. With increased competition from other low-cost microcontrollers, it seems that Arduino is looking to expand out of its comfort zone and find new revenue streams.

Continue reading “New Part Day: Arduino Goes Pro With The Portenta H7”

OWON Oscilloscope Teardown

We sympathize with [learnelectronic’s] statement: “I’m ashamed. I may have bought another oscilloscope.” We get it and we enjoyed watching him tear down the OWON SDS1102. (Video, embedded below.) As you might guess, this is a 100 MHz, two-channel scope, and very similar to many other Chinese scopes you can get inexpensively.

The last ten minutes are so of the video below shows him removing the case. There’s only three little boards inside. One is clearly a power supply. The other two don’t have much on them. There’s a tiny RF shield over one part of the board, so you assume that’s the input section.

Continue reading “OWON Oscilloscope Teardown”

Automate Your Life With Node-RED (Plus A Dash Of MQTT)

For years we’ve seen a trickle of really interesting home automation projects that use the Node-RED package. Each time, the hackers behind these projects have raved about Node-RED and now I’ve joined those ranks as well.

This graphic-based coding platform lets you quickly put together useful operations and graphic user interfaces (GUIs), whether you’re the freshest greenhorn or a seasoned veteran. You can use it to switch your internet-connected lights on schedule, or at the touch of a button through a web-app available to any device on your home network. You can use it as an information dashboard for the weather forecast, latest Hackaday articles, bus schedules, or all of them at once. At a glance it abstracts away the complexity of writing Javascript, while also making it simple to dive under hood and use your 1337 haxor skills to add your own code.

You can get this up and running in less than an hour and I’m going to tackle that as well as examples for playing with MQTT, setting up a web GUI, and writing to log files. To make Node-RED persistent on your network you need a server, but it’s lean enough to run from a Raspberry Pi without issue, and it’s even installed by default in BeagleBone distributions. Code for all examples in this guide can be found in the tutorial repository. Let’s dive in!

Continue reading “Automate Your Life With Node-RED (Plus A Dash Of MQTT)”

Lego Drone Finally Takes Off

We were concerned when we saw [Brick Experiment Channel] test a drone propulsion pod made with Lego. After all, the thrust generated was less than the weight of the assembly. But a few tweaks got enough lift to overcome the assembly weight, as you can see in the video below.

The next step was to build three more pods and add some lightweight avionics and a battery. The first flight was a little dicey because the sensor orientation was off. Then there was some more software tuning before things really got airborne.

Continue reading “Lego Drone Finally Takes Off”

Tetraethyl Lead: The Solution To One, And Cause Of Many New Problems

From the 1920s until the 1970s, most gasoline cars in the USA were using fuel that had lead mixed into it. The reason for this was to reduce the engine knocking effect from abnormal combustion in internal combustion engines of the time. While lead — in the form of tetraethyllead — was effective at this, even the 1920s saw both the existence of alternative antiknock agents and an uncomfortable awareness of the health implications of lead exposure.

We’ll look at what drove the adoption of tetraethyllead, and why it was phased out once the environmental and health-related issues came into focus. But what about its antiknock effects? We’ll also be looking at the alternative antiknock agents that took its place and how this engine knocking issue is handled these days.

Continue reading “Tetraethyl Lead: The Solution To One, And Cause Of Many New Problems”

What To Know When Buying Chips That Haven’t Been Made For Three Decades

Those of us who have worked with vintage sound generator chips such as the Yamaha FM synthesizers in recent years have likely run into our own fair share of “fake” or “remarked” chips, sometimes relabeled to appear as a chip different than the die inside the packaging entirely. [David Viens] from Plogue has finally released his findings on the matter after 3 years of research. (Video, embedded below.)

The first thing to determine is in what way are these chips “fake”? Clearly no new YM2612’s were manufactured by Yamaha in 2015, but that doesn’t mean that these are simply unlicensed clones put out by another die factory. [David] explains how these chips are often original specimens sourced from recycled electronic waste from mostly environmentally unsafe operations in China, which are then reconditioned and remarked to be passed as “new” by resellers. Thankfully, as of 2017, he explains that most of these operations are now being shut down and moved into an industrial park where the work can be done in a less polluting manner.

The next thing that [David] dives into is how these remarked chips can be spotted. He explains how to use telltale signs in the IC packaging to identify which chip plant produced them, and visible indications of a chip that has been de-soldered from a board and reconditioned. There are different ways in which the remarking can be done, and sometimes it’s possible to undo the black-top, as it’s called, and reveal the original markings underneath with the simple application of acetone with a cotton swab.

We’ve talked about fake chips and how they can lead to hardware failure here before, but in the case of chips like these which aren’t manufactured anymore, we’re not left with much choice other than FPGA or software reimplementations. Check out [David]’s 40-minute look into these chips after the break.

Continue reading “What To Know When Buying Chips That Haven’t Been Made For Three Decades”

One ESP8266, One Battery, One Year… And Counting.

There are times when a sensor is required that does its job without the need for human attention over a long period, and for those applications a minimal power drain is a must. [Dave Davenport] had an EPS8266-based moisture sensor, and became disappointed in having to replace its AA batteries every few months. With an 18650 Li-ion cell and a bunch of power-saving tricks that time has been extended so far to over a year and still going, so he’s written a blog post detailing how he did it.

Some of his techniques such as turning off the sensor or using a better LDO regulator than the stock Wemos one are straightforward. Others though are unexpected, such as using the memory associated with the on-board RTC to store the WiFi connection info and channel number during sleep. The normal ESP8266 connection sequence involves a network scan, by hanging onto what it found last time the extra time and thus power expended by it can be avoided. Similarly switching from a DHCP lease to a fixed IP address cuts the time the device waits for a lease and thus the time it has to stay awake.

We might not all have ESP8266 moisture sensors to build, but we’re many of us on a quest to sip less power in our projects. Let us help you with a previous sojourn into that arena.

ESP8266 image: connorgoodwolf [CC BY-SA 4.0].