The Easiest Thermal Camera Build You’ll Ever See

Thermal cameras are one of those tools that we all want, but just can’t justify actually buying. You don’t really know what you would do with one, and when even the cheap ones are a couple hundred dollars, it’s a bit out of the impulse buy territory. So you just keeping waiting and hoping that eventually they’ll drop to the price that you can actually own one yourself.

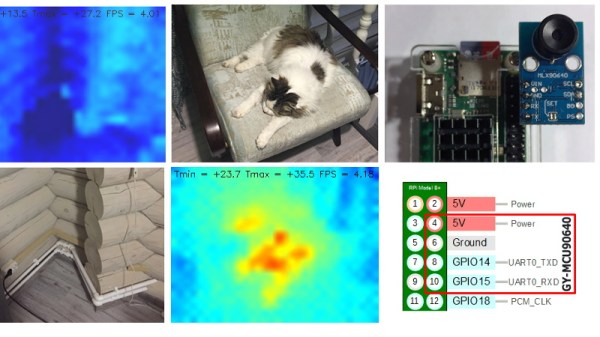
Well, today might be the day you were waiting for. While it might not be the prettiest build, we think you’ll agree it can’t get much easier than what [vvkuryshev] has put together. His build only has two components: a Raspberry Pi and a thermal camera module he picked up online for about $80 USD. There isn’t even any wiring involved, the camera fits right on the Pi’s GPIO header.

Of course, you probably wouldn’t be seeing this on Hackaday if all he had to do was just buy a module and solder it to the Pi’s header. As with most cheap imported gadgets, the GY-MCU90640 module that [vvkuryshev] bought came with some crusty Windows software which wasn’t going to do him much good on the Raspberry Pi. But after going back and forth a bit with the seller, he was able to get some documentation for the device that put him on the right track to writing a Python script which got it working under Linux.

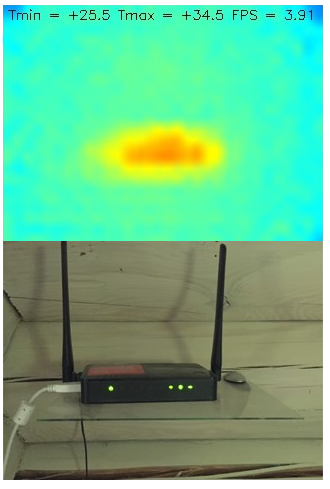
The surprisingly simple Python script reads a frame from the camera four times a second over serial and run it through OpenCV. It even adds some useful data like the minimum and maximum temperatures in the frame to the top of the image. Normally the script would output to the Pi’s primary display, but if you want to use it remotely, [vvkuryshev] says he’s had pretty good luck running it over VNC. In fact, he says that with a VNC application on your phone you could even use this setup on the go, though the setup is a bit awkward for that in its current incarnation.

This isn’t the first DIY thermal camera build we’ve seen, and it isn’t even the first one we’ve seen that leveraged a commercially available imaging module. But short of buying a turn-key camera, we don’t see how it could get any easier to add heat vision to your bag of tricks.

Lithium Jump Starter Disassembly Is Revealing

High-capacity lithium batteries tend to make everything in life better. No longer must you interact with your fellow human beings if your car battery goes flat in the carpark. You can jump the car yourself, with a compact device that fits in your glovebox. [Big Clive] decided to pull one apart and peek inside, and it’s quite the illuminating experience.

The first thing to note is there is almost no protection at all for the lithium battery inside. The output leads connect the lithium pack inside directly to the car battery, save for some diodes in series to prevent the car’s alternator backcharging the pack. [Clive] demonstrates this by short circuiting the pack, using a copper pipe as a test load to measure the current output. The pack briefly delivers 500 amps before the battery gives up the ghost, with one of the cells swelling up and releasing the magic smoke.

The teardown then continues, with [Clive] gingerly peeling back the layers of insulation around the cells, getting right down to the conductive plates inside. It’s a tough watch, but thankfully nothing explodes and [Clive]’s person remains intact. If you’ve never seen inside a lithium cell before, this is a real treat. The opened pack is even connected to a multimeter and squeezed to show the effect of the physical structure on output.

It would be interesting to compare various brands of jump starter; we imagine some have more protection than others. Regardless, be aware that many on the market won’t save you from yourself. Be careful out there, and consider jumping your car with an even more dangerous method instead (but don’t). Video after the break.

Continue reading “Lithium Jump Starter Disassembly Is Revealing”

Spot This DIY Electronic Load’s Gracefully Hidden Hacks

Sometimes it’s necessary to make do with whatever parts one has on hand, but the results of squashing a square peg into a round hole are not always as elegant as [Juan Gg]’s programmable DC load with rotary encoder. [Juan] took a design for a programmable DC load and made it his own in quite a few different ways, including a slick 3D-printed enclosure and color faceplate.

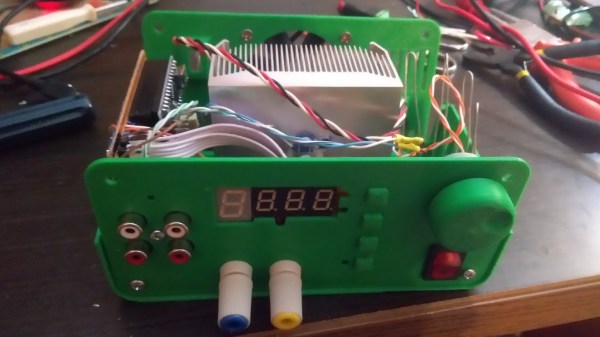
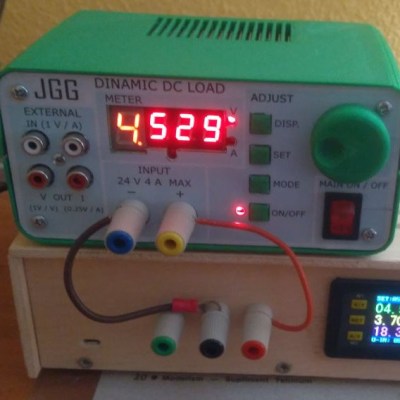
The first thing to catch one’s eye might be that leftmost seven-segment digit. There is a simple reason it doesn’t match its neighbors: [Juan] had to use what he had available, and that meant a mismatched digit. Fortunately, 3D printing one’s own enclosure meant it could be gracefully worked into the design, instead of getting a Dremel or utility knife involved. The next is a bit less obvious: the display lacked a decimal point in the second digit position, so an LED tucked in underneath does the job. Finally, the knob on the right could reasonably be thought to be a rotary encoder, but it’s actually connected to a small DC motor. By biasing the motor with a small DC voltage applied to one lead and reading the resulting voltage from the other, the knob’s speed and direction can be detected, doing a serviceable job as rotary encoder substitute.

The project’s GitHub repository contains the Arduino code for [Juan]’s project, which has its roots in a design EEVblog detailed for an electronic load. For those of you who prefer your DIY rotary encoders to send discrete clicks and pulses instead of an analog voltage, a 3D printed wheel and two microswitches will do the job.

LittlevGL Brings GUI Tools To Micropython

Microcontrollers are wonderfully useful things, but programming them can be a little daunting if you’re used to the simplicity of compiling for regular PCs. Over time though, this has become easier. Communities have strayed away from assembly code and created higher-level languages such as Micropython, to allow these devices to be programmed in a more accessible manner. Unfortunately, Micropython has historically lacked a decent high-level GUI library. Thankfully, that’s no longer the case, with [amirgon] porting LittlevGL to the platform.

Putting a GUI into a project with a screen seems simple, until one actually gets down to brass tacks. A simple button can consist of a background color, text, and a symbol – and that’s not even considering the use of shading or other visual effects. Having a library to handle the grunt work can massively cut down development time.

LittlevGL is the work of [kisvegabor], and is programmed in C, but this effort has made it possible to integrate it with Micropython code. It’s all object-oriented, and thus works well in the broader Python framework. [amirgon] notes that it’s particularly good for quick development, due to Python’s ability to run code without a slow compiling step.

There are other approaches to this problem, too – with MyOpenLab being a particularly versatile example.

Vacuum-Powered Rotary Tool Redux, This Time Machined

We love to see projects revisited, especially when new materials or methods make it worth giving the first design another go around. This twin-turbine vacuum-powered Dremel tool is a perfect example of what better tools can do for a build.

You may recall [JohnnyQ90]’s first attempt at a vacuum powered rotary tool. That incarnation, very similar in design to the current work, was entirely 3D-printed, and caused no little controversy in the comments about the wisdom of spinning anything made on an FDM printer at 43,000 RPM. Despite the naysaying, [Johnny] appears to have survived his own creation. But the turbo-tool did have its limitations, including somewhat anemic torque. This version, machined rather than printed and made almost completely from aluminum, seems to have solved that problem, perhaps thanks to the increased mass of the rotating parts. The twin rotors and the stator were milled with a 5-axis CNC machine, which has been a great addition to [JohnnyQ90]’s shop. The turbine shaft, looking like something from a miniature jet engine, was meticulously balanced using magnets mounted in the headstock and tailstock of a lathe. The video below shows the build and a few tests; we’re not big fans of the ergonomics of holding the tool on the end of that bulky hose, but it sure seems to work well. And that sound!

We first noticed [JohnnyQ90] when he machined aluminum from soda cans to make a mini Tesla turbine. His builds have come a long way since then, and we look forward to what he’ll come up with next.

Continue reading “Vacuum-Powered Rotary Tool Redux, This Time Machined”

Teardown Of A Luxury Bluetooth Nightlight

If you had asked us yesterday what peak nightlight technology looked like, we might have said one of those LED panels that you stick in the outlet. At least it beats one of those little wimpy light bulbs behind the seashell, anyway. But after looking at a detailed teardown of the “Glow Light” from Casper, we’ve learned a lot about the modern nightlight. Such as the fact that there are adults who not only sleep with nightlights, but are willing to pay $89 USD for one.

But more importantly, as [Tyler Mincey] demonstrates in his excellent look inside one of these high-end nightlights, they are gorgeous pieces of engineering. Even if a nightlight next to the bed has long since gone the way of pajamas with feet on them for you personally, we think you’ll be impressed just how much technology has gone into these softly glowing gadgets.

On the outside they might look like marshmallows, but the insides look far more like what you’d expect from an expensive piece of consumer gear. It’s based on the Nordic nRF52832 Bluetooth SoC which is becoming an increasingly common sight in consumer gadgets, and uses an inertial measurement unit (IMU) to detect when it’s moved or twisted and adjusts the light output accordingly. If you’ve got the disposable income for two of these things, they’ll even synchronize so that twisting one will dim its counterpart.

The teardown that [Tyler] did on the Glow Light is quite frankly one of the best we’ve ever seen, and while it might be a bit light on the gritty technical details, it more than makes up for that with the fantastic pictures that are about as close to actual hardware porn as you can get. The only question we have now is, how long until a hacker replicates this design with a 3D printed enclosure and an ESP?

[Thanks to Adrian for the tip.]

Zach Archer: Live Coding 500 Watts For ToorCamp

ToorCamp is a five-day open air tech camping event held every two years somewhere around the northwest corner of Washington state. Think of it as something like Burning Man, except you can survive for three hours without water, there aren’t a whole bunch of scenesters and Instagram celebs flying in on private planes, and everyone there can actually build something. Oh, and ToorCamp has delivery drones that will send you creme brulee. These mini creme brulees were probably made with the hot air gun hanging off a soldering station. Don’t worry, you’re getting fresh air that’ll balance out the heavy metal poisoning.

For last year’s ToorCamp, the biggest welcome sign was a 40-foot-long illuminated ToorCamp sign. This was designed, built and coded by Zach Archer, and he was at the 2018 Hackaday Superconference to give us the details on how he made it and how it was coded.

Continue reading “Zach Archer: Live Coding 500 Watts For ToorCamp”