Ten 3D Printed Gadgets That Just Can’t Stay Still

There was a time, not so very long ago, when simply getting a 3D printer to squirt out an object that was roughly the intended shape and size of what the user saw on their computer screen was an accomplishment. But like every other technology, the state of the art has moved forward. Today the printers are better, and the software to drive them is more capable and intuitive. It was this evolution of desktop 3D printing that inspired the recently concluded 3D Printed Gears, Pulleys, and Cams contest. We wanted to see what hackers and makers can pull off with today’s 3D printing tools, and the community rose to the challenge.

Let’s take a look at the top ten spinning, walking, flapping, and cranking 3D printed designs that shook us up:

Continue reading “Ten 3D Printed Gadgets That Just Can’t Stay Still”

Hack My House: Raspberry Pi As A Touchscreen Thermostat

Your thermostat is some of the oldest and simplest automation in your home. For years these were one-temperature setting and nothing more. Programmable thermostats brought more control; they’re alarm clocks attached to your furnace. Then Nest came along and added beautiful design and “learning features” that felt like magic compared to the old systems. But we can have a lot more fun. I’m taking my favorite single-board computer, the Raspberry Pi, and naming it keeper of heat (and cool) by building my own touchscreen thermostat.

Mercury thermostats started it all, and were ingenious in their simplicity — a glass capsule containing mercury, attached to a wound bi-metal strip. As the temperature changes, the contraption tilts and the mercury bead moves, making or breaking contact with the wiring. More sophisticated thermostats have replaced the mercury bead with electronics, but the signaling method remains the same, just a simple contact switch.

This makes the thermostat the prime target for an aspiring home automation hacker. I’ve had this particular project in mind for quite some time, and was excited to dive into it with simple raw materials: my Raspberry Pi, a touchscreen, and a mechanical relay board.

Continue reading “Hack My House: Raspberry Pi As A Touchscreen Thermostat”

Simple Timer Evolves Into Custom Kid’s Watch

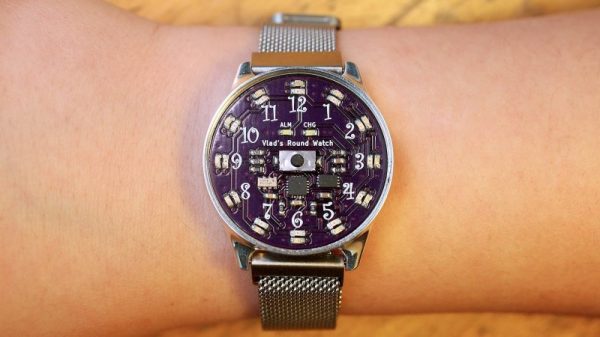
Sporting a new wristwatch to school for the first time is a great moment in a kid’s life. When it’s a custom digital-analog watch made by your dad, it’s another thing altogether.

As [Chris O’Riley] relates, the watch he built for his son [Vlad] started out as a simple timer for daily toothbrushing, a chore to which any busy lad pays short shrift unless given the proper incentive. That morphed into an idea for a general purpose analog timepiece with LEDs taking the place of hands. [Chris] decided that five-minute resolution was enough for a nine-year-old, which greatly reduced the number of LEDs needed. An ATtiny841 tells a 28-channel I2C driver which LEDs to light up, and an RTC chip keeps [Vlad] on schedule. The beautiful PCB lives inside a CNC machined aluminum case; we actually commented to [Chris] that the acrylic prototype looked great by itself, but [Vlad] wanted metal. The watch has no external buttons; rather, the slightly flexible polycarbonate crystal bears against a PCB-mounted pushbutton to control functions.

With a snappy wristband, [Vlad] will be rolling fancy on the schoolyard. It’s a great looking piece that needed a wide range of skills to execute, as all watches do. Check out some other watch builds, like this lovely pure analog, another digital-analog hybrid, or this pocket watch that packs an Enigma machine inside.

Continue reading “Simple Timer Evolves Into Custom Kid’s Watch”

Multiple OLEDs? Save Pins By Sharing The I2C Clock

Inexpensive OLED displays with I2C interfaces abound, but there is a catch: they tend to be stuck on I2C address 0x3C. Some have a jumper or solder pads to select an alternate (usually 0x3D), but they lack any other method. Since an I2C bus expects every device to have a unique address, this limits the number of displays per bus to one (or two, at best.) That is all still true, but what [Larry Bank] discovered is a way to get multiple OLED displays working with considerably fewer microcontroller pins than usually needed.

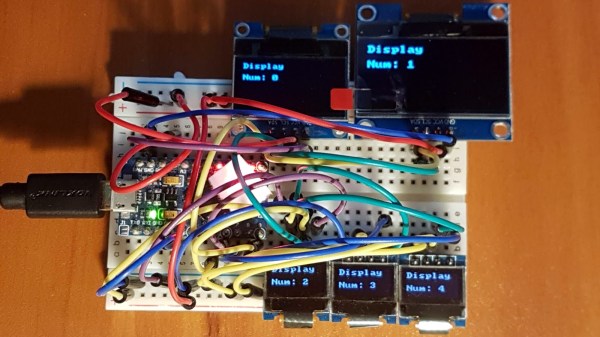
While bit-banging I2C to host one display per bus on the same microcontroller, an idea occurred to him. The I2C start signal requires both clock (SCL) and data (SDA) to be brought low together, but what would happen if the displays shared a single clock line? To be clear, each OLED would — logically speaking — still be on its own I2C bus with its own data line, but they would share a clock signal. Would a shared clock cause attached devices to activate unintentionally?

A quick test consisting of four OLED displays (all with address 0x3C) showed that it was indeed possible to address each display with no interference if they shared a clock. Those four individually controlled displays needed only five I/O lines (four SDA, one shared SCL) instead of eight. The Multi_OLED library is available on GitHub, and in case it is useful for devices other than OLED displays, bit-banged I2C with support for shared clock lines is available separately.

There’s more to do with OLEDs than get clever with signals: check out these slick number-change animations, and that even looks to be a project that could benefit from a few saved GPIO pins, since it uses one small display per digit.

Common Chemicals Combine To Make Metallic Sodium

There’s no debating that metallic sodium is exciting stuff, but getting your hands on some can be problematic, what with the need to ship it in a mineral oil bath to keep it from exploding. So why not make your own? No problem, just pass a few thousand amps of current through an 800° pot of molten table salt. Easy as pie.

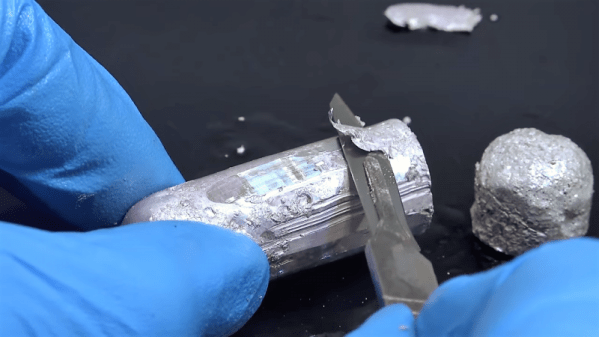
Thankfully, there’s now a more approachable method courtesy of this clever chemical hack that makes metallic sodium in quantity without using electrolysis. [NurdRage], aka [Dr. N. Butyl Lithium], has developed a process to extract metallic sodium from sodium hydroxide. In fact, everything [NurdRage] used to make the large slugs of sodium is easily and cheaply available – NaOH from drain cleaner, magnesium from fire starters, and mineral oil to keep things calm. The reaction requires an unusual catalyst – menthol – which is easily obtained online. He also gave the reaction a jump-start with a small amount of sodium metal, which can be produced by the lower-yielding but far more spectacular thermochemical dioxane method; lithium harvested from old batteries can be substituted in a pinch. The reaction will require a great deal of care to make sure nothing goes wrong, but in the end, sizable chunks of the soft, gray metal are produced at phenomenal yields of 90% and more. The video below walks you through the whole process.

It looks as though [NurdRage]’s method can be scaled up substantially or done in repeated small batches to create even more sodium. But what do you do when you make too much sodium metal and need to dispose of it? Not a problem.

Continue reading “Common Chemicals Combine To Make Metallic Sodium”

Blink An LED On The Internet Of Things

Blinking an LED is generally considered the hardware equivalent of the classic “Hello World” project. It’s a quick and simple test to show that you’ve got the basics worked out, and a launching point for bigger and better things. So why should it be any different in this glorious new Internet of Things era?

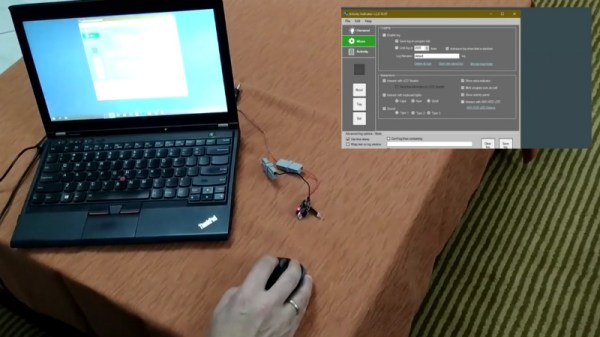
The “WiFi HDD LED” created by [Limbo] is essentially just that, a status LED that can be triggered remotely thanks to the WiFi capability of the ever-popular ESP8266. Don’t think there’s much use for a wireless LED that blinks when your computer’s hard drive is thrashing around? Maybe not, but it’s definitely worth checking out if you’re looking for a good way to get your feet wet in the world of ESP hacking.

On the hardware side, this is exactly what you’d expect: an LED hanging off the digital pin of an ESP8266 module. If you go with the bare ESP-01 like [Limbo], things are somewhat more complex due to the need for a voltage regulator, but if you’re using one of the more common ESP development boards then there’s nothing else you need to add. Really, as a proof of concept you could even use the built-in LED on those boards.

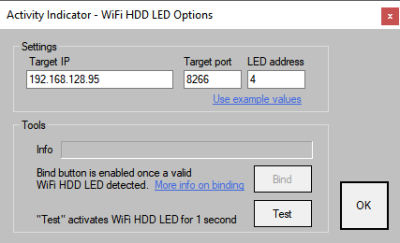
As you might imagine, this project is more about the software than the hardware. The code on both sides of the equation has been released as open source for your hacking pleasure, and is more capable than you’d probably expect. The LED is actually an extension of a system activity monitor that [Limbo] had previously developed and includes a binding function to make sure you’re talking to the right blinking ESP. It’s probably overkill for many purposes, but it’s a good example of how to do more robust UDP connections than we’re used to seeing.

This project is one of many that prove there’s more than one way to accomplish a particular goal, and that there’s something to be learned from even the most eccentric of hacks.

Continue reading “Blink An LED On The Internet Of Things”

The No-Parts Temperature Sensor In Your Arduino

[Edward], creator of the Cave Pearl project, an underwater data logger, needed a way to measure temperature with a microcontroller. Normally, this problem is most easily solved by throwing a temperature sensor on the I2C bus — these sensors are cheap and readily available. This isn’t about connecting a temperature sensor in your Arduino. This build is about using the temperature sensor in your clock.

The ATMega328p, the chip at the heart of all your Arduino Uno clones, has within it a watchdog timer that clicks over at a rate of 110 kHz. This watchdog timer is somewhat sensitive to temperature, and by measuring this temperature sensor you can get some idea of the temperature of the epoxy blob that is a modern microcontroller. The trick is calibrating the watchdog timer, which was done with a homemade ‘calibration box’ in a freezer consisting of two very heavy ceramic pots with a bag of rice between them to add thermal mass (you can’t do this with water because you’re putting it in a freezer and antique crocks are somewhat valuable).

By repeatedly taking the microcontroller through a couple of freeze-thaw cycles, [Edward] was able to calibrate this watchdog timer to a resolution of about 0.0025°C, which is more than enough for just about any sensor application. Discussions of accuracy and precision notwithstanding, it’s pretty good.

This technique measures the temperature of the microcontroller with an accuracy of 0.005°C or better, and it’s using it with just the interrupt timer. That’s not to say this is the only way to measure the temperature of an ATMega; some of these chips have temperature sensors built right into them, and we’ve seen projects that use this before. However, this documented feature that’s clearly in the datasheet seems not to be used by many people.

Thanks [jan] for sending this in.