Raspberry Pi Ham Radio Remote Reviewed

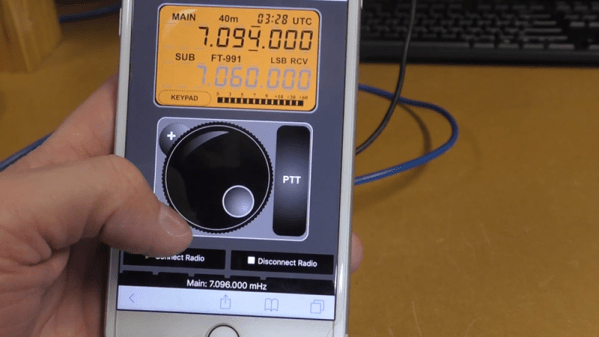
One problem with ham radio these days is that most hams live where you can’t put a big old antenna up due to city laws and homeowner covenants. If you’re just working local stations on VHF or UHF, that might not be a big problem. But for HF usage, using a low profile antenna is a big deal. However, most modern radios can operate remotely. Well-known ham radio company MFJ now has the RigPi Station Server and [Ham Radio DX] has an early version and did a review.

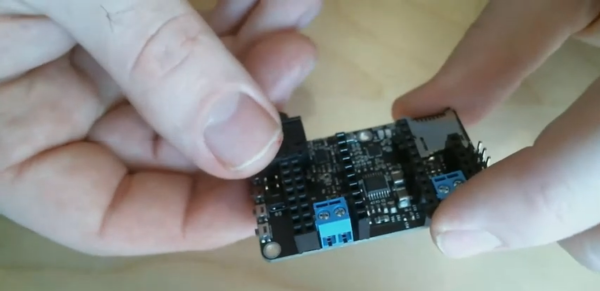
As the name implies, the box contains a Raspberry Pi. There’s also an audio interface. The idea is to consolidate rig control along with other station control (such as rotators) along with feeding audio back and forth to the radio. It also sends Morse code keying to the radio. The idea is that this box will put your radio on the network so that you operate it using a web browser on a PC or a mobile device.

According to MFJ, you can operate voice, Morse code, or digital modes easily and remotely. The box uses open source software that can control over 200 different radios and 30 rotors. Of course, you could build all this yourself and use the same open source software, but it is nicely packaged. [Ham Radio DX] says you don’t need to know much about the Pi or Linux to use the box, although clearly you can get into Linux and use the normal applications if you’re so inclined.

Even if you don’t want to transmit, we could see a set up like this being used for remote monitoring. We’d like to see a companion box for the remote end that had the audio hardware, a keyer, and perhaps a knob to act as a remote control of sorts. Of course, you could probably figure out how to do that yourself. We wonder if some ham clubs might start offering a remote radio via an interface like this — we’ve seen it done before, but not well.

Your $50 radio probably isn’t going to work with this, and if you use FT8, you could argue you don’t need to be there anyway.

Continue reading “Raspberry Pi Ham Radio Remote Reviewed”

Better Battery Management Through Chemistry

The lead-acid rechargeable battery is a not-quite-modern marvel. Super reliable and easy to use, charging it is just a matter of applying a fixed voltage to it and waiting a while; eventually the battery is charged and stays topped off, and that’s it. Their ease is countered by their size, weight, energy density, and toxic materials.

The lithium battery is the new hotness, but their high energy density means a pretty small package that can get very angry and dangerous when mishandled. Academics have been searching for safer batteries, better charge management systems, and longer lasting battery formulations that can be recharged thousands of times, and a recent publication is generating a lot of excitement about it.

Consider the requirements for a battery cell in an electric car:

  • High energy density (Lots of power stored in a small size)
  • Quick charge ability
  • High discharge ability
  • MANY recharge cycles
  • Low self-discharge
  • Safe

Lithium ion batteries are the best option we have right now, but there are a variety of Li-ion chemistries, and depending on the expected use and balancing and charging, different chemistries can be optimized for different performance characteristics. There’s no perfect battery yet, and conflicting requirements mean that the battery market will likely always have some options.

Continue reading “Better Battery Management Through Chemistry”

Make “Wireless” Earbuds Truly Wireless

[Don] bought some off-brand Bluetooth earbuds online that actually sound pretty good. But while it’s true that they don’t require wires for listening to tunes, the little storage/charging box they sleep in definitely has a micro USB port around back. Ergo, they are not truly wireless. So [Don] took it upon himself to finish what the manufacturer started. Because it’s 2019, and words have meaning.

Finally, he had a use for that Qi charger he’s had lying around since the Galaxy S5 era. [Don] pried the earbud case open with a guitar pick and found a nicely laid-out charging circuit board without any black goop.

Once he located ground and Vcc pads, it was just a matter of performing a bit of surgery on the coil’s pins so he could solder wires there instead. Miraculously, the Qi coil fit perfectly inside the bottom of the case and the plastic is thin enough that it doesn’t interfere with the charging.

Want to try it for yourself? [Don]’s done an excellent job of documenting this hack, with clear pictures of every step. Soon you’ll be able to rid yourself of all those pesky USB cables.

Of course, [Don] still has to plug the charging base into the wall. If he ever wanted to add another level of wireless, he could always retrofit the base coil into his laptop.

PVC Pipe Turned Portable Bluetooth Speaker

We’ve always felt that sections of PVC pipe from the home improvement store are a criminally underutilized construction material, and it looks like [Troy Proffitt] feels the same way. Rather than trying to entirely 3D print the enclosure for his recently completed portable Bluetooth speaker, he combined printed parts with a piece of four inch pipe from the Home Depot.

While using PVC pipe naturally means your final hardware will have a distinctly cylindrical look, it does provide compelling advantages over trying to print the entire thing. For one, printing an enclosure this large would have taken hours or potentially even days. But by limiting the printed parts to accessories like the face plate, handle, and caps, [Troy] reduced that time considerably. Of course, even if you’re not in a rush, it’s worth mentioning that a PVC pipe will be far stronger than anything your desktop FDM printer is likely to squirt out.

[Troy] provides links for all the hardware he used, such as the speakers, tweeters, and the Bluetooth audio board itself. The system is powered by an 1800 mAh 3S RC-style battery pack that he says lasts for hours, though he also links to a wall adapter that can be used if you don’t mind being tethered. Unfortunately it doesn’t look like he has any internal shots of the build, but given the relatively short parts list, we imagine it’s all fairly straightforward inside.

While this is certainly a respectable looking build considering it started life in the plumbing aisle, we have to admit that we’ve seen some portable Bluetooth speakers with fully 3D printed enclosures in the past that looked absolutely phenomenal. The tradeoff seems pretty clear: reuse existing materials to save time, print them if you don’t mind reinventing the wheel occasionally.

2D-Scanner Records Surfboard Profiles For Posterity

[Ryan Schenk] had a problem: he built the perfect surfboard. Normally that wouldn’t present a problem, but in this case, it did because [Ryan] had no idea how he carved the gentle curves on the bottom of the board. So he built this homebrew 2D-scanner to make the job of replicating his hand-carved board a bit easier.

Dubbed the Scanbot 69420 – interpretation of the number is left as an exercise for the reader, my dude – the scanner is pretty simple. It’s just an old mouse carrying a digital dial indicator from Harbor Freight. The mouse was gutted, with even the original ball replaced by an RC plane wheel. The optical encoder and buttons were hooked to an Arduino, as was the serial output of the dial indicator. The Arduino consolidates the data from both sensors and sends a stream of X- and Z-axis coordinates up the USB cable as the rig slides across the board on a straightedge. On the PC side, a Node.js program turns the raw data into a vector drawing that represents the profile of the board at that point. Curves are captured at various points along the length of the board, resulting in a series of curves that can be used to replicate the board.

Yes, this could have been done with a straightedge, a ruler, and a pencil and paper – or perhaps with a hacked set of calipers – but that wouldn’t be nearly as much fun. And we can certainly see applications for this far beyond the surfboard shop.

Professional Audio On An ESP32

Audiophiles have worked diligently to alert the rest of the world to products with superior sound quality, and to warn us away from expensive gimmicks that have middling features at best. Unfortunately, the downside of most high quality audio equipment is the sticker price. But with some soldering skills and a bit of hardware, you can build your own professional-level audio equipment around an ESP32 and impress almost any dedicated audiophile.

The list of features the tiny picoAUDIO board packs is impressive, starting with a 3.7 watt stereo amplifier and a second dedicated headphone amplifier. It also has all of the I/O you would expect something based on an ESP32 to have, such as I2S stereo DAC, an I2S microphone input, I2C GPIO extenders and, of course, a built-in MicroSD card reader. The audio quality is impressive too, and the project page has some MP3 files of audio recorded using this device that are worth listening to.

Whether you want the highest sound quality for your headphones while you listen to music, or you need a pocket-sized audio recording device, this might be the way to go. The project files are all available so you can build this from the ground up as well. Once you have that knocked out, you can move on to building your own speakers.

Continue reading “Professional Audio On An ESP32”

Hackaday Links Column Banner

Hackaday Links: October 6, 2019

“If you or someone you love has been exposed to questionable quality electrolytic capacitors, you could be entitled to financial compensation.” Perhaps that’s not exactly the pitch behind this class action lawsuit against capacitor manufacturers, but it might as well be. The suit claims that the defendants, a group of capacitor manufacturers that includes Nichicon, Matsuo, ELNA, and Panasonic, “engaged in an unlawful conspiracy to fix, raise, maintain, or stabilize the prices of Capacitors.” Translation: if you bought capacitors between 2002 and 2014 from a distributor, you paid too much for them. The suit aims to recover a bunch of money from the defendants and divide it up between all the class members, so make sure you go back through all your receipts from Mouser and DigiKey over the last 17 years so you can file a claim that could be worth several dozen cents.

When are people going to learn that posting pictures of their illegal activities online is an Official Bad Idea? One SpaceX fan earned a night in jail after posting selfies he took with Starhopper, the SpaceX test article currently residing at Elon Musk’s would-be spaceport at Boca Chica, Texas. JB Wagoner, a SpaceX super-fan, made the pilgrimage from California to Texas — in his Tesla of course — to see the recent Starship Mark 1 unveiling, and decided to take a side trip to see the Starhopper. He parked at a beach, climbed a dune, and was able to walk right up to Starhopper and go selfie-crazy. After posting the pictures on Facebook, he was arrested, interviewed by Homeland Security, charged with criminal trespass, and thrown in a cell overnight. Wagoner has since been bonded out, but the charges might not stick, since Texas trespassing law requires clear signage or verbal notification of trespass, neither of which Wagoner encountered. SpaceX had even let the fence between the beach and the Starhopper collapse, so Wagoner seems to have had no way of knowing he was trespassing. Still, posting the pictures online was probably asking for trouble.

As satire and dark comedy, the 1987 cyberpunk classic RoboCop can’t be beat. But it also managed to accurately foreshadow a lot of what was to come in the world in terms of technology. No, we don’t have cyborg law enforcement — yet — but we do have something predicted by one throwaway scene: robotic realtors. In the movie, kiosks were set up around Murphy’s old house to extol the various virtues of living there, which ended up triggering the cyborg and starting the film’s climactic rampage. The real-life robotic realtor is a little more flexible, more like a telepresence robot — described aptly as “a Segway with an iPad on top.” The robotic realtor is not autonomous; it only lets a remote realtor interact with potential homebuyers without having to travel to multiple homes. It seems a little gimmicky to us, but the robots are reported to have made 25 sales in their first year on the job.

We’ve been seeing a lot of cheap resin printers these days, enough to make us want to jump into the market and start playing with them. But the cheap ones are all cheap for the same reason — they’re so dang small! They all use LCD screens from phones to mask off the UV light used to cure the resin, and the resulting print volume is tiny. Clem Mayer from MayerMakes has bigger ideas, though: he wants to make a giant resin printer using an LCD monitor as the mask. It’s not as simple as using a bigger screen, though; the film used between the screen and the resin, a fluoropolymer film called FEP, gets deformed when used on larger screens. So Clem is looking at a new built-plate interface that floats the resin on a layer of denser, immiscible liquid. It’s an interesting idea that is still clearly in the proof-of-concept phase, but we look forward to seeing what progress Clem makes.