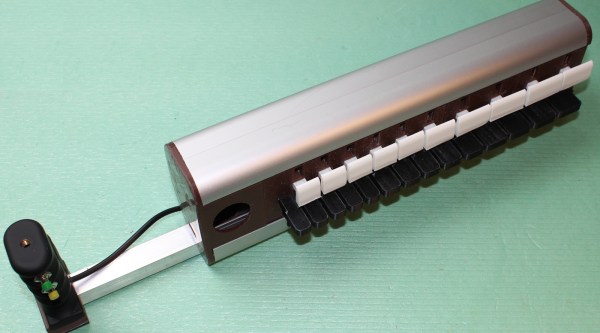
Engineers, hackers, and makers can most certainly build a musical gadget of some kind. They’ll build synths, they’ll build aerophones, and they’ll take the idea of mercury delay line memory, two hydrophones, and a really long tube filled with water to build the most absurd delay in existence. One thing they can’t seem to do is build a woodwind MIDI controller. That’s where [J.M.] comes in. He’s created the Open Woodwind Project as an open and extensible interface that can play sax and clarinet while connected to a computer.
Early prototype to test out variable resistive pressure pads
If you want to play MIDI, there are plenty of options for keyboards, drum sets, matrix pads, and even strings. If you want to play a MIDI saxophone, there aren’t many options. Keytars, for example, are more popular than MIDI woodwind controllers. [J.M.] is changing this with a MIDI controller that recreates electronic aerophones electronically.
The controller itself uses a Teensy 3.2 loaded up with an ARM Cortex M4, two MPR121 touch controllers for 24 channels of capacititve touch capability, and a pressure sensor to tell the computer how strong the user is blowing. All of this works, and [J.M.] has a few videos showing off the capabilities of his homemade controller. It’s a great piece of work, and there are a few extentions that make this really interesting: there’s the possibility of adding CV out so it can be connected to modular synths, and the addition of accelerometers to the build makes for some very interesting effects.
Wiring is one of those things that we’ve all had to do on a project, but probably didn’t give a lot of thought to. It’s often the last thing that happens during the build, and almost certainly doesn’t get approached with any kind of foresight. You look at the components you need to connect, dig through the parts bins until you find something that looks like it should fit, and tack it in with a blob of solder and perhaps some hot glue if you’re feeling really fancy. We’re all guilty of it from time to time, but Bradley Gawthrop is here to tell you there’s a better way.
If you’re hoping his talk from the 2017 Hackaday Superconference contains “One crazy trick” for turning your normal rat’s nest of wiring into a harness worthy of the Space Shuttle, sorry to disappoint. Bradley acknowledges it takes some extra planning and a couple specialized tools, but the end results speak for themselves. While his talk is a must-watch for anyone looking to master the arcane arts of electron corralling, his post-talk chat with Elliot Williams after the break is a great primer for the how and why of everyone’s least favorite part of building their own hardware.
Bradley will be at Supercon again this year. It’s one anecdote for the concentration of awesome people you find at the event. We’re now just two seeks away so go get your ticket and then join us after the break for the interview.
In the 1970s, the Soviet Union decided to dig a hole for science. Not just any hole, the Kola Superdeep Borehole reached a depth of over 12 kilometers, the deepest at the time and the second deepest today by just a few meters. Since this was one of the few holes dug this deep that wasn’t being drilled for oil, the project was eventually abandoned. [Dmitry] was able to find some core samples from the project though, and he headed up to the ruins of the scientific site with his latest project which produces musical sounds from the core samples.
The musical instrument uses punched tape, found at the borehole site, as a sort of “seed” for generating the sounds. Around the outside of the device are five miniature drilling rigs, each holding a piece of a core sample from the hole. The instrument uses the punched tape in order to control the drilling rigs, and the sound that is created is processed by the instrument and amplified, which creates some interesting and rather spooky sounds. The whole thing is controlled by an Arduino Mega.
Not only does the project make interesting sounds from a historically and scientifically significant research station and its findings, but the project has a unique and clean design that really fits its environment at the abandoned facility. The other interesting thing about this project is that, if you want to make the trek, anyone can go explore the building and see the hole for themselves. If you’re wondering about the tools that could be used to make a hole like this, take a look at this boring project.
The Triforium is a public art installation in Los Angeles, weighing 60 tons and standing six stories tall. Built in 1975, it was designed to combine light and sound, all under the control of computer hardware of the era.
The team were able to recover the original software that ran the sculpture’s effects — stored on 8-bit paper tape, which was not uncommon for the era. These were manually transcoded, and an emulated version of the original program has been created. In the interest of not causing further damage to the sculpture, the original lights are being left untouched. Instead, an LED system will be fitted to the sculpture to enable it to be relit.
Quartz bells of the original carillon
A reflection pool at the base of the sculpture is long gone, as is the original audio source. When first built it housed a carillon — a musical instrument that uses a bell for each note in the scale. In the case of the Triforium, the carillon was made of 79 quartz bells played either manually or by the computer and amplified over a speaker system.
In 2006 that carillon was removed (replace with a digital audio source) but the gods of dumpster diving were smiling that day. It was snapped up by someone who recognized the uniqueness of the instrument and shared their story as a brief webpage. We hope that some day this will also be restored to working condition and played along with the Triforium in an exhibition. The sound of a carillon is amazing to hear in person, and we suspect the timbre of quartz bells to add an indescribable layer to the experience.
Do you talk to your alarm clock? I do. I was recently in a hotel room, woke up in the middle of the night and said, “Computer. What time is it?” Since my Amazon Echo (which responds to the name Computer) was at home, I was greeted with silence. Isn’t the future great?
Of course, there have been a variety of talking clocks over the years. You used to be able to call a phone number and a voice would tell you the time. But how old do you think the talking clock really is? Would you guess that this year is the 140th anniversary of the world’s first talking clock? In fact, it doesn’t just hold the talking clock record. The experimental talking clock Frank Lambert made is also the oldest surviving recording that can be still be played back on its original device.
In 1878, the phonograph had just been invented and scratched out sounds on a piece of tin foil. Lambert realized this wouldn’t hold up to multiple playbacks and set out to find a more robust recording medium. What he ended up building was a clock that would announce the time using lead to record the speech instead of tin foil.
Trash is relative. When my coworker accidentally lit an ABS-barbecue inside the company laser cutter, he made trash. The wreckage was headed for the dump, but I managed to save it and pass it on to my friend [Amy]. Four months later, she phoenixed it back to life from the trash-it-was to a glorious new system more powerful than the original. This is her story, carefully told in detail in a three-part series (part one, part two, part three) that takes us on a journey from trash to triumph. She even recorded video of the entire process (also embedded below)
Get your notes out because while [Amy] spares every expense to keep this project cheap, she spares no expense at laying out the details for anyone’s path to success when working with these beasts.
Free Laser Cutter Starter Pack
As far as origin stories go, our story starts at my last employer’s office. I was in the machine shop asking one of our MechEs a question when the intern points a finger towards the corner of the room and asks: “hey is that supposed to be on fire?” I turn around to see billowing flames coming from our budget Chinese laser cutter. “Nope!” I say. “We need a fire extinguisher!” But our MechE was already on it. In half a moment he returned with an extinguisher. With one squirt the fire was out, but the machine was caked with a nasty powdery debris. It turns out another coworker had committed the almighty sin of laser cutting: he turned it on and walked away. Better yet, it was cutting ABS with a disconnected air nozzle.
This cutter was headed to the dump, but a few shenanigans later, I managed to divert this heap to [Amy]. The paint job was an absolute disaster on the outside, and the gooey ABS-and-powder mixture had caked over the inside. [Amy] dug in, stripping off the paint flakes and re-coating it. Apart from the belts, she salvaged every other part inside the machine. Her secret: “IPA and steel wool.” From there, she built her own fume extractor and lofted the whole system onto a frame she welded herself so that she could push both extractor and cutter around her wood shop as a unit. These days, it’s seeing some mileage for cutting out jigs for her woodworking projects.
Perhaps what’s truly special about this project is that she restored it with the camera rolling. As if building projects isn’t hard enough, getting the right lighting and camera angles while you’re doing the work is even more work! There’s no drop-down lofted camera setup in her garage, so each documented step is carefully set up so it captures what’s happening onscreen. While the IPA-and-steel wool might’ve been one nifty trick, by the end of these videos you’ll find that there really aren’t any secrets: just one engineer who sees the dignity in a project done well and has the patience to carry it out.
Get to know [Amy] on her blog, and you’ll discover the true finesse of her scavenging and engineering wielded hand-in-hand. From Ukuleles borne of fallen tree branches to a garage woodshop bootstrapped from a series of Craigslist adventures, it’s no surprise that a broken laser cutter would find a new life when it landed in her hands.
When I started working in a video production house in the early 1980s, it quickly became apparent that there was a lot of snobbery in terms of equipment. These were the days when the home video market was taking off; the Format War had been fought and won by VHS, and consumer-grade VCRs were flying off the shelves and into living rooms. Most of that gear was cheap stuff, built to a price point and destined to fail sooner rather than later, like most consumer gear. In our shop, surrounded by our Ikegami cameras and Sony 3/4″ tape decks, we derided this equipment as “ReggieVision” gear. We were young.
For me, one thing that set pro gear apart from the consumer stuff was the type of connectors it had on the back panel. If a VCR had only the bog-standard F-connectors like those found on cable TV boxes along with RCA jacks for video in and out, I knew it was junk. To impress me, it had to have BNC connectors; that was the hallmark of pro-grade gear.
I may have been snooty, but I wasn’t really wrong. A look at coaxial connectors in general and the design decisions that went into the now-familiar BNC connector offers some insight into why my snobbery was at least partially justified.