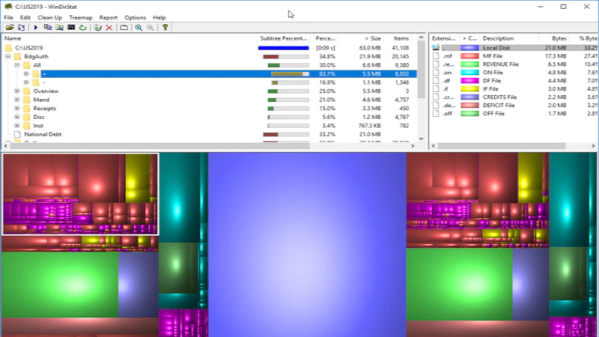
Biodegradable Implants Supercharge Nerve Regeneration

Controlled electrical stimulation of nerves can do amazing things. It has been shown to encourage healing and growth in damaged cells of the peripheral nervous system which means regaining motor control and sensation in a shorter period with better results. This type of treatment is referred to as an electroceutical, and the etymology is easy to parse. The newest kid on the block just finished testing on rat subjects, applying electricity for one, three, or six days per week in one-hour intervals. The results showed that more treatment led to faster healing. The kicker is that the method of applying electricity was done through unbroken skin on an implant that dissolves harmlessly.

The implant in question is, at its most basic, an RFID tag with leads that touch the injured nerves. This means wireless magnetic coupling takes power from an outside source and delivers it to where it is needed. All the traces on are magnesium. There is a capacitor with silicon dioxide sandwiched between magnesium, and a diode made from a doped silicon nanomembrane. All this is encased in a biodegradable substrate called poly lactic-co-glycolic acid, a rising star for FDA-approved polys. Technologically speaking, these are not outrageous.

These exotic materials are not in the average hacker’s hands yet, but citizen scientists have started tinkering with the less invasive tDCS and which is applying a small electrical current to the brain through surface electrodes or the brain hacking known as the McCollough effect.

Via IEEE Spectrum.

Build Your Own Dial-up ISP With A Raspberry Pi

The bing-bongs, screeches, and whiirings of a diai-up modem are long forgotten now. For good reason. Dial up was slow, and if you’re one of those unlucky people reading this and waiting for the animated gif above this paragraph to load, you have our condolences. But still, nostalgia. It bit [Doge Microsystems] hard, and now there’s a dial-up ISP on [Doge]’s desk.  Why? For fun, probably, and if you’re going to retrocompute, you might as well go the whole way.

The setup for this astonishing feat of dial-up networking is an ISA modem inside a ‘lunchbox’ computer running what is probably Windows 98. The ‘homebrew POTS’ system is a SIP ATA (which is most certainly obsolete and out of stock, but this one will get you close), and a Raspberry Pi clone running Asterisk.  There’s a serial modem and a USB to serial adapter involved, and a PPP daemon running on the Pi clone answers the incoming call, negotiates authentication, and does the NAT. It’s a networking geek’s dream.

As for what good this is, anyone who asks the question is missing the point entirely. Dial up is slow, horrible, and there’s a reason we don’t use it anymore. However, and there’s always a however, if you’re developing your own serial modem hardware for some weird project, I guess this setup would come in handy. If you’d like to test out a wooden modem, this is the setup for you. Yes, it’s ancient technology no one wants anymore, but that’s how you do it if you want.

Lego Monorail From Your 3D Printer

If you had to guess the age of a person hailing from a country in which Lego is commonly available, you might very well do it by asking them about the Lego trains available in their youth. Blue rails or grey rails, 4.5, 9, or 12 volt power, and even somewhat unexpectedly, one rail or two. If that last question surprises you we have to admit that we were also taken aback to discover that for a few years in the 1980s everybody’s favourite Danish plastic construction toy company produced a monorail system.

[Mike Rigsby] had a rather ambitious Christmas display to produce, and as part of it included a pair of reindeer, Rudolph and Bluedolph, atop freight cars on a loop of Lego monorail. He didn’t just use classic Lego parts off-the-shelf, instead he recreated the system in its entirety on his 3D printer; locomotive, rolling stock, and all. In a simlar way tot he original his locomotive sits between the two freight cars, each container housing a pair of AA batteries which together power the unit.

The Lego system isn’t perhaps a classic monorail, in that it involves a four-wheeled vehicle that is guided by a central rail rather than sitting upon it. Drive comes from teeth on the side of the rail which mesh with a gear on the power car. There have been 3D-printable sections of it available as add-ons for owners of classic sets for a while, but this may be the first printable locomotive and train. The Christmas novelty aspect of it all may be a little past its sell-by date here in February, but it’s still worth a look as a potential source of parts for any project that might require a linear rail system.

Perhaps surprisingly we’ve never featured a monorail before, though we have brought you a MagLev.

How Do You Etch Something You Can’t Move?

We probably don’t need to tell this to the average Hackaday reader, but we’re living in a largely disposable society. Far too many things are built as cheaply as possible, either because manufacturers know you won’t keep it for long, or because they don’t want you to. Of course, the choice if yours if you wish to you accept this lifestyle or not.

Like many of us, [Erik] does not. When the painted markings on his stove become so worn that he couldn’t see them clearly, he wasn’t about to hop off to the appliance store to buy a new one. He decided to take things into his own hands and fix the poor job the original manufacturers did in the first place. Rather than paint on new markings, he put science to work and electroetched them into the metal.

Whether or not you’ve got a stove that needs some sprucing up, this technique is absolutely something worth adding to your box of tricks. Using the same methods that [Erik] did in his kitchen, you could etch an awesome control panel for your next device.

So how did he do it? Despite the scary multisyllabic name, it’s actually quite easy. Normally the piece to be etched would go into a bath of salt water for this process, but obviously that wasn’t going to work here. So [Erik] clipped the positive clamp of a 12 V battery charger to the stove itself, and in the negative clamp put a piece of gauze soaked in salt water. Touching the gauze to the stove would then eat away the metal at the point of contact. All he needed to complete the project were some stencils he made on a vinyl cutter.

We’ve previously covered using electricity to etch metal in the workshop, as well as the gorgeous results that are possible with acid etched brass. Next time you’re looking to make some permanent marks in a piece of metal, perhaps you should give etching a try.

[via /r/DIY]

CNC Tellurion Lets You See The Earth And Moon Dance

Kids – they’re such a treasure. One minute you’re having a nice chat, the next minutes they’re testing your knowledge of the natural world with a question like, “Why can we see the Moon during the day?” And before you know it, you’re building a CNC Earth-Moon orbital model.

We’ve got to applaud [sniderj]’s commitment to answering his grandson’s innocent question. What could perhaps have been demonstrated adequately with a couple of balls and a flashlight instead became an intricate tellurion that can be easily driven to show the relative position of the Earth and Moon at any date; kudos for anticipating the inevitable, “Where was the moon when I was born, Grampa?” question. The mechanism is based on the guts of a defunct 3D-printer, with the X-, Y-, and Z-axis steppers now controlling the Earth’s rotation and tilt and the Moon’s orbit respectively, with the former extruder drive controlling the tilt of the Moon’s orbital plane. A complex planetary gear train with herringbone gears, as well as a crossed-shaft helical gear set, were 3D-printed from PLA. The Earth model is a simple globe and the Moon is a ping-pong ball; [sniderj] is thinking about replacing the Moon with a 3D-printed bump-map model, a move which we strongly endorse. The video below shows the tellurion going through a couple of hundred years of the saros at warp speed.

There’s just something about machines that show the music of the spheres, whether they be ancient or more modern. And this one would be a great entry into our 3D-Printed Gears, Pulleys, and Cams contest too.

Continue reading “CNC Tellurion Lets You See The Earth And Moon Dance”

You Are Your Own Tactile Feedback

[Maurin Donneaud] has clearly put a lot of work into making a large flexible touch sensitive cloth, providing a clean and intuitive interface, and putting it out there for anyone to integrate into their own project.. This pressure sensing fabric is touted as an electronic musical interface, but if you only think about controlling music, you are limiting yourself. You could teach AI to land a ‘copter more evenly, detect sparring/larping strikes in armor, protect athletes by integrating it into padding, or measure tension points in your golf swing, just to name a few in sixty seconds’ writers brainstorming. This homemade e-textile measures three dimensions, and you can build it yourself with conductive thread, conductive fabric, and piezoresistive fabric. If you were intimidated by the idea before, there is no longer a reason to hold back.

The idea is not new and we have seen some neat iterations but this one conjures ideas a mile (kilometer) a minute. Watching the wireframe interface reminds us of black-hole simulations in space-time, but these ones are much more terrestrial and responding in real-time. Most importantly they show consistent results when stacks of coins are placed across the surface. Like most others out there, this is a sandwich where the slices of bread are ordinary fabric and piezoresistive material and the cold cuts are conductive strips arranged in a grid. [Maurin] designed a custom PCB which makes a handy adapter between a Teensy and houses a resistor network to know which grid line is getting pressed.

If you don’t need flexible touch surfaces, we can help you there too.

Continue reading “You Are Your Own Tactile Feedback”

This Kerosene Lantern Becomes A Compact Bioreactor

A bioreactor is a useful thing to have in any biology lab. Fundamentally, it’s a tank in which biological activity can be nurtured and controlled. [The Thought Emporium] needed a visual aid for an upcoming video on bioluminescent bacteria, but figured a single test tube full of the little critters just wasn’t visually striking enough. Thus began the build to turn a kerosene lantern into a full-featured bioreactor.

The ideal bioreactor for the project needed to be visually appealing, biologically safe, and to have the possibility for continuous operation. First, the lantern’s base was sealed with aluminium plate and silicone sealant. The top was then fitted with a plastic plug, which contained passthroughs for air and fluid feeds, UV LEDs for luminescence tests, as well as potential sterilization purposes. Wiring was neatly passed through the arms of the lantern, and an air pump hidden in the top. A battery compartment was also installed so the reactor can be portable, even when fully loaded.

The bioreactor was first filled with highlighter ink, and the UV lights switched on, confirming that the reactor does look the part when filled with glowing fluid. Then, it was flushed with hydrogen peroxide, before being refilled with growth medium and an E. Coli strain which produces a fluorescent red protein. Growth was successful, and there are future plans to use the bioreactor for other projects, too.

It goes without saying that it’s important to take the proper precautions when hacking on biological projects, lest you inadvertently create the zombie virus and take down half the population of the eastern seaboard. Regardless, it’s an impressive build that showcases various techniques for working with biological matter that may not be familiar to the home hacker. If you’re looking for more automation for your home biology hacks, perhaps the OpenLH project may interest you. Video after the break.

[Thanks to Baldpower for the tip!]

Continue reading “This Kerosene Lantern Becomes A Compact Bioreactor”