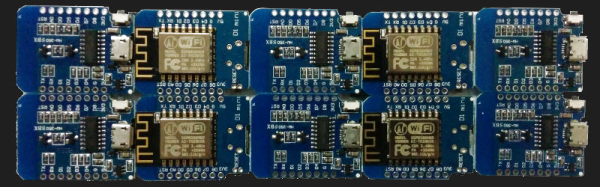
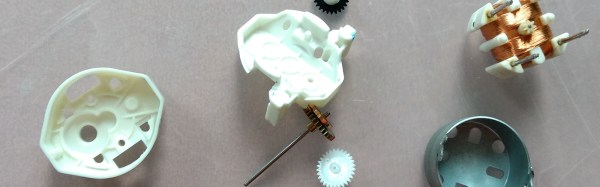
ESP8266-based development boards have proliferated rapidly. One favorite, the WEMOS Mini-D1 is frequently imitated and sold without any branding. As these boards continue to ship to hobbyists and retailers around the world, we thought it might be interesting to conduct a little experiment.
There are a few ESP8266 development boards available, and the most popular seem to be the NodeMCU ‘Amica’ board. Of course, there are dozens of other alternatives including the WiFiMCU, Sparkfun’s ESP8266 Thing, and Adafruit’s HUZZAH ESP8266. Given that, why is this review limited to the Mini D1 boards? Because the Mini D1 is the cheapest. Or was, until it was cloned.
We took a look at some of these ‘clone’ boards to figure out the differences, find out if they work as intended, and perhaps most importantly, are these clone boards shipped out reliably. What are the results? Check that out below.
If you’re in the Bay Area this weekend, the only place to be on Saturday night is O’Neill’s Irish Pub in San Mateo. Hackaday is once again hosting a meetup after Maker Faire closes for the evening, and you don’t want to miss it. Please RSVP now.
This is the fourth year of our BAMF meetup and we’re continually amazed at the turnout — we pack ’em in and it’s not just because the first round of drinks is on us. This is the mixer for everyone who is passionate about hardware. You’ll find your Internet heroes on hand (think YouTube and electronics podcasts), those going through the grinder of startups exhibiting at the faire, engineers for the giant silicon valley firms, plus all of the hackers who spend their time in basements, garages, and taking over the kitchen table to break something open and make it their own. And of course the Hackaday crew will be on hand, you’ll find [Mike], [Jasmine], [Shulie], [Rich], [Jordan], and [Gerrit] losing our voices as the conversation carries on late into the evening.
The photo at the top of the page is from the 2016 Meetup. This photo is from the 2015 Meetup. Now’s your chance to be the face of the party in next year’s announcement!
Our profoundly awesome sister site, Tindie, is also putting out the call to all hardware artisans (they call themselves Tindarians) to turn out for the meetup. If you’ve never heard of Tindie you’re missing out. And if you’ve never sold your creations there, this meetup is a perfect chance to meet some of the people who do. They’re not just purveyors of bleeding edge hardware, they’re the ones who dream it up and make it happen. You should join their ranks!
We love hackers from all walks of life. But unfortunately, because of the venue for this event, we must limit this to those who are 21 years of age and older. If you can’t get into this event, come find us at the Hackaday/Tindie booth at the Faire.
Other than that, we love to see smiling faces, blinking or moving hardware, and the coolest T-shirt you have in your dresser. Come hang out with Hackaday. You’ll have a most excellent evening if you do. See you Saturday!
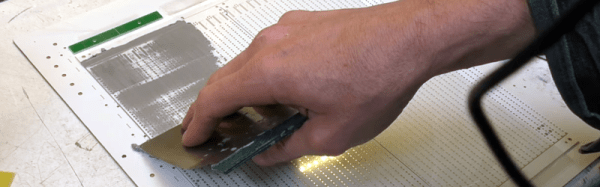
You never know what you might find in an arts and craft store. A relatively recent addition to crafting is automatic cutting machines like the Cricut and Cameo cutters. These are typically used to cut out shapes for scrapbooking, although they will cut or engrave almost anything thin. You can think of them as a printer with a cutting blade in place of the print head. [Mikeselectricstuff] decided to try a Cameo cutter to produce SMD stencils. The result, as you can see in the video below, is quite impressive.
If you’ve ever wanted to do SMD soldering with a reflow oven, stencils are invaluable for putting solder paste on the board where you want it quickly. The board [Mike] has contains a boat-load (over 2,000) of LEDs and dropping solder on each pad with a syringe would be very time consuming (although he did do some touch up with a syringe).
The board he’s using doesn’t have any extreme fine-pitched parts. However, he did some test patterns and decided he could get down to a finer pitch, especially with a little tweaking. However, the stencil he used didn’t need any changes. All he did was export the solder paste layer as a DXF and bring it straight into the Cameo software.
This isn’t the first time we’ve seen one of these cutters pressed into stencil service. You can also get some use out of your 3D printer.
These are the Golden Years of electronics hacking. The home DIY hacker can get their hands on virtually any part that he or she could desire, and for not much money. Two economic factors underlie this Garden of Electronic Eden that we’re living in. Economies of scale make the parts cheap: when a factory turns out the same MEMS accelerometer chip for hundreds of millions of cell phones, their setup and other fixed costs are spread across all of these chips, and a $40 million factory ends up only costing $0.50 per unit sold.
But the unsung hero of the present DIY paradise is how so many different parts are available, and from so many different suppliers, many of them on the other side of the globe. “The Internet” you say, as if that explains it. Well, that’s not wrong, but it’s deeper than that. The reason that we have so much to choose from is that the marginal cost of variety has fallen, and with that many niche products and firms have become profitable where before they weren’t.
So let’s take a few minutes to sing the praises of the most important, and sometimes overlooked, facet of the DIY economy over the last twenty years: the falling marginal cost of variety.
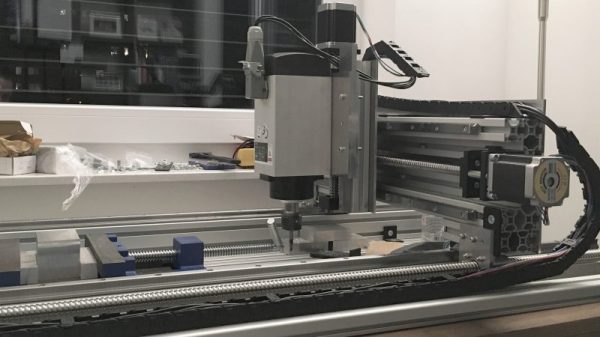
A lot of homebrew CNC machines end up being glorified plotters with a router attached that are good for little more than milling soft materials like wood and plastic. So if you have a burning need to mill harder materials like aluminum and mild steel quickly and quietly, set your sights higher and build a large bed CNC machine with off-the-shelf components.
With a budget of 2000 €, [SörenS7] was not as constrained as a lot of the lower end CNC builds we’ve seen, which almost always rely on 3D-printed parts or even materials sourced from the trash can. And while we certainly applaud every CNC build, this one shows that affordable and easily sourced mechatronics can result in a bolt-up build of considerable capability. [SörenS7]’s BOM for this machine is 100% catalog shopping, from the aluminum extrusion bed and gantry to the linear bearings and recirculating-ball lead screws. The working area is a generous 900 x 400 x 120mm, the steppers are beefy NEMA23s, and the spindle is a 3-kW VFD unit for plenty of power. The video below shows the machine’s impressive performance dry cutting aluminum.
All told, [SörenS7] came in 500 € under budget, which is a tempting price point for a machine this big and capable.
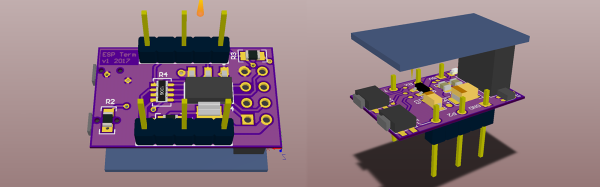
From debug messages to the fundamental ‘hello world’, serial communication does it all over three little wires. Now imagine being able to cut the cord to your next microcontroller project and use your phone as a VT100 terminal. This was the premise of [Ondřej Hruška]’s Wireless Terminal Project where he took an ESP8266 and added an in-browser terminal emulator which can be accessed over WiFi. The final hardware uses an ESP-01 module mounted atop a breadboard adapter with a 3.3V LDO, protection circuitry for the pins and under-voltage disable.
The firmware is based on [SpriteTM]’s libesphttpd code which was modified to include the VT100 escape sequence parser. The parser, in turn, was coded as a state machine and compiled using Ragel which simplifies such projects greatly. When you access the tiny web server, the loaded webpage starts to communicate over web sockets to the ESP-01. Key-presses from the terminal are sent to the buffer and onto the parser and control logic. The characters are then passed to the hardware UART lines at 115200bps and if an escape sequence is detected, the corresponding action is executed instead.
[Ondřej Hruška] shares the code as well as a user manual in PDF for anyone who would like to try it out and help improve the project. With a little inspiration on learning about state machines, you could extend the project to your own use case as well.
Automotive dashboards are something that largely go untouched in the average car’s life. Other than the occasional wipe with a damp cloth, they’re generally reliable for the life of the car and considered too tricky to repair as age sets in. Nevertheless, some hackers find themselves tinkering with them, and learn skills in the process, such as how to control stepper motors and talk to the CAN bus. Having done some projects in the past, [Dan] had some old tachometers lying around and decided to turn them into a piece of art.
The build is powered by an STM32 – a powerful ARM-based platform with plenty of IO and potential. [Dan] leveraged its capabilities to have the board generate music and react to its onboard accelerometer data while also driving the stepper motors from the old tachometers. The project was then completed by 3D printing a mounting plate and placing the tachometer assemblies into the back of an IKEA canvas print.
The end result is a piece of wall art that emits eerie stringed music while twitching around. It came about from [Dan]’s prior projects in working with dashboards. It’s a fun use of some well-earned hacking skills, but we reckon there’s even more potential. There’s a huge number of projects that could benefit from lightweight tiny actuators, and we’d love to see a robot made entirely out of junkyard dashboard parts.