On the scale of awesomeness, writing an operating system ranks near the top for software hackers and ranks just below writing a whole new language. [Lukas F. Hartmann] is reaching for the epic status with the Raspberry Pi operating system dubbed Interim. In an interesting mixture of old and new, it’s written in LISP!
LISP (LISt Processing) is the second oldest high-level programming language that received wide-spread usage. The only one older is FORTRAN (FORMula TRANslation), and that is just by one year. LISP is generally associated with artificial intelligence research but it also surfaced as a utilitarian scripting language in various applications like AutoCad. You may have also heard of a more recent dialect, Clojure, which has been receiving a lot of attention.
The source code, an image for the Pi 2, and directions for making it all work are available. [Lukas] also describes how to get a new OS up and running on a Pi.
GPS-based location services will be around with us forever. If you’re in the outback, in the middle of the ocean, or even just in a neighborhood that doesn’t have good cell coverage, there’s no better way to figure out where you are than GPS. Using satellites orbiting thousands of miles above the Earth as a location service is an idea that breaks down at some very inopportune times. If you’re in a parking garage, you’re not using GPS to find your car. If you’re in a shopping mall, the best way to find your way to a store is still a map. Anyone every tried to use GPS and Google Maps in the hotel/casino labyrinth that is the Las Vegas strip?
[Blecky]’s entry for the Best Product competition of the Hackaday Prize aims to solve this problem. It’s an indoor location service using only cheap WiFi modules called SubPos. With just a few ESP8266 modules, [Blecky] can set up a WiFi positioning system, accurate to half a meter, that can be used wherever GPS isn’t.
The idea for a GPS-less positioning system came to [Blecky] after a caving expedition and finding navigation though subterranean structures was difficult without the aid of cell coverage and GPS. This got [Blecky] thinking what would be required to build a positioning service in a subterranian environment.
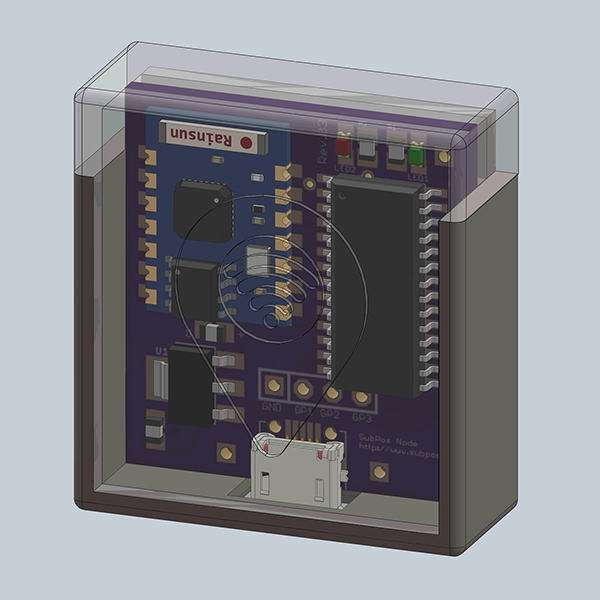
A SubPos node, equipped with an ESP8266 WiFi module
The answer to this question came in the form of a cheap WiFi module. Each of the SubPos nodes are encoded with the GPS coordinates of where they’re placed. By transmitting this location through the WiFi Beacon Frame, along with the transmitted power, any cell phone can use three or more nodes to determine its true location, down to a few centimeters. All of this is done without connecting to a specific WiFi network; it’s a complete hack of the WiFi standard to allow positioning data.
The most shallow comparison to an existing geolocation system would be a WiFi positioning system (WPS), but there are several key differences. In WPS, the WiFi APs don’t transmit their own location; the AP is simply cross-referenced with GPS coordinates in a database. Secondly, APs do not transmit their own transmit power – important if you’re using RSSI to determine how far you are from an Access Point.
The best comparison to an indoor location service comes from a new Decawave module that sets up ‘base stations’ and figures out a sensor’s location based on time of flight. This, however, requires additional radios for each device receiving location data. SubPos only requires WiFi, and you don’t even need to connect to an AP to get this location data; everything is broadcast as a beacon frame, and every device with WiFi detects a SubPos node automatically.
As an entry to the Hackaday Prize Best Product competition, there is an inevitable consideration as to how this product will be marketed. The applications for businesses are obvious; shopping malls could easily build a smartphone app showing a user exactly where in the mall they are, and provide directions to The Gap or one of the dozens of GameStops in the building. Because the SubPos nodes also work in 3D space, parking garage owners could set up a dozen or so SubPos nodes to direct you to your exact parking spot. Disney, I’m sure, would pay through the nose to get this technology in their parks.
Already [Blecky] is in talks with one company that would like to license his technology, but he’s not focused only on the high-dollar business accounts. He already has a product that needs manufacturing, and if he wins the Best Product competition, he will be working on something for the hacker/homebrew market. The price point [Blecky] sees is around $15 a node. The economics of this work with the ESP WiFi module, but [Blecky] is also looking at alternative chip sets that would allow for more than just RSSI position finding; an improved version of the SubPos node not based on the ESP-8266 could bring time of flight into the mix, providing better position accuracy while still being cheaper to manufacture than the current ESP-based solution.
[Blecky] has a great project on his hands here, and something we will, undoubtedly, see more of in the future. The idea of using WiFi beacon frames to transmit location data, and received signal strength to suss out a position is groundbreaking and applicable to everything from spelunking to finding your car in a parking garage. Since the SubPos system isn’t tied to any specific hardware, this could even be implemented in commercial routers, giving any device with WiFi true location data, inside or out. It’s also one of the top ten finalists for the Hackaday Prize Best Product competition, and like the others, it’s the cream of the crop.
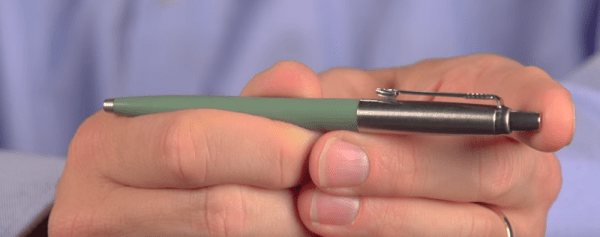
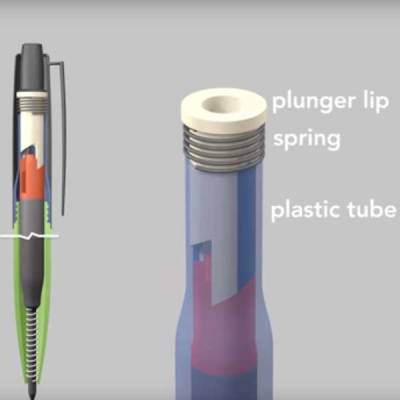
In this excellent video, he describes the simple (but remarkably sophisticated) engineering of the mechanism that allows a pen to pop the ballpoint mechanism out, then back in again. It is a great example of how to illustrate and explain a complex concept, much like his videos on how the CCD sensor of your camera works.
Perhaps the most interesting part of the video is an off the cuff observation he makes, though. The Parker company, who first developed the retractable mechanism, were worried that this new design might flop. So they didn’t put the distinctive Parker arrow clip onto the pen until a few years later, when the pen was a big seller. It seems that while some engineering problems are easy to solve, short-sighted accountants are a harder problem.
As laptops have become smaller and easy to carry around, they have also picked up the most unfortunate property of being easy to steal. We’ve read the stories of how some victims are able to track them down via webcam still images of the thief. [Mastro Gippo] decided to take it one step further and add a remotely operated hardware self destruct to his laptop. The idea is if the laptop becomes unrecoverable, it will become useless and any sensitive data will be destroyed without harming the area around it.
It’s somewhat inception like, as it’s a hack within a hack. It’s based on the Crunchtrack, a CAN bus reverse engineering tool equipped with GPS and a SIM800 GSM module, which was also developed by [Mastro Gippo]. The idea is to tuck the small board somewhere in the laptop and wire it up between the battery and some sensitive parts. Send a single SMS text and ‘poof’, bye-bye laptop.
He wrote all the code in less the 24 hours for the BattleHack Hackathon. He decided to spice up the act with some firecrackers and a detonator, which made his team the crowd favorite and earned a victory.
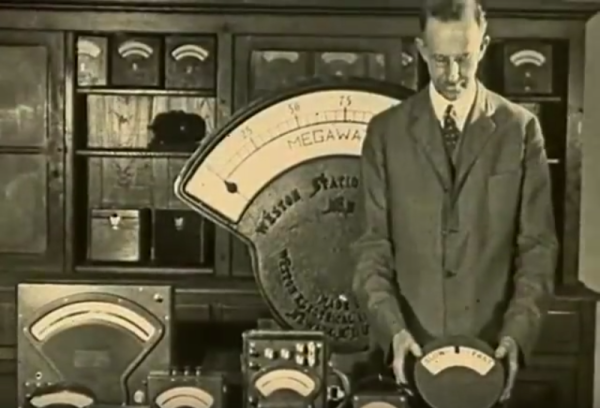
A ‘meter is one of the most important tools on any electronics bench. After you’ve exhausted your five senses trying to figure out what’s happening in a circuit, firing up the old ‘meter is usually the next step. Meters are largely digital nowadays, but their analog ancestors are still widely available. We have a chemist and inventor named [Edward Weston] to thank for the portability and ubiquity of DC measuring equipment.
After immigrating to the United States from England with the degree in medicine his parents wanted him to earn, [Edward Weston] asserted that he was more interested in chemistry. His career began in electroplating, where he soon realized that he needed a reliable, constant current source to do quality plating. This intense interest in power generation led him to develop a saturated cadmium cell, which is known as the Weston cell. Its chemistry produces a voltage stable enough to be used for meter calibration. The Weston cell is also good for making EMF determinations.
Within a few years, he co-founded the Weston Electrical Instrument Corporation. The company produced several types of meters along with transformers and transducers known for their portability and accuracy. In 1920, [Weston & Co.] created this 1920 educational film in cooperation with the United States Navy as part of a series on the principles of electricity.
The viewer is invited to consider the importance of measurement to civilization, most notably those fundamental measurements of length, mass, and time. [Weston] positions his electrical measuring instruments at this level, touting them as the international favorite. We get the full tour of a Weston meter, from the magnet treated for permanence to the specially designed pole pieces that correctly distribute lines of magnetic force. What education film about electromagnetism would be complete without an iron filings demonstration? This one definitely delivers.
The deal between Dialog and Atmel is not very big; the combined revenue of both companies should be $2.7 Billion, not even in the top-20 semiconductor companies by revenue. However, Atmel is an extremely big player in the Internet of Things and the nebulous ‘maker’ market. Dialog’s portfolio is complementary to Atmel’s, focusing on mobile platforms such as smartphones, e-readers, and tablets. The future is in the Internet of Things, and Dialog wants to get in on the ground floor.
Dialog’s current portfolio is focused mainly on mobile devices, with Bluetooth wearables-on-a-chip, CODEC chips for smartphones, and power management ICs for every type of portable electronics. Atmel’s portfolio is well-established in automotive, smart energy metering, and the maker movement. While the Arduino may be Atmel’s most visible contribution to the industry, the Arduino itself is just a fraction of Atmel’s sales in this space. Atmel parts can already be found Internet of Things products like the LightBlue Bean (an 8-bit AVR), and the Tessel 2 Internet of Things board (a 32-bit Atmel ARM).
Curiously, neither Dialog nor Atmel have many sensor or MEMS products, and the future of wearables, portable electronics, and the Internet of Things will depend on these sensors. STMicroelectronic produces both the microcontrollers and sensors that are packed into phones. TI is nearly a full-stack hardware company, able to produce everything that will go into a wearable or Internet of Things device, all the way from the power regulator to the microcontroller. Although this may be seen as a shortcoming for Dialog and Atmel, both companies combined are still many times smaller than the likes of Avago/Broadcom or NXP/Freescale there’s plenty of room for more acquisitions to round out their future needs.
As for what changes will come to Dialog and Atmel’s portfolio, don’t expect much. Unlike the NXP and Freescale merger where both companies have a lot products that do pretty much the same thing, the portfolios of Dialog and Atmel build on each other’s strengths. You’ll have your 8-bit AVRs for a few more decades, and with Dialog’s focus on connectivity, we can expect even more tools for building the Internet of Things.
Welcome back to part II in this ensemble of techniques with laser-cut Delrin. Thanks for many of the great insights along the way in the comments. In this guide, I’d like to go over some of the more immediate kinks that come to mind when getting started with this material.
Sourcing Delrin Sheets
When it comes to shopping, there are a variety of suppliers to choose from, but there are a few key words and thoughts to keep in mind.
Names
First, Delrin, is the “brand name” that refers to the Acetal homopolymer. Variants may also be labeled, acetal or acetal homopolymer. Delrin’s natural color is a soft white, but dyes can take it into a range of other colors. Black and white are, by far, the most common, though.
Tolerances
In the previous guide, all of the examples were cut from a small range of sheet thicknesses (0.0625[in], 0.09375[in], and .125[in]) sourced from OnlineMetals. As the thickness of the sheet increases, the tolerances on the thickness rating will also become more loose. You might buy a .125[in] plate and find it to be .124[in] in some places and .126[in] in others. If you purchase a .250[in] sheet, however, you’ll find that it may vary as much as .126[in] oversize though!
Buy it Flat
Despite McMaster-Carr being my go-to solution for one-off prototypes where rapid build iterations trump BOM cost, I don’t recommend purchasing Delrin from them as their sheets don’t have a flatness rating and often gets shipped bent in (oddly sized) boxes. (Seriously, has anyone else gotten a few oddly-sized parts in a gigantic McMaster-box before?)
Internal Stresses
Extruded Delrin has internal stresses built up inside of the sheet. There are a variety of reasons why this could be the case, but my biggest hunch is that the extrusion process at the factory results in different parts of the sheets solidifying at different times as the sheet cools, possibly causing some parts of the sheet to tighten from the cooling before other gooier sections have yet to finish cooling. What this means for you is that as your part gets lased out of the sheet, you’re, in a sense, relieving that stress. As a result, the part that you cut–especially for thin sheets–may come out of the laser cutter slightly warped.

 The source code, an image for the Pi 2, and directions for making it all work are available. [Lukas] also describes how to get a new OS up and running on a Pi.
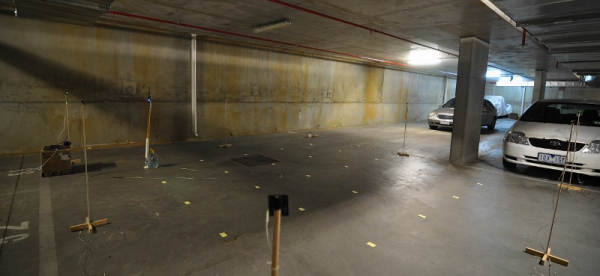
 In this excellent video, he describes the simple (but remarkably sophisticated) engineering of the mechanism that allows a pen to pop the ballpoint mechanism out, then back in again. It is a great example of how to illustrate and explain a complex concept, much like his videos on how