Ultra Benchy Is A Big Plastic Boat, Alright

The 3DBenchy, or Benchy for short, is a popular test model for 3D printers. Designed with overhanging curved surfaces, flat planes, holes, and other difficult geometry, it’s a great way to benchmark a printer or verify that everything is set up correctly. It comes in rather handy, but at this point has also become something of a meme within the 3D printer community. Thus, when NURDspace members decided to embark on a collaborative giant print, the decision was easy – and Ultra Benchy was born!

The size chosen for the print was arbitrarily set at 700mm long, or a 1166.65% scale up of the original model. The versatile LuBan software was used to split the giant model into manageable chunks that could be printed by community members. Chunks were claimed and kept track of in a spreadsheet, with contributors instructed to print with specific settings in order to ensure quality was similar across the whole build.

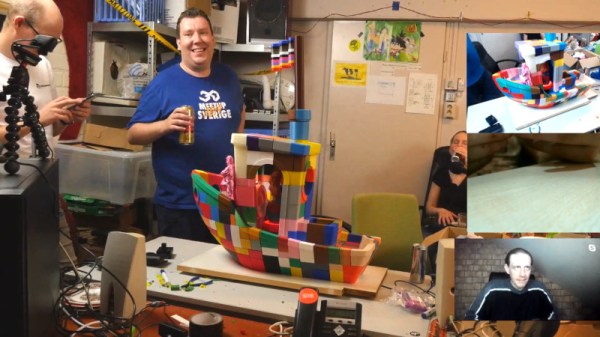
With all the parts collected, the final construction was done on the 31st of August in a Youtube livestream. Reportedly, build time was a marathon 10 hours. The final result is a pleasingly patchwork Benchy, that looks quite impressive in its final assembled form.

Collaborative prints are a staple of 3D printing festivals, but the technique can also be used to create large functional assemblies from smaller 3D printed components, such as [Ivan]’s gigantic Nerf gun that we covered previously.

Continue reading “Ultra Benchy Is A Big Plastic Boat, Alright”

Force Sensitive Resistor Takes The Pain Out Of Bed Leveling

How do you know if your 3D printer bed is levelled? Oh, don’t worry – you’ll know. Without a level bed, filament won’t stick properly to the build surface and you’ll run into all sorts of other problems. Knowing how tricky it can be to get the bed just right, [Antzy] built a tool to help.

The device, which he calls the FS-Touch, is based around an Arduino Pro Micro fitted with a force sensitive resistor. This allows the distance between the bed and nozzle to be measured based on the force read by the resistor when placed in between the two.

Using the tool is simple. First, the bed is brought roughly into alignment using the typical paper method. Then, a reading is taken from one corner of the bed, and the measurement saved for reference. The other corners can then be set to the same level, with the aid of LEDs to guide the user in which direction to turn the adjustment knobs.

Measuring force in this way has the potential of being more repeatable than the somewhat difficult paper method. It promises to ease the task for users that may be struggling to get their bed in proper shape. Of course, automated bed levelling makes things even easier again. Video after the break.

Continue reading “Force Sensitive Resistor Takes The Pain Out Of Bed Leveling”

3D Printed Pen Plotter Is As Big As You Need It To Be

There’s nothing quite like building something to your own personal specifications. It’s why desktop 3D printers are such a powerful tool, and why this scalable plotter from the [Lost Projects Office] is so appealing. You just print out the end pieces and then pair it with rods of your desired length. If you’ve got some unusually large computer-controlled scribbling in mind, this is the project for you.

The design, which the team calls the Deep Ink Diver (d.i.d) is inspired by another plotter that [JuanGg] created. While the fundamentals are the same, d.i.d admittedly looks quite a bit more polished. In fact, if your 3D printed parts look good enough, this could probably pass for a commercial product.

For the electronics, the plotter uses an Arduino Uno and a matching CNC Shield. Two NEMA 17 stepper motors are used for motion: one to spin the rod that advances the paper, and the other connected to a standard GT2 belt and pulley to move the pen back and forth.

We particularly like the way [Lost Projects Office] handled lifting the pen off the paper. In the original design a solenoid was used, which took a bit of extra circuitry to drive from the CNC Shield. But for the d.i.d, a standard SG90 servo is used to lift up the arm that the pen is attached to. A small piece of elastic puts tension on the assembly so it will drop back down when the servo releases.

If this plotter isn’t quite what you’re after, don’t worry. There’s more where that came from. We’ve seen a number of very interesting 3D printed plotters that are just begging for a spot in your OctoPrint queue.

STEP Up Your Jetson Nano Game With These Printable Accessories

Found yourself with a shiny new NVIDIA Jetson Nano but tired of having it slide around your desk whenever cables get yanked? You need a stand! If only there was a convenient repository of options that anyone could print out to attach this hefty single-board computer to nearly anything. But wait, there is! [Madeline Gannon]’s accurately named jetson-nano-accessories repository supports a wider range of mounting options that you might expect, with modular interconnect-ability to boot!

A device like the Jetson Nano is a pretty incredible little System On Module (SOM), more so when you consider that it can be powered by a boring USB battery. Mounted to NVIDIA’s default carrier board the entire assembly is quite a bit bigger than something like a Raspberry Pi. With a huge amount of computing power and an obvious proclivity for real-time computer vision, the Nano is a device that wants to go out into the world! Enter these accessories.

At their core is an easily printable slot-and-tab modular interlock system which facilitates a wide range of attachments. Some bolt the carrier board to a backplate (like the gardening spike). Others incorporate clips to hold everything together and hang onto a battery and bicycle. And yes, there are boring mounts for desks, tripods, and more. Have we mentioned we love good documentation? Click into any of the mount types to find more detailed descriptions, assembly directions, and even dimensioned drawings. This is a seriously professional collection of useful kit.

Conductive Origami Lights Up Your Life

It’s taken mobile phone developers years to develop electric circuits and displays that can fold. Finally he first few have come to market — with mixed reviews and questionable utility at best. For all that R&D, there are a lot of other cases where folding circuitry might have been more useful than it seems these handsets have been. One of those is conductive origami, which in this case allows for light fixtures that turn themselves on as they are unfolded.

This conductive origami is produced by [Yael Akirav] using a 3D printer to deposit the conductive material onto fabric. From there, the light fixture can be unfolded into its final position and turned on. This isn’t just a decorative curiosity though, the design of the folding material actually incorporates the ability to turn itself on as it is unfolded. One device brightens itself as it is slowly unfolded.

This is an interesting take on foldable circuits in general, especially with some of the functionality incorporated into the physical shape of the material. We’ve seen conductive elements embroidered into fabric before, but this takes it to a new level. Surely there are more applications for a device like this that we will see in the future as well.

Thanks to [t42] for the tip!

Lithophanes Ditch The Monochrome With A Color Layer

3D printed lithophanes are great, if a bit monochromatic. [Thomas Brooks] (with help from [Jason Preuss]) changed all that with a tool for creating color lithophanes but there’s a catch: you’ll need a printer capable of creating multi-color prints to do it.

A video (embedded below) begins with an intro but walks through the entire process starting around the 1:26 mark. The lithophane is printed as a single piece and looks like most other 3D printed lithophanes from the front, but the back is different. The back (which is the bottom printed layer) is made of up multiple STL files, one for each color, and together creates something that acts as a color filter. When lit from behind, light passes through everything and results in an image that pops with color in ways that lithophanes normally do not.

The demo print was created with a printer equipped with a Palette 2, an aftermarket device that splices together filament from different spools to create multicolored prints, but we think a Prusa printer with an MMU (multi material upgrade) should also do the trick.

[Thomas] already has a lot of ideas on how to improve the process, but these early results are promising. Need a gift? Lithophanes plus LED strips make great lamps, and adding a cheap clock movement adds that little extra something.

Continue reading “Lithophanes Ditch The Monochrome With A Color Layer”

Behold The Crimson Axlef*cker (Do Not Insert Finger)

Are your aluminum extrusions too straight? The Crimson Axlef*cker can help you out. It’s a remarkable 3D printed, 4-stage, 125:1 reduction gearbox driven by a brushless motor. Designer [jlittle988] decided to test an early prototype to destruction and while he was expecting something to break, he didn’t expect it to twist the 2020 aluminum extrusion shaft before it did. We suppose the name kind of stuck after that.

Internals of the first prototype, shaft of BLDC motor just visible at top. Twisted 2020 extrusion output shaft at bottom right.

[jlittle988] has been documenting the build progress on reddit, and recently posted a fascinating video (embedded below) of the revised gearbox twisting the output shaft even further. He’s a bit coy about the big picture, saying only that the unit is part of a larger project. In fact, despite the showy tests, his goal is not to simply obtain maximum torque. We can only speculate on what his bigger project is, but in the meantime, seeing the gearbox results is some good clean fun. He first announced the gearbox test results here, and swiftly followed it up with some revisions, then the aforementioned video. There’s also an image gallery of the internals, so check that out.

The Crimson Axlef*cker is driven by an ODrive brushless dual-shaft motor and an ODrive controller as well; that’s the same ODrive whose open source motor controller design impressed us so much in the past.

Between projects like this one and other gearboxes like this cycloidal drive, it’s clear that custom gearbox design is yet another door that 3D printing has thrown wide open, allowing hobbyists to push developments that wouldn’t have been feasible even just a few years earlier.

Continue reading “Behold The Crimson Axlef*cker (Do Not Insert Finger)”