Running Doom On A Doomed GPS

What’s the first thing you think of when you see an old GPS navigation system for sale cheap at a garage sale? Our research indicates that 100% of people would wonder if it could run Doom; at least that’s what we conclude from the single data point we have, anyway. [Jason Gin] asked and answered the question — with a resounding yes — about his recent acquisition.

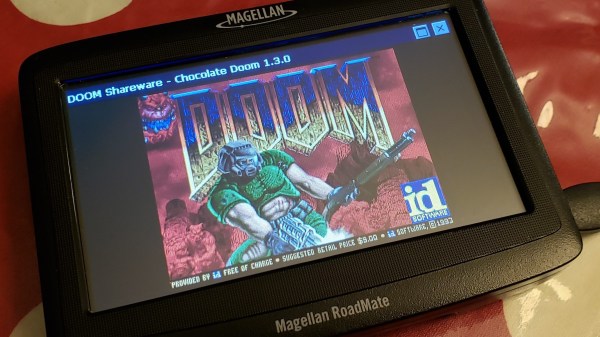
The unit in question is a Magellan RoadMate 1412 running Windows CE. After some playing, [Jason] found that simply connecting the unit to a computer via USB caused all the application files to appear as a FAT-formatted volume. Replacing the obviously-named “MapNavigator.exe” with a copy of TotalCommander/CE allowed browsing around the filesystem.

This revealed that much was missing from the CE install, including the Explorer shell and command prompt. Either could be used to launch Doom with the required command-line arguments. Luckily, [Jason] had another trick ready, namely using MortScript (a scripting engine) to launch the Doom executable. This worked like a charm, and after a few tweaks, he now has a dedicated demo box.

We say “demo box” instead of “Doom machine” because without a keyboard, you can’t actually play the game — only view the demo. In a valiant attempt, he connected a USB OTG connector, but the GPS doesn’t seem to recognize input devices, only USB storage devices. Keep at it, [Jason], we’d love to see you crack this one!

[Jason] is no stranger to hacking Windows CE devices. Last time we checked in, the target was a KeySight DSO1102G oscilloscope.

Continue reading “Running Doom On A Doomed GPS”

How To Play Doom – And More – On An NES

Doom was a breakthrough game for its time, and became so popular that now it’s essentially the “Banana For Scale” of hardware hacking. Doom has been ported to countless devices, most of which have enough processing ability to run the game natively. Recently, this lineup of Doom-compatible devices expanded to include the NES even though the system definitely doesn’t have enough capability to run it without special help. And if you want your own Doom NES cartridge, this video will show you how to build it.

We featured the original build from [TheRasteri] a while back which goes into details about how it’s possible to run such a resource-intensive game on a comparatively weak system. You just have to enter the cheat code “RASPI”. After all the heavy lifting is done, it’s time to put it into a realistic-looking cartridge.

To get everything to fit in the donor cartridge, first the ICs in the cartridge were removed (except the lockout IC) and replaced with custom ROM chips. Some modifications to the original board have to be soldered together as well, since the new chips’ pinouts don’t match perfectly. Then, most of the pin headers on the Raspberry Pi and the supporting hardware have to be removed and soldered together. Then, [TheRasteri] checks to make sure that all this extra hardware doesn’t draw too much power from the NES and overheat it.

The original project was impressive on its own, but with the Doom cartridge completed this really makes it the perfect NES hack, and also opens up the door for a lot of other custom games, including things like Mario64.

Continue reading “How To Play Doom – And More – On An NES”

Trimmed Dreamcast Board Makes For Perfect Portable

In the last year or so we’ve been seeing an array of portable game system builds based around “trimmed” Wii motherboards which have literally been cut down to a fraction of their original size. It turns out that most of the board is dedicated to non-essential functions, with the core Wii system contained within one specific area that can be isolated with a steady hand. But as [Gman] shows in his latest build, the same concept can also be applied to the Sega Dreamcast.

But of course, there’s a bit more to it than just taking a hacksaw to a Dreamcast motherboard. [Gman] had to supplement the trimmed system with quite a bit of additional hardware, such as a power management board he originally designed for portable Wii projects.

Other components were specifically built for this project. For example there’s a custom PCB that handles emulating the Dreamcast controller using a PIC32MZ microcontroller. He’s also using a LM49450 to pull digital audio from the motherboard over I2S, completely bypassing the analog output.

While not currently functioning, [Gman] also included an SPI OLED display and the hardware necessary to emulate basic functionality of the system’s unique Visual Memory Unit (VMU) right in the front of the system. We’re looking forward to seeing him revisit this feature in the future when he’s got the software side of things worked out.

The Nintendo 2DS inspired enclosure is completely 3D printed. A Prusa i3 with textured PEI bed was used to achieve the gorgeous dappled look on the system’s front panel, while the buttons were done on a Form 2 SLA printer. With a mold made from the printed buttons, [Gman] was able to cast the final pieces using a variety of colors until he found a combination he was happy with.

If you’re not Team Sega and would rather hack up your own tiny versions of Nintendo’s hardware, look no further than this fully functional trimmed Wii built into an Altoids tin.

Another World On The Apple II

What’s more fun than porting an old game released for an old system such as the Apple IIgs to its 10-year-older predecessor, the Apple II from 1977? Cue [Deater]’s port of the classic video game ‘Another World‘ to the original Apple II. As was fairly obvious from the onset, the main challenges were with the amount of RAM, as well as with the offered graphics resolutions.

Whereas the Apple II could address up to 48 kB of RAM, the 16-bit Apple IIgs with 65C816 processor could be upgraded to a maximum of 8 MB. The graphics modes offered by the latter also allowed ‘Another World’ to run at a highly playable 320×200, whereas the ported version is currently limited to the ‘low resolution’ mode at 40×48 pixels.

The game itself still needs a lot of work to add missing parts and fix bugs, but considering that it has been implemented in 6502 assembler from scratch, using just the gameplay of the IIgs version as reference, it’s most definitely an achievement which would have earned [Deater] a lot of respect back in the late ’80s as well.

Feel free to check out the Github page for this project, grab a floppy disk image from the project page and get playing. Don’t forget to check out the gameplay video linked after the break as well.

Continue reading “Another World On The Apple II”

Game On With These Open Source Arduino Buzzers

Planning a game of Hacker Jeopardy at your next meetup? You’re going to want some proper buzzers to complete the experience, but why buy when you can build? [Flute Systems] has released an open source DIY game buzzer system based on the Arduino that will help instantly elevate your game. Certainly beats just yelling across the room.

The design has been made to be as easily replicable as possible: as long as you’ve got access to a 3D printer to run off the enclosures for the buzzers and base station, you’ll be able to follow along no problem. The rest of the project consists of modular components put together with jumper wires and scraps of perfboard. Granted it might not be the most elegant solution, but there’s something to be said for projects that beginners and old salts alike can complete.

Each buzzer consists of an Arduino Pro Mini 3.3 V, a nRF24L01, and of course a big pushbutton on the top. Each one is powered by a 110 mAh 3.7 V LiPo battery, though [Flute Systems] notes that the current version of the buzzer can’t actually recharge it. You’ll need to pull the pack out and charge it manually once and awhile. Thankfully, the printed enclosure features a very clever twist-lock mechanism which makes it easy to open anytime you need to poke at the internals.

The base station uses the 5 V version of the Pro Mini, with a Adafruit PowerBoost 1000C to step up the voltage from its 2,000 mAh battery. Of course it also has a nRF24L01, and also adds a buzzer and twin four digit seven-segment LED displays. [Flute Systems] says you can expect about five hours of runtime for the base station.

An especially nice feature of this setup is that the eight digit display allows the base station to show the number of each button in the order it was received. So rather than just getting a display of who buzzed in first, you can see the chronological order in which all eight buttons were pressed. Coming up with clever applications for this capability is left as an exercise for the reader.

Of course, there’s more than one way to build a buzzer. If you don’t like the way [Flute Systems] did it, then check out this version that uses 900 MHz radios and an OLED to show the results.

Adding A Co-Processor To Help SNES Games With Slowdown

The Super Nintendo port of Gradius III is notable for being close to the arcade original, with its large, bright and colorful graphics. However, due to the limitation of the console’s hardware, the port is also well known for having constant slowdowns during gameplay, particularly during later sections. [Vitor] hacked away at the game and made a patched version of the ROM use a co-processor to eliminate those issues.

The slowdown seen here in Gradius is not uncommon to SNES players, many games of that era suffer from it when several sprites appear on the screen at once. This is partially due to the aging CPU Nintendo chose, supposedly in order to maintain NES backwards compatibility before the idea got scrapped. Unable to complete its tasks by the time the next frame needs to be shown, the hardware skips frames to let the processor catch up before it can continue. This is perceived as the aforementioned slowdown.

Around the later stage of the SNES’s life, games started using additional chips inside the cartridges in order to enhance the console’s performance. One of them is the SA1, which is a co-processor with the same core as the main CPU, only with a higher clock rate. By using it, games had more time to run through the logic and graphics manipulation before the next frame. What [Vitor] did was port those parts of Gradius III to the SA1, essentially making it just like any other enhanced cartridge from back in the day.

Unlike previous efforts we’ve seen to overclock the SNES by giving it a longer blanking time, this method works perfectly on real unmodified hardware. You can see the results of his efforts after the break, particularly around stage 2 where several bubbles fill the screen on the second video.

Continue reading “Adding A Co-Processor To Help SNES Games With Slowdown”

Doing What Id Couldn’t: Returning Music To Jaguar Doom

While the rest of the world has by and large forgotten the Atari Jaguar, the generously marketed console still has a fan base, and even some dedicated hackers prodding away at it. [Cyrano Jones] is one of them, and he managed something many considered unthinkable: restoring in-game music to the Jaguar port of Doom.

The Jaguar version of the classic shooter was developed by id Software themselves, and is generally considered one of the better console ports. For example, the large number of buttons on the Jaguar controller allowed players to select weapons directly rather than having to cycle through them. Unfortunately, the complete lack of music during gameplay was a glaring omission that took several points off of an otherwise fairly solid presentation.

The common culprit blamed for this was that the Jaguar’s DSP was already being used for math processing, so it didn’t have any cycles left for music playback. Coupled with a tight deadline, id probably cut their losses and released it without in-game music rather than try and spend more time engineering a solution. To compensate for the lack of in-game music, id did include the famous soundtrack in the intermission screens rather than entirely strip it out.

As [Cyrano] found out by studying the source code that’s been available since 2003, sound effects in the Jaguar version of Doom are played using something called a “ring buffer”: a cyclical fixed-length data buffer which constantly gets outputted as audio. With a patch of unused memory he could fit a second ring buffer in, rendering the music to it with close to no performance hit elsewhere in the code and then mixing both buffers for the final audio output. It looks as though id already had some of this solution in place, but with enough issues that forced them to abandon the idea in order to release the game on time.

Software hacks are not the only things that the Jaguar fan base can do though, and a fine example of a hardware one is this custom mod showing what it could’ve looked like with the CD add-on in an integrated unit.

Continue reading “Doing What Id Couldn’t: Returning Music To Jaguar Doom”