The Neuron – A Hackers Perspective

It’s not too often that you see handkerchiefs around anymore. Today, they’re largely viewed as unsanitary and well… just plain gross. You’ll be quite disappointed to learn that they have absolutely nothing to do with this article other than a couple of similarities they share when compared to your neocortex. If you were to pull the neocortex from your brain and stretch it out on a table, you most likely wouldn’t be able to see that not only is it roughly the size of a large handkerchief; it also shares the same thickness.

The neocortex, or cortex for short, is Latin for “new rind”, or “new bark”, and represents the most recent evolutionary change to the mammalian brain. It envelopes the “old brain” and has several ridges and valleys (called sulci and gyri) that formed from evolution’s mostly successful attempt to stuff as much cortex as possible into our skulls. It has taken on the duties of processing sensory inputs and storing memories, and rightfully so. Draw a one millimeter square on your handkerchief cortex, and it would contain around 100,000 neurons. It has been estimated that the typical human cortex contains some 30 billion total neurons. If we make the conservative guess that each neuron has 1,000 synapses, that would put the total synaptic connections in your cortex at 30 trillion — a number so large that it is literally beyond our ability to comprehend. And apparently enough to store all the memories of a lifetime.

In the theater of your mind, imagine a stretched-out handkerchief lying in front of you. It is… you. It contains everything about you. Every memory that you have is in there. Your best friend’s voice, the smell of your favorite food, the song you heard on the radio this morning, that feeling you get when your kids tell you they love you is all in there. Your cortex, that little insignificant looking handkerchief in front of you, is reading this article at this very moment.

What an amazing machine; a machine that is made possible with a special type of cell – a cell we call a neuron. In this article, we’re going to explore how a neuron works from an electrical vantage point. That is, how electrical signals move from neuron to neuron and create who we are.

A Basic Neuron
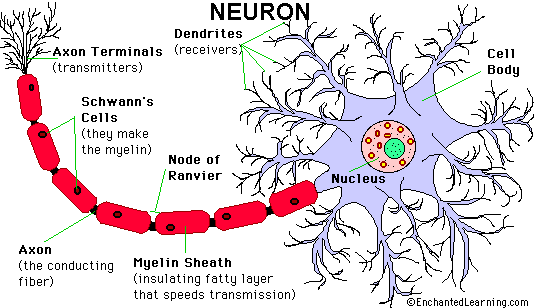
Neuron diagram via Enchanted Learning

Despite the amazing feats a human brain performs, the neuron is comparatively simple when observed by itself. Neurons are living cells, however, and have many of the same complexities as other cells – such as a nucleus, mitochondria, ribosomes, and so on. Each one of these cellular parts could be the subject of an entire book. Its simplicity arises from the basic job it does – which is outputting a voltage when the sum of its inputs reaches a certain threshold, which is roughly 55 mV.

Using the image above, let’s examine the three major components of a neuron.

Soma

The soma is the cell body and contains the nucleus and other components of a typical cell. There are different types of neurons whose differing characteristics come from the soma. Its size can range from 4 to over 100 micrometers.

Dendrites

Dendrites protrude from the soma and act as the inputs of the neuron. A typical neuron will have thousands of dendrites, with each connecting to an axon of another neuron. The connection is called a synapse but is not a physical one. There is a gap between the ends of the dendrite and axon called a synaptic cleft. Information is relayed through the gap via neural transmitters, which are chemicals such as dopamine and serotonin.

Axon

Each neuron has only a single axon that extends from the soma, and acts similar to an electrical wire. Each axon will terminate with terminal fibers, forming synapses with as many as 1,000 other neurons. Axons vary in length and can reach a few meters long. The longest axons in the human body run from the bottom of the foot to the spinal cord.

The basic electrical operation of a neuron is to output a voltage spike from its axon when the sum of its input voltages (via its dendrites) crosses a specific threshold. And since axons are connected to dendrites of other neurons, you end up with this vastly complicated neural network.

Since we’re all a bunch of electronic types here, you might be thinking of these ‘voltage spikes’ as a difference of potential. But that’s not how it works. Not in the brain anyway. Let’s take a closer look at how electricity flows from neuron to neuron.

Action Potentials – The Communication Protocol of the Brain

The axon is covered in a myelin sheet which acts as an insulator. There are small breaks in the sheet along the length of the axon which are named after its discoverer, called Nodes of Ranvier. It’s important to note that these nodes are ion channels. In the spaces just outside and inside of the axon membrane exists a concentration of potassium and sodium ions. The ion channels will open and close, creating a local difference in the concentration of sodium and potassium ions.
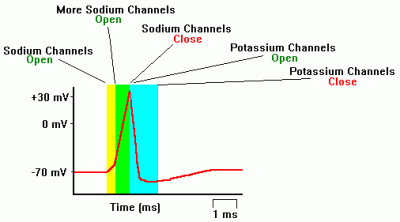
Diagram via Washington U.

We all should know that an ion is an atom with a charge. In a resting state, the sodium/potassium ion concentration creates a negative 70 mV difference of potential between the outside and inside of the axon membrane, with there being a higher concentration of sodium ions outside and a higher concentration of potassium ions inside. The soma will create an action potential when -55 mV is reached. When this happens, a sodium ion channel will open. This lets positive sodium ions from outside the axon membrane to leak inside, changing the sodium/potassium ion concentration inside the axon, which in turn changes the difference of potential from -55 mV to around +40 mV. This process in known as depolarization.
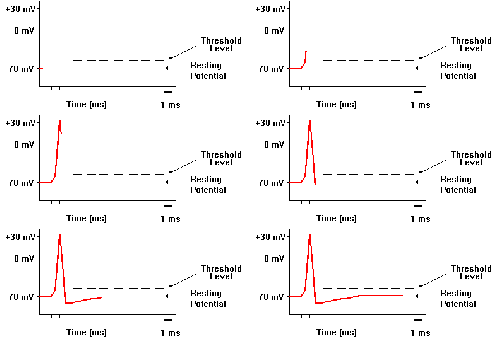
Graph via Washington U.

One by one, sodium ion channels open along the entire length of the axon. Each one opens only for a short time, and immediately afterward, potassium ion channels open, allowing positive potassium ions to move from inside the axon membrane to the outside. This changes the concentration of sodium/potassium ions and brings the difference of potential back to its resting place of -70 mV in a process known as repolarization. Fro start to finish, the process takes about five milliseconds to complete. The process causes a 110 mV voltage spike to ride down the length of the entire axon, and is called an action potential. This voltage spike will end up in the soma of another neuron. If that particular neuron gets enough of these spikes, it too will create an action potential. This is the basic process of how electrical patterns propagate throughout the cortex.

The mammalian brain, specifically the cortex, is an incredible machine and capable of far more than even our most powerful computers. Understanding how it works will give us a better insight into building intelligent machines. And now that you know the basic electrical properties of a neuron, you’re in a better position to understand artificial neural networks.

Sources

Action Potential in Neurons, via Youtube

On Intelligence, by Jeff Hawkins, ISDN 978-0805078534
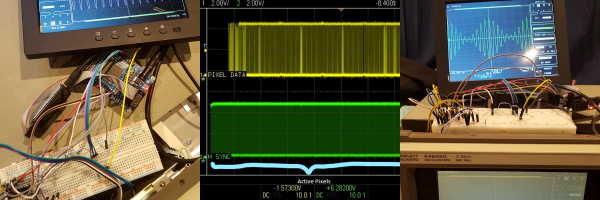
FPGA Rescues Scope From The Dumpster

I’m always on the lookout for a quality addition to my lab that would respect my strict budget. Recently, I’ve found myself pushing the Hertz barrier with every other project I do and hence desperately wanted a high bandwidth scope. Unfortunately, only recently have 70 MHz to 100 MHz become really affordable, whilst a new quad channel oscilloscope in the 500 MHz to 1 GHz range still costs a fortune to acquire. My only option was to find an absolute miracle in the form of an old high bandwidth scope.

It seemed the Gods of Hand Me Down electronics were smiling upon me when I found this dumpster destined HP 54542C. It appeared to be in fairy good shape and was the Top Dog in its day. But something had to be broken right? Sure enough, the screen was clearly faulty and illegible. Want to know how I fixed it? Four letters: FPGA.

Continue reading “FPGA Rescues Scope From The Dumpster” →

Interview: Francesco De Comité Makes Math Visually Awesome

Francesco de Comité is an Associate Professor in Computer Science at the University of Sciences in Lille, France, where he researches the 2D and 3D representation of mathematical concepts and objects. He’s presented papers on a variety of topics including anamorphoses, experiments in circle packing, and Dupin cyclides. His current project involves modeling and 3D printing sea shells. He’ll be presenting a paper on the topic at Bridges Conference in July. You can find his projects on Flickr as well as on Shapeways.

Hackaday: One of your recent projects involves creating fractal patterns and warping them into biologically-correct sea shell shapes, which you then print.

FdC: Modeling seashell shapes is an old topic–Moseley, 1838, D’Arcy Thompson beginning of 20th century. A seashell can be defined as a curve turning around an axis, while translating in the direction of this axis (i.e. on a helicoidal trajectory), and growing in size at the same time. This was modeled for computers in the ’60s by David Raup.

Drawing patterns on seashells was described by Hans Meinhardt using a model of chemical reactions (activator-inhibitor), in the same spirit as Turing’s work on morphogenesis. Combining these two works, and using 3D printers instead of 2D renderers, we can build realistic seashells, either by copying existing shells, or inventing new ones. A 3D model is not just a juxtaposition of a huge number of 2D views: manipulating 3D models can help you understand the object, find details, and so on.

I was curious to see if making a 3D seashell was possible. Moreover, I show that this can be done with simple tools — well, except the 3D printer.
Continue reading “Interview: Francesco De Comité Makes Math Visually Awesome” →

Malduino Elite – First Impressions

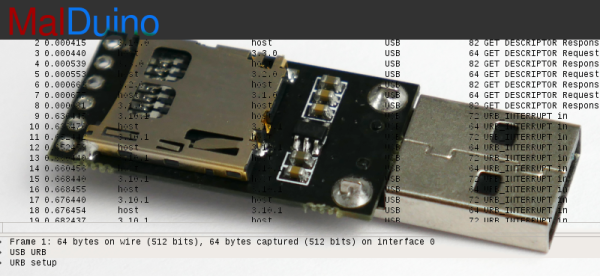
A while back, I wrote an article about Malduino, an Arduino-based, open-source BadUSB device. I found the project interesting so I signed up for an Elite version and sure enough, the friendly postman dropped it off in my mail box last Friday, which means I got to play around with it over the weekend. For those who missed the article, Malduino is USB device which is able to emulate a keyboard and inject keystrokes, among other things. When in a proper casing, it will just look like a USB flash drive. It’s like those things you see in the movies where a guy plugs in a device and it auto hacks the computer. It ships in two versions, Lite and Elite, both based on the ATmega32U4.

The Lite version is really small, besides the USB connector it only contains a switch, which allows the user to choose between running and programming mode, and a LED, which indicates when the script has finished running.

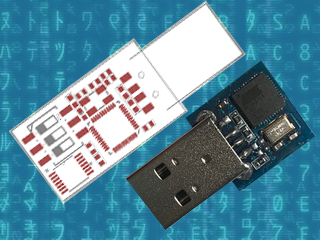
Original Malduino Elite sketch and Lite prototype

The Elite version is bigger, comes with a Micro-SD card reader and four DIP switches, which allow the user to choose which script to run from the card. It also has the LED, which indicates when a script has finished to run. This allows the user to burn the firmware only once and then program the keystroke injection scripts that stored in the Micro-SD card, in contrast to the Lite version which needs to be flashed each time a user wants to run a different script.

These are the two Malduinos and because they are programmed straight from the Arduino IDE, every feature I just mentioned can be re-programmed, re-purposed or dropped all together. You can buy one and just choose to use it like a ‘normal’ Arduino, although there are not a lot of pins to play around with. This freedom was one the first things I liked about it and actually drove me to participate in the crowd-funding campaign. Read on for the full review.
Continue reading “Malduino Elite – First Impressions” →

How To Build Your Own Google AIY Without The Kit

Google’s voice assistant has been around for a while now and when Amazon released its Alexa API and ported the PaaS Cloud code to the Raspberry Pi 2 it was just a matter of time before everyone else jumped on the fast train to maker kingdom. Google just did it in style.

Few know that the Google Assistant API for the Raspberry Pi 3 has been out there for some time now but when they decided to give away a free kit with the May 2017 issues of MagPi magazine, they made an impression on everyone. Unfortunately the world has more makers and hackers and the number of copies of the magazine are limited.

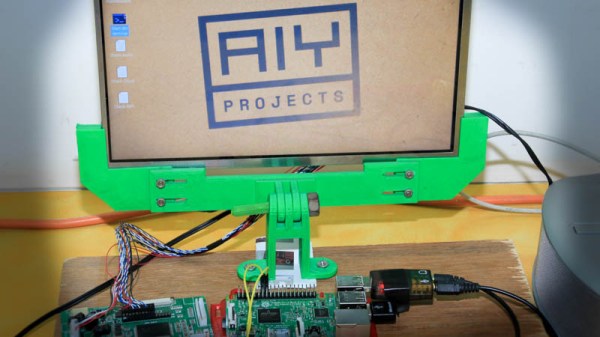
In this writeup, I layout the DIY version of the AIY kit for everyone else who wants to talk to a cardboard box. I take a closer look at the free kit, take it apart, put it together and replace it with DIY magic. To make things more convenient, I also designed an enclosure that you can 3D print to complete the kit. Lets get started.

Continue reading “How To Build Your Own Google AIY Without The Kit” →

The Tri Rotor Drone: Why Has It Been Overlooked?

A DJI Phantom 3. Zimin.V.G. [CC BY-SA 4.0]
If you are a watcher of the world of drones, or multirotors, you may have a fixed idea of what one of these aircraft looks like in your mind. There will be a central pod containing batteries and avionics, with a set of arms radiating from it, each of which will have a motor and a propeller on its end. You are almost certainly picturing a four-rotor design, such as the extremely popular DJI Phantom series of craft.

Of course, four-rotor designs are just one of many possible configurations of a multirotor. You will commonly see octocopters, but sometimes we’ve brought you craft that really put the “multi” in “multirotor”. If the computer can physically control a given even number of motors, within reason, it can be flown.

There is one type of multirotor you don’t see very often though, the trirotor. Three propellers on a drone is a rare sight, and it’s something we find surprising because it’s a configuration that can have some surprising benefits. To think about why, it’s worth taking a look at some of the characteristics of a three-rotor machine’s flight.

Continue reading “The Tri Rotor Drone: Why Has It Been Overlooked?” →

Ohm? Don’t Forget Kirchhoff!

It is hard to get very far into electronics without knowing Ohm’s law. Named after [Georg Ohm] it describes current and voltage relationships in linear circuits. However, there are two laws that are even more basic that don’t get nearly the respect that Ohm’s law gets. Those are Kirchhoff’s laws.

In simple terms, Kirchhoff’s laws are really an expression of conservation of energy. Kirchhoff’s current law (KCL) says that the current going into a single point (a node) has to have exactly the same amount of current going out of it. If you are more mathematical, you can say that the sum of the current going in and the current going out will always be zero, since the current going out will have a negative sign compared to the current going in.

You know the current in a series circuit is always the same, right? For example, in a circuit with a battery, an LED, and a resistor, the LED and the resistor will have the same current in them. That’s KCL. The current going into the resistor better be the same as the current going out of it and into the LED.

This is mostly interesting when there are more than two wires going into one point. If a battery drives 3 magically-identical light bulbs, for instance, then each bulb will get one-third of the total current. The node where the battery’s wire joins with the leads to the 3 bulbs is the node. All the current coming in, has to equal all the current going out. Even if the bulbs are not identical, the totals will still be equal. So if you know any three values, you can compute the fourth.

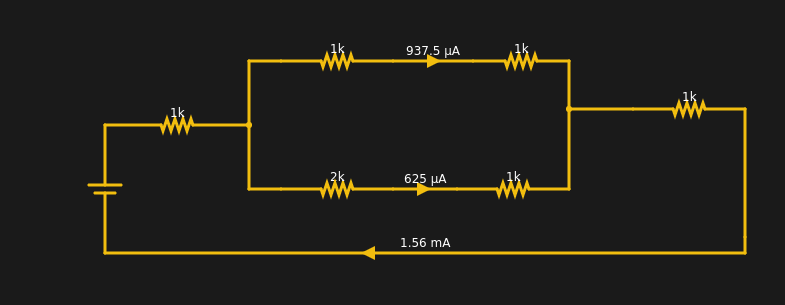
If you want to play with it yourself, you can simulate the circuit below.

The current from the battery has to equal the current going into the battery. The two resistors at the extreme left and right have the same current through them (1.56 mA). Within rounding error of the simulator, each branch of the split has its share of the total (note the bottom leg has 3K total resistance and, thus, carries less current).

Continue reading “Ohm? Don’t Forget Kirchhoff!” →